
Welcome back everyone! In the last article, we went over the first half of the Ruby basics to build our own port scanner. For those of you who didn’t read the last article, I highly suggest you do so. In this second (and most likely final) Ruby basics article, we’ll be covering some intermediate topics. Let’s go ahead and list what we’ll be covering here:
- Loops
- Methods
- Begin/Rescue
The first two items on this list are relatively simple, but the third can get rather complicated. But don’t worry, we’ll do our best to make sense of it. So, let’s get to it!
Loops
Loops are just what they sound like, loops. Loops allow us to repeat a set of code over and over until the loop is finished or a certain result is achieved. For example; we may need to loop through an array and connect a port for each element in the array (That’s a port scanner).
There are quite a few ways to perform loops in Ruby, but the way that I use most often is the .each method. What this means is that we need to use an iterable object and we need call .each after it. Once we perform these calls, we follow it with the keyword do followed by our variable(s).
Before we explain any further, let’s take a look at a script that puts each element of an array individually. After we run it, we should be able to wrap our heads around it. Let’s take a look at the code:
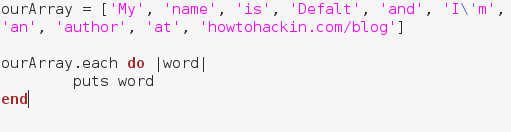 Alright, let’s give a quick rundown of this code and then we’ll execute it. We’ve made an array containing many strings, and we’ve made a .each loop. We can see the word “word” encased in pipes (This is a pipe: |). Think of this as a temporary variable name. Each element in the list will be housed under this temporary variable when it’s their turn to be put through the loops code. Now that we know the in’s and out’s of this loop, let’s execute this script:
 There we go, we were able to print out each element of our array individually. Now that we know how loops work, let’s move on to methods.
Methods
Repetition is very important in programming, no matter what language you use. Imagine if we needed to execute the same block of code multiple times in different place, it would be a huge pain to write the chunk of code multiple times, plus it would make the file size of the script rather large. If we want to execute a set of code multiple times in different places, we can use a method. Think of a method as a chunk of code that we’ve placed under a variable, we only need to call the variable name (and give the arguments) to call the chunk of code. We’ll be make two methods, both will perform the same actions, but one will take arguments. Our methods are simply going to say hello to us. Let’s write these methods now:
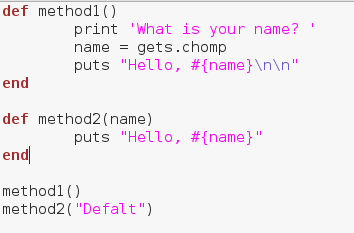
Alright. Here we’ve made two methods, both functioning nearly the same, with the exception of the implementation of arguments in the second method. Then we’ve called our methods. Let’s see these methods in action and execute our script:
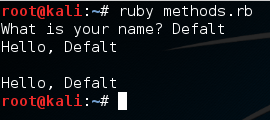 Alright, there we go! We were able to make and properly execute our methods! These will allow us to re-run a section of code whenever and wherever we need. Now that we’ve learned about methods, let’s move on to a very important concept, begin/rescue.
Begin/Rescue
In the span of these two article, I’m sure we’ve run into a few errors. When we make a script, we need to account for any possible errors that can occur. We need to account for these errors so that the error messages don’t end up spilling all over the screen. This jumbled output looks extremely unprofessional and can often times devastate the functionality of a script.
We can use begin/rescue to account for these errors. It’s fairly simple when you think about the words, begin this action, and rescue it from this error. There are many, many errors that can be generated by faulty code, and these errors are organized into a hierarchy. It would be very beneficial to become familiar with this hierarchy, this way you can distinguish between different errors and provide very specific feedback as to what went wrong.
We’re going to start this section by making a script that doesn’t work. We’re going to intentionally make a script that will return an error, and then we’re going to use begin and rescue to fix it. Let’s start by making our faulty script:
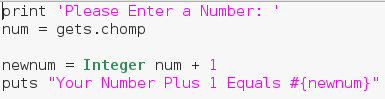 This example script will simply ask the user for a number and tell them what their number plus one is. But as you may have guessed, the user can enter whatever they want, including things that aren’t numbers. Let’s go ahead and generate an error by entering a word instead of a number:
 Here we can see that we’ve generated an error. By taking a deeper look at the error message we can see that it was a TypeError. Now that we know what kind of error is generated by this bug, we can account for it using begin and rescue. Let’s edit our code to account for this new error:
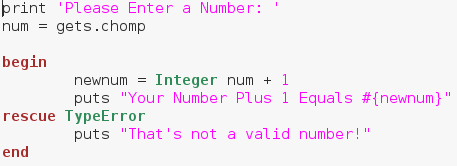
We can see here that the syntax for utilizing begin and rescue is rather simple. We’ve merely placed the possibly volatile code under the begin, and we’ve place the rescue code beneath the rescue. Now that we’ve modified our code, let’s run it again and see what happens:
 There we go! We were able to successfully diagnose and account for a possible error! When making real life tools, error detection is extremely important. We stand no chance of notifying the users of an error if we don’t even know what happened!
We covered some key topics today. After this article, we should all be on the same page for building our very own port scanner! We’re going to actually be building the port scanner in the next article, I’ll see you there!