
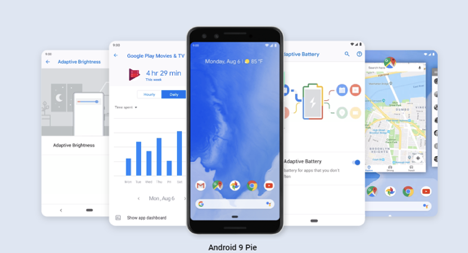
Computers hold more raw power than android devices and sometimes it makes sense to use them for Android applications. Android is a self-sufficient and clean OS that runs on more than 2.5 billion devices. It shows how popular the OS is. Rather than separate devices, we can also use Android on computers using a sandbox environment. One of them is VirtualBox with Android. VirtualBox makes it easy to run another operating system on the same computer, including most Android versions. There are many simulators we use for this. But if you hate bloatware and want pure experience with raw Android, VirtualBox with Android is the best way.
To run VirtualBox for Android, we need Virtual Disk Image (VDI) similar to any operating system. Linux, Ubuntu, older versions of Windows, OpenBSD, iOS, and plenty more can also run with proper VDI. But as Android is our target OS, we will focus on it. Running Android on VirtualBox makes things easy as it doesn’t require the whole computer for a single OS. This article will cover the files needed, setup, optimization, and best practice on a single page. The guide is covered for users from beginner to advance with easy directions, which will help to jump in any choice section.
To get things started, we need to set up the environment.
- VirtualBox: Firstly, we need to download the latest version of VirtualBox.
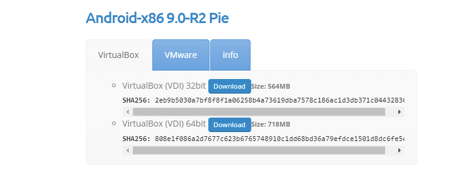
- Android VDH: Osboxes hosts images for stable android versions. They are vanilla and ready to be used with VirtualBox.
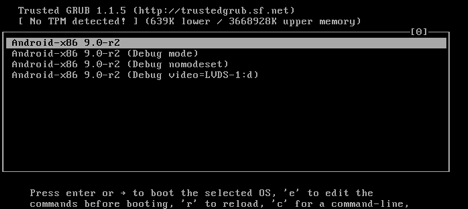
There are other versions to experiment with, but Android 9.0 (Pie) is pretty stable, and so we will use it in this guide.
 Yes, we are using the recent one. You may choose other versions too. Latest version can utilize all the newest features from Google. Also, it will support most apps on Playstore. It is also possible to use ISO files for booting android OS. They can be downloaded from here. The process is almost the same as far as this article goes, and once android loads for the first time, we need to exit and eject the ISO image from the disk and continue our task. The rest are as follows.
- Optimization: To run this smoothly, we need to optimize settings to have the best possible Android experience. Luckily, it’s not very resource-hungry, and a minimum amount of hardware dependency should suffice.
- Virtualization requires to be active on the computer because modern computers are optimized to use whatever resources available. Enabling virtualization will make sure the virtual environment gets some of that priority too.
We can enable virtualization from BIOS. Computers with newer AMD processors have this enabled by default. Non-enabled virtualization may prompt errors like VT-x/AMD-V hardware acceleration not allowed, or host supports it but not enabled.
- Hyper-V needs to be disabled or uninstalled from the windows machine. Hyper-V is a Windows feature and can be disabled from Control Panel. Once Navigated to Control Panel, user should press Uninstall Program.
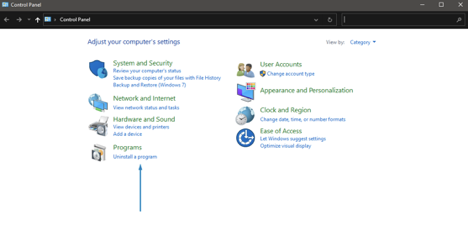
It will list a lot of programs and features installed in the system. Windows 10 apps menu doesn’t include all the apps running, so we have to do it in the old school way.
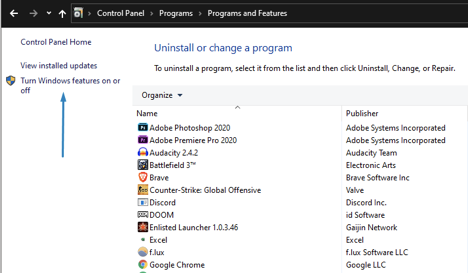 We have to click on “Turn Windows features on or off” and navigate to “Hyper-V.”
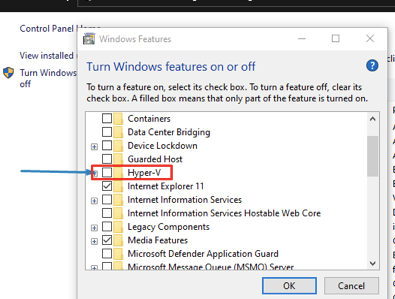 Once Hyper-V is unticked, clicking ok shall save the setting. And we are ready to set up our VirtualBox with an Android sandbox.
VirtualBox with Android
The procedure to install VirtualBox is as simple as installing any other software. Double-clicking the .exe (setup) file will start the installation process, and it’s up to the user to select whichever directory to install the application. It takes a short while to complete. Once done, let’s fire up the VirtualBox.
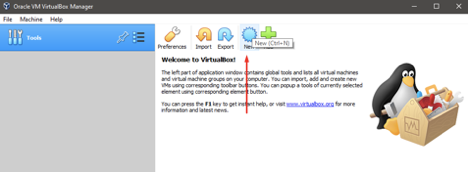 Once opened, we are greeted with a screen like below. Click on new and select Expert Mode from the bottom. We can name our OS. We will keep things simple and call it “Android Pie” & Machine Folder to something easily reachable. Keeping it default won’t be any problem either. From Type, we’ll select “Linux” and for Version “Other Linux (64-bit).”
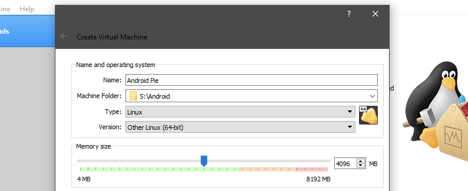
For an x64-bit OS, 4 GB of memory size is enough and recommended. We may choose “Use an existing virtual hard disk file” and navigate the following menu for hard disk. Click on the icon on the bottom right to select a hard disk file.
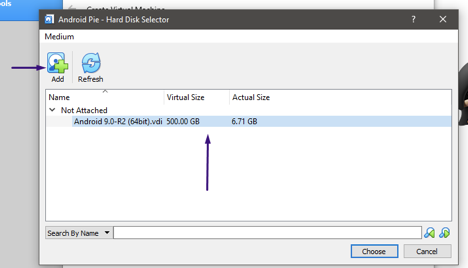
Clicking on “Add” and navigating to the directory where we kept the Android image file and selecting will give us the VDH. Select the choose option, and it will redirect us to the previous window.

Our initial setting will look like the image above. Hit Create!
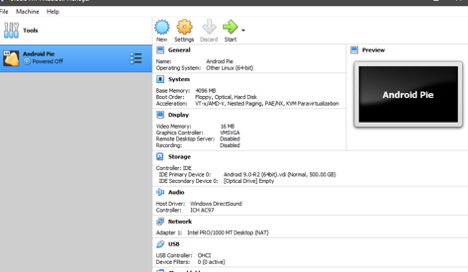
It will lead us back to the main page and just like the image above. Our Android environment is ready. But before we start, there are a few tweaks that need to do before starting our sandbox. Browsing through the setting icon will give us plenty of options to optimize the VirtualBox and help the windows collaboration process.
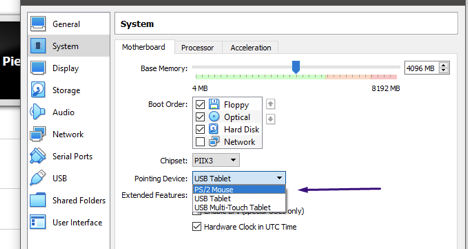
Sometimes the controls bug out at the time of using an OS with VB. So, from the system, we will have to select the pointing device to PS/2 Mouse. It will help implement proper computer controls (keyboard & mouse) into the android environment.
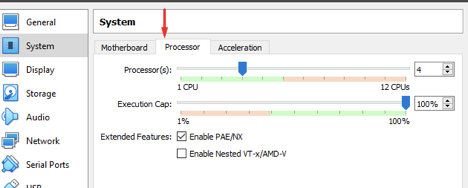
From the processor tab, we need to bump up the usable CPU for the system. We to use at least half of the cores. It will treat the sandbox to run similarly with the native system.
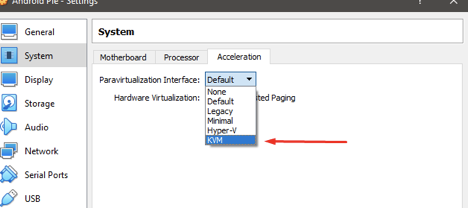
For acceleration, we will choose KVM with hardware virtualization ticked on. KVM is one of the best solutions for x86 hardware container-based systems to run as a virtualization solution.

From the display, we can crank up video memory to as high as it goes. It will help our graphics unit for rendering smoother images. Lower quality may drop frames and cause a stutter in the display, which is not pleasant to work with.
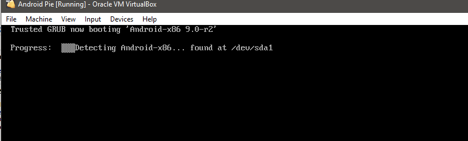
Once the option is saved, we can start our VirtualBox with Android by clicking the start button. It will take some moment for the first boot. We don’t need to do anything else for the moment, as the installation procedure will take place by itself.
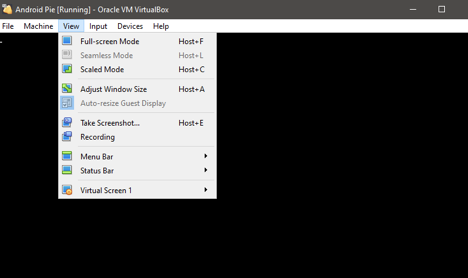
While the first boot and setups are running, we can select view and enable Full-screen mode for better visibility.
It may take a while to run through setup and boot for the first time. Like Android phones or tablets, a splash screen will show up and must follow through the first setup process as usual. On the other hand, adding a Google mail can help sync data into the sandbox to make things easier.
Frequently asked Q&A for VirtualBox with Android
- How many instances of Android can we run with VirtualBox?
- As many as hardware supports. And for different android versions, we need to follow the same process with a separate sandbox
- How costly is the method?
- Running VirtualBox with Android is free. And even free android simulators like Bulestacks, Nox App Player have unnecessary apps installed. But this method is clean and stress-free. To be noted that, it may not perform as great as a core application like the ones mentioned here.
- What Android version should you use?
- Running the latest stable version is always better. But if you have issues, roll back to a different version and check what works best. We already covered fixes for virtualization; recheck those too.
- VirtualBox with Android not booting?
- Make sure to have the required specifications met. Operating system: Other Linux (64-bit), Memory: at least 1 GB (for older versions), CPU: at least 2-cores is sufficient.
- Is it necessary to remove the disk image?
- If you’re using ISO, then yes. To exit simulation, press right control on keyboard + “H.”