
Malware is any software that is created with the intent of causing harm to a device, server, client, or an entire network. Whether it’s a piece of bogus security software hounding us to buy it, or a bot waiting for commands, they all need a way to survive a power cycle. They need to automatically start when your computer boots up, so they use Windows features that ensure automated execution during the startup. This is the reason why most of the Windows related malware are designed in such a way as they rely on Windows startup processes to live.
We can use this behavior to detect malware by inspecting only the programs that start at the Windows bootup, and that can speed up the identifying process. AutoRuns utility for windows operating systems can be downloaded from here.
Windows Startup
When a system is booted, the Windows operating system automatically runs certain programs using its “autoRun” feature. While some programs are set to run automatically by default, any program can be made to start automatically by entering its location in the startup folder or adding a value into the run key in the windows registry. This is beneficial since it allows users to choose which applications they want to launch at startup.
It is often required for other programs, such as protection applications, and these programs must often begin as soon as possible. But on the other hand, malicious entities also use this feature to get into the user’s system by adding the malicious run keys in the registry. They automatically load their software through browser helper objects (a DLL module), services, scheduled tasks or drivers.
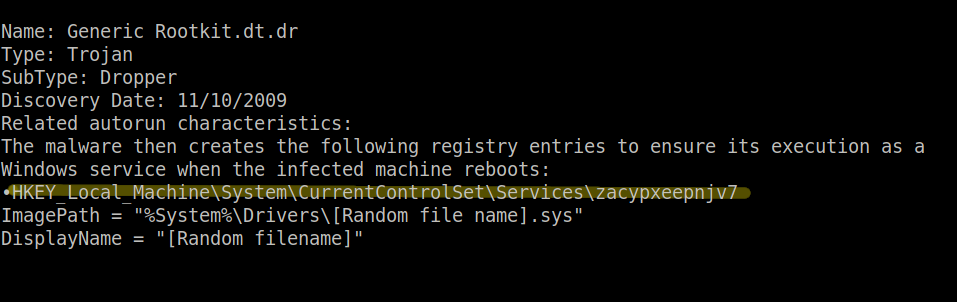
Let’s look at the screenshot given below, it can be seen clearly that this piece of malware under consideration depends on windows autorun features and uses the registry entry of windows to get into the system .
AutoRuns
For tracking down such malicious code, “AutoRuns” utility can be very useful. AutoRuns is the windows utility that has the most detailed knowledge of auto-starting positions of any startup monitor. It displays all the programs that are scheduled to run at device bootup, as well as the order in which Windows processes them. Autorun utility searches the auto-run areas for the system and shows the information about the autorun entries like their location, description, publisher, path, size, and last modified date etc.
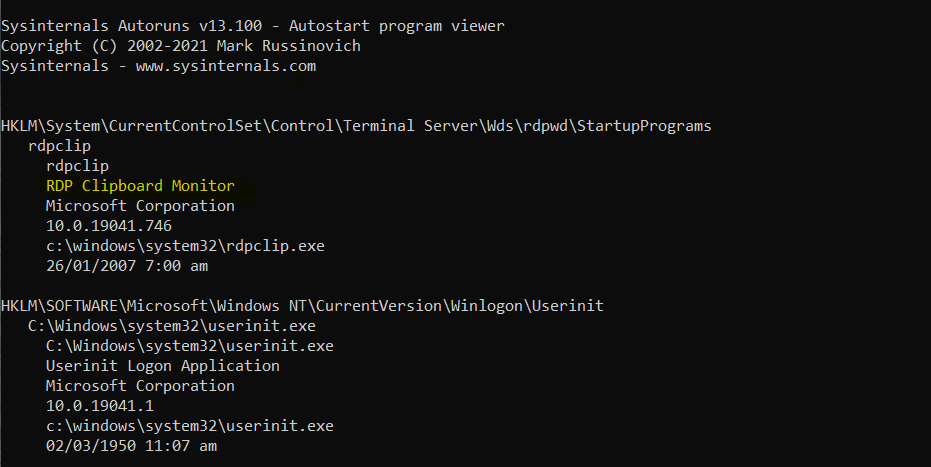
Autoruns utility also has a command line version as well as a GUI version. The command line version gives us more control over the information that we can retrieve as compared to the GUI version. Looking at the following screenshot, it can be seen that the autorunsc.exe is providing information about different softwares configured to automatically run on startup.
C:\> autorunsc.exe
The basic concept behind using Autoruns utility to find vulnerabilities is to search for changes in Windows autorun areas over time. Comparing a new snapshot picture against a previous snapshot image and observing the changes is how the change identification is done. The procedure involves determining a schedule for taking snapshots, comparing, and then rotating them. The method runs at the planned time and takes a fresh screenshot of the auto-run areas. It compares the current snapshot to an older snapshot, most likely the previous one, and detects the changes.
Let’s look at an example and a little power of AutoRuns utility. Two snapshots using the autorun utility have been taken. First one before installing the google toolbar and second one after installing it. For the first snapshot, create a temporary directory named ARTemp in the root of C: and change directories to that directory. Then run the command given below in order to take a snapshot using AutoRuns :
C:\> autorunsc.exe -avc >first.txt
It will save the output to a first.txt file and we’ll get a comma-delimited file for our previous snapshot.

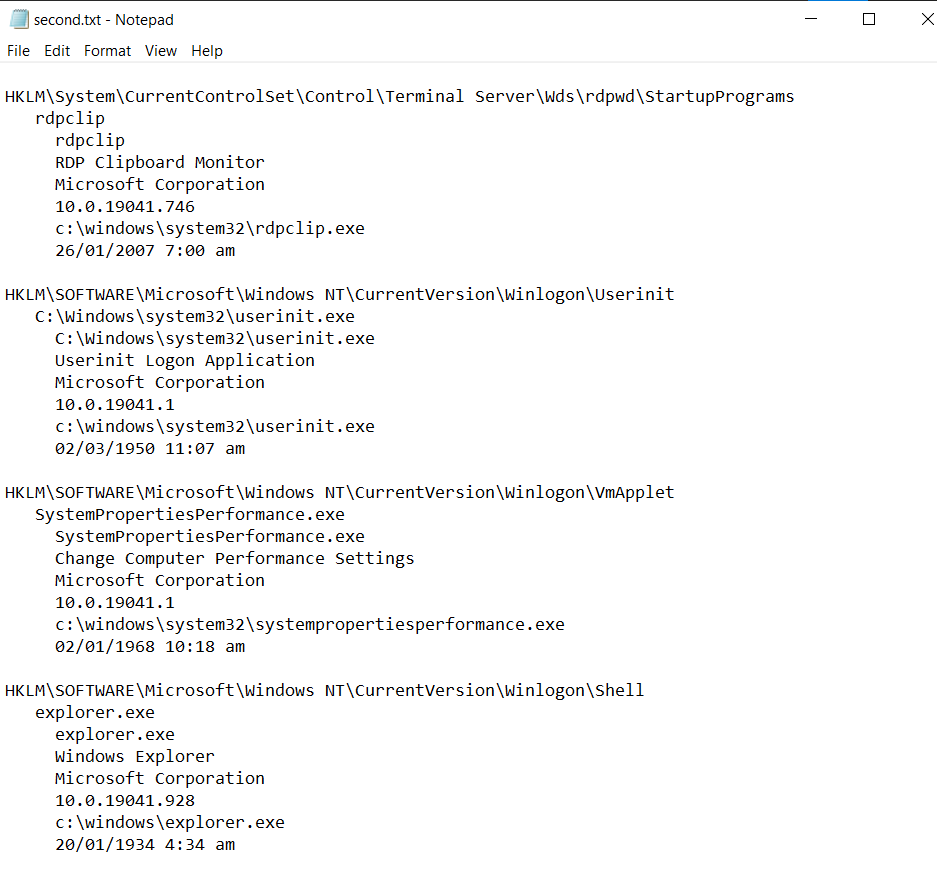
Now install the google toolbar and run the same command again by just changing the filename to second.txt for generating the second snapshot. We are not looking at the contents of snapshot files explicitly because they hold a lot of detail. In these snapshots, we are just looking at a subset of what the files contained.
C:\> autorunsc.exe -avc > second.txt
Now in order to look at the differences between two files, “diffUtils” (a windows utility for comparing two same types of files) for windows will be used. It can be installed from here.
C:\> diff.exe first.txt second.txt
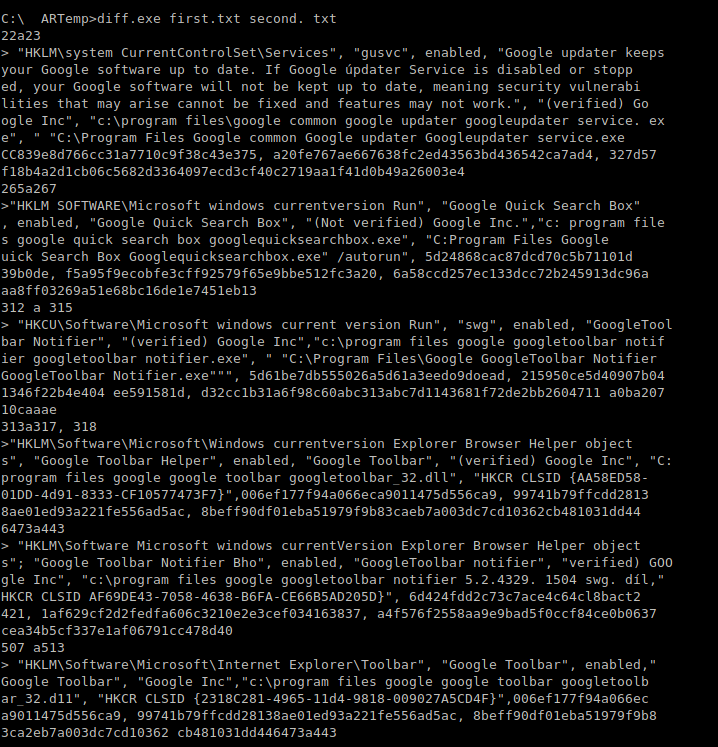
In this snapshot, it can be seen that the google toolbar adds six entries to the autorun areas. That means that “diff.exe” finds six entries in the “second.txt” file that didn’t exist in the “first.txt” file. It is worth noting that each subsequent entry is preceded by the symbol “>” When considering the order of the command line input data, the “>” symbol can be thought of as a pointer to the file where the entry appears. In addition to first.txt, second.txt file will have these entries. The entries in the rest of the folders are identical, so none of them are shown. The “<” mark would have existed if there had been an entry in first.txt that was not in the second.txt file.
Automating the process
Continuing to do it like this and checking the differences after every restart would be costly and time-consuming, particularly on a system with little adjustments anticipated. One can get bored and would like to rather avoid running the process on a daily basis in case he is having empty records day after day. In order to automate this process, just use the already generated script. The script uses the “autorunsc” command for the current snapshot and then compares it to the previous snapshot file like this.
strCommand="%ComSpec%/c"&strPath&"autorunsc.exe/accepteula-‐avc>"&_strCurrentFile CallRunCommand(strCommand,0,booWait)
strCommand="%ComSpec%/c"&strPath&"diff.exe"&strPreviousFile&""&_strCurrentFile&">"&strDiffFile
CallRunCommand(strCommand,0,booWait)
We can begin to see numerous reports produced after running this script on a regular basis for a period of time. Clearly, the reports that begin with “No improvements were found” are the ones anyone would want to see but unfortunately this won’t be the case every time. Unknown and suspicious contents in these reports will be seen as well as normal modifications caused by software installations, upgrades, and uninstallations.
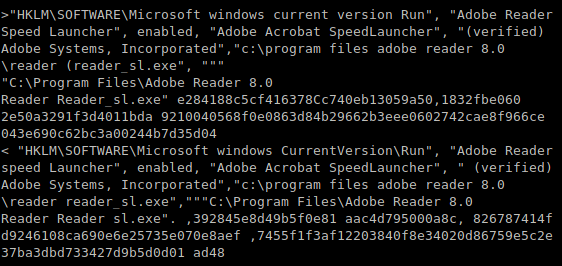
For example, when we update some software, we will see that coinciding entries are common. One entry will tell us about the deletion of the old information, and the other will about the insertion of a new one. The following snapshot is displaying the results of the difference of two snapshots after we update the Adobe Reader Speed Launcher.
Detecting Malware
In order to detect a malware using AutoRuns, one should look for such entries that are unverified, have strange urls or no company name is associated with it. Hackers go to great lengths to make their malicious code seem legitimate. They use names that seem to be official, such as “Security Tool” or “AntiVirus 2009” etc. This is where the investigative process comes into play, especially for the entries we are unfamiliar with. For example, in the following screenshot, no signature is present and we are not sure about this anti cracking tool. This file can be a malware injection.
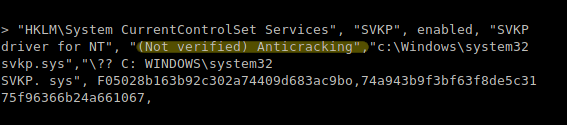
Sometimes, you may come across files that aren’t signed, whether they’re from Microsoft or another provider. This will happen if the files are from an earlier tech version. The more recent the programme, the more likely it is to include signed files. However, we’ll have to look at these submissions. We don’t know whether the entry is “Not Confirmed” at this time. It’s possible that Microsoft didn’t sign the file, that it’s signed with a false certificate, or the file has been modified due to malware.
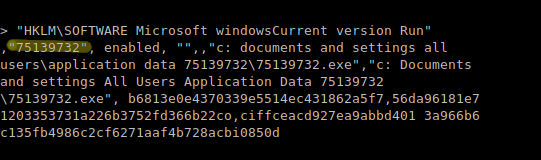
When an item is seen in the report that seems to be suspicious and we are not sure about it, some testing sites like “Threat expert” can be used. ThreatExpert is an integrated automated vulnerability intelligence framework intended to completely automate the detection and reporting of computer viruses, worms, trojans, adware, spyware, and other security-related threats. Threat reports for those suspicious items can be checked on these sites. For example for the following item, we can check the threat report by the entry no. 75139273.
Conclusion
To survive a reboot and get loaded automatically after a machine is powered up again, malware can make use of many legitimate Windows features that allow the software to launch at boot. We can use this behavior to quickly identify malware using Autoruns. Autoruns is a tool that contains a vast amount of knowledge about all the locations which malware can leverage and it displays them in a systematic order which makes it easier to analyze and further investigate the malicious entries It contains different tabs i.e Drivers, Image Hijacks, AppInit_DLLs, Known DLLs, Winlogon , Print Monitors in order to show exactly where a malicious DLL is being placed. You can also confirm the suspicious items by running them through the antivirus engines either by submitting a file or a hash code. If you find that registry marked as malicious, you just delete it from your system by just going to its location.