
You might be like the rest of us and trying to figure out what type of lab you should set up and why. I’m here to break down the differences between Hyper-v and Virtualbox and there are some significant differences. This might actually change your mind on which route to to go so read on to find out who wins in the battle Hyper-V vs VirtualBox.
In today’s virtualized world, hypervisors are aplenty. From Microsoft to Oracle, and from Amazon to RedHat, many companies are offering virtualization services at different levels, using their own hypervisors. Choosing between equally famous hypervisors for your specific needs can sometimes feel like a challenge. In this article, we will compare Microsoft’s Hyper-V and Oracle’s VirtualBox; two powerful hypervisors that are both readily used around the world.
Types of Hypervisor
A hypervisor is any piece of software that allows you to run multiple virtual machines (with each virtual machine having its own virtual hardware, operating system, and kernel) on a single, bare-metal machine (also known as host machine).
There are two ways a hypervisor can provide this hardware virtualization to every virtual machine, and that’s what separates a Type-1 hypervisor (Hyper-V) from a Type-2 hypervisor (VirtualBox). See figure below:
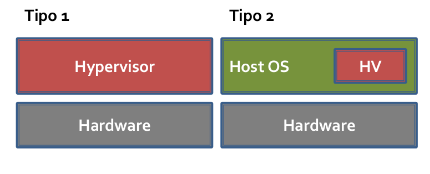
A Type-1 hypervisor, like Hyper-V, runs right above the hardware. As soon as a machine starts, it assumes control from the UEFI or BIOS. It then starts the management OS, which can be Windows, Windows Server, or a Hyper-V server. Virtual machines can be configured to start automatically as well.
Conversely, a Type-2 hypervisor, like VirtualBox, runs atop the host operating system, which is in-turn installed on the physical machine. When the machine starts, the host operating system assumes control. Virtual machines can only be started from the VirtualBox application.
Windows-Only vs. Multi-Platform
Hyper-V is a Windows-only hypervisor, which can be configured to run on Windows 8, 10, and Windows Server 2008 onwards. On the other hand, VirtualBox is multiplatform. It is available for many Linux distributions, Mac, and Windows operating systems.
If a lot of your physical machines are running Windows, then Hyper-V is a good choice. However, if your environment is multi-platform, or favors Linux, then VirtualBox is the way to go.
Hyper-V vs. VirtualBox: Hardware Access
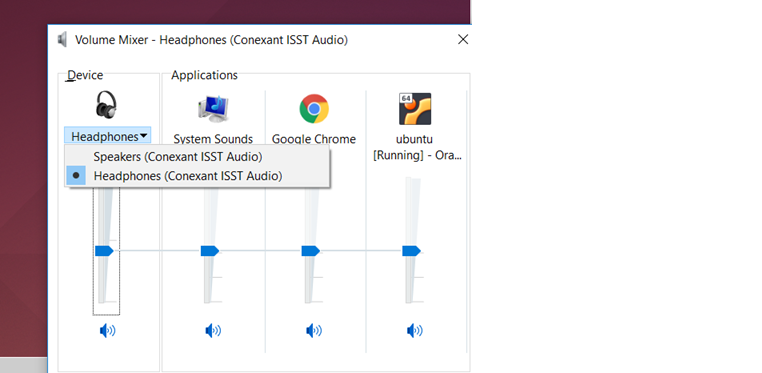
Arguably the biggest difference between Hyper-V and VirtualBox stems from the ease of hardware access offered by the two. When we talk about VirtualBox, even though it doesn’t have direct access to the hardware, it can gain it by requesting the guest operating system. For example, to change the sound device on the guest operating system, all we must do is change the device via the guest operating system. See below:
Similarly, sharing folders between the guest and host operating systems is also straightforward in VirtualBox. See below:

On the other hand, gaining access via a Type-1 hypervisor is not so simple. Since the management (host) operating system runs in a different partition to that of the virtual machine, it can’t simply request access to the hardware. Even though the later Hyper-V versions do have some features (Enhanced session mode) that try to simplify this, but it’s still not as seamless or out-of-the-box as we saw with VirtualBox.
Virtual Hard Disk Compatibility
Hyper-V only supports VHD and VHDX formats. However, VirtualBox has support for VDI, VMDK, VHD, HDD, QED, and QCOW formats.
As you can see, VirtualBox doesn’t support VHDX. So, moving a virtual hard disk from Hyper-V to VirtualBox won’t be a smooth transition; at-least not one without conversions. If you want to use different virtual hard disk formats, or expect to switch the platforms in which they are residing, from time to time, then VirtualBox is the wise choice.
Display and Video Features
VirtualBox boasts a few video and display features that are simply not present in Hyper-V:
- VirtualBox’s server mode gives remote computers the ability to connect to the host operating system and have access to the console of any number of guests. Multiple simultaneous connections are supported. Even though vmconnect.exe can be used alongside Hyper-V to achieve similar functionality, the versatility isn’t there.
- VirtualBox allows you to record a guest session.
- Hyper-V can only project display on either one or all monitors. However, with VirtualBox you can choose to throw display on any number of monitors, between 1 and 8.
Configuring/Installing on Windows 10
Installing VirtualBox
- Visit the official VirtualBox website here (https://www.virtualbox.org/wiki/Downloads) and click “Windows hosts” to download the installer for your Windows machine.
- Install the downloaded file.
- We will be setting up Ubuntu as a virtual machine on VirtualBox.
- Head over to the official Ubuntu website to download the ISO.
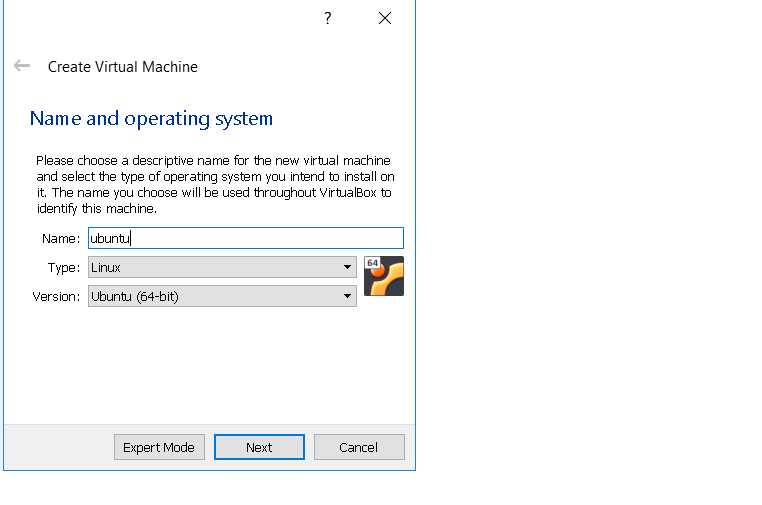
- Open VirtualBox and click the “New” button.
- Enter a name for your new virtual operating system and click “Next”.
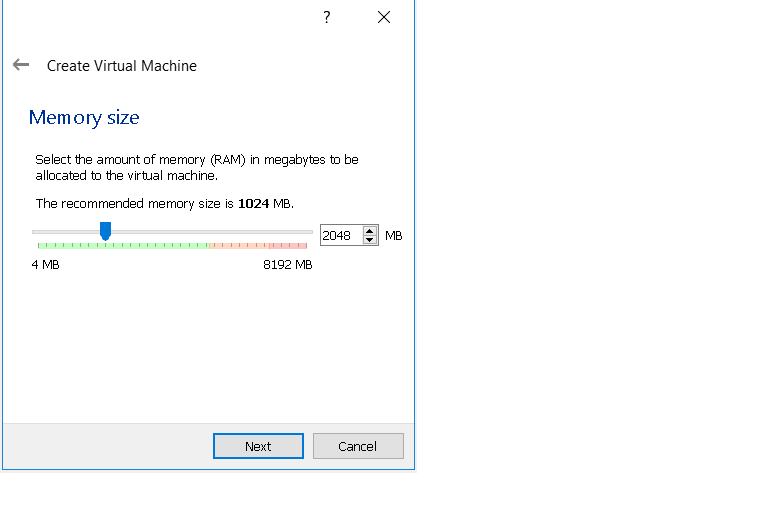
7. Choose the RAM for your VM. It’s recommended to give at-least 2GBs of RAM for it to run without any lag.
8. Next up, click the “Create a virtual hard disk now” radio button to create a new virtual hard disk.
9. For the hard disk file type, VDI or VirtualBox Disk Image is the recommended choice.
10. For “storage on physical hard disk”, choose the “dynamically allocated” option so that your VM only takes up storage when you start adding actual data to it.
11. You can decide the virtual hard disk size in the “File location and size” section, depending on the amount of storage you have.
- Finally click “Create”.
- Click the “Settings” icon at the top.
- From the window that appears, click the “Storage” icon. Click the CD icon under “Controller: IDE”.
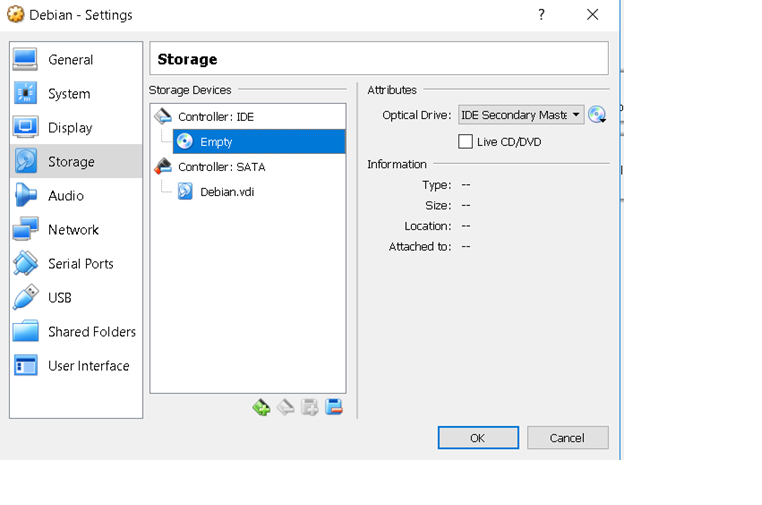
15. Now click the CD icon present in front of the Optical Drive dropdown on the right. Then select “Choose virtual optical disk file”. Now you will navigate to the location where the downloaded file (From step 1) is present. Click “Open”.
- Start the virtual machine and follow on-screen instructions to install Ubuntu.
Enabling Hyper-V
If you have Windows 8 or Windows Server 2008 onwards installed on your system, you will have Hyper-V available by default. There are many ways you can enable it; we will be sharing two of them here:
Via PowerShell
- Start PowerShell via administrator.
- Run the following command:
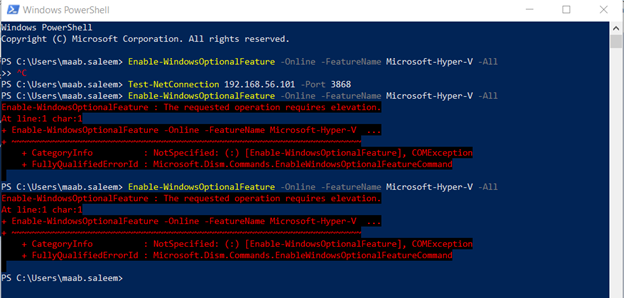
Enable-WindowsOptionalFeature -Online -FeatureName Microsoft-Hyper-V -All
Note: If you are receiving the following error (see image), it’s likely that you didn’t start PowerShell as administrator.
- After the installation has completed, reboot the machine.
Via Settings
- Open Control panel.
- Navigate to “Programs and features”
- Click “Turn Windows features on or off”
- Find the “Hyper-V” radio button and turn it on.
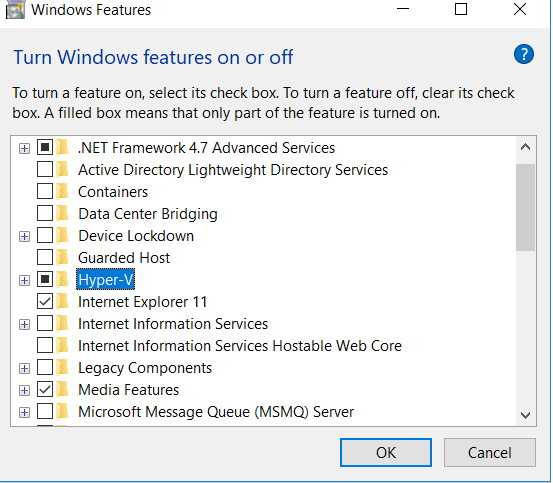
5. Click Ok. You will be prompted to restart your computer when the installation completes.