

Mobile application penetration testing is like a security check for your phone and apps. It helps find and fix any weak points that hackers could use. This is important because as we use smartphones more, we want to make sure our personal information is safe. The testing looks for problems, like where data is stored or how it’s protected, and helps fix them before bad guys can take advantage. Doing these checks regularly is like keeping our phones’ security up-to-date to stay safe from online threats.
Let’s discuss the steps involved in penetration testing of mobile applications
- Extracting application details and apk
- Static Analysis
- SSL pinning and its bypassing techniques
- Dynamic Analysis of application
- Some more important points
Before discussing the actual process, let’s talk about the tools we are going to need for this process.
- JADX-GUI
- adb
- apktool
- Android Studio
JADX-GUI
The JADX GUI tool is used by developers to decompile Android applications into a readable format, allowing for the analysis of source code, reverse engineering, and understanding the inner workings of an app for debugging or security assessment purposes.
Java is required for this tool that can be installed from the link.
ADB Tool
In mobile application testing, ADB (Android Debug Bridge) is employed to execute commands and perform debugging operations on Android devices, aiding in efficient testing and troubleshooting. ADB is also used to get the shell in our emulator devices to access the application internals. It can be installed from the below link:
https://developer.android.com/studio/releases/platform-tools
APK Tool
APKTool is a command-line tool used by developers to decompile and recompile Android application packages (APKs), enabling them to analyze, modify, and understand the inner workings of Android applications. It’s commonly utilized for tasks such as resource extraction, code analysis, and debugging during the development and reverse engineering processes.
We can download this tool from the link below.
https://ibotpeaches.github.io/Apktool/
Android Studio
Android Studio facilitates mobile application testing through features like emulators, debugging tools, profiling, and integration with testing frameworks, ensuring thorough evaluation of app functionality, performance, and usability prior to deployment. Please use the below link for downloading android studio.
https://developer.android.com/studio
Setting up Emulator in Android Studio
Before we start testing, we can set up a few important stuff that can really help in effective and easy testing of applications.
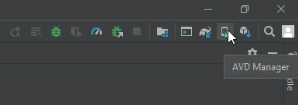
Device File-Explorer: It can be set up to navigate through the file system of the emulator easily. When the application is connected with the emulator, we can easily navigate through files and folders. We can enable it from top bar of android studio as shown below:

We can also enable the terminal window & logcat from the same menu as above.
Now we can use emulators using AVD manager in android studio. This option can be seen on the top right corner of android studio.
After that, click Create Virtual Device”
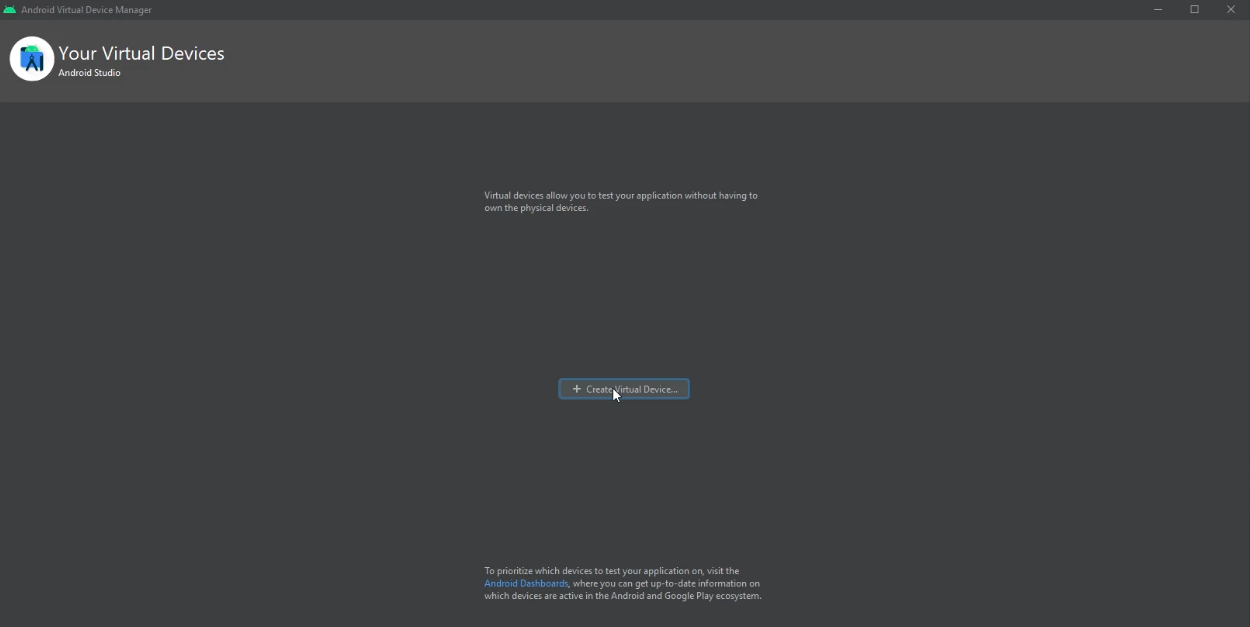
A new window will pop up for selecting hardware and other configurations for our AVD.
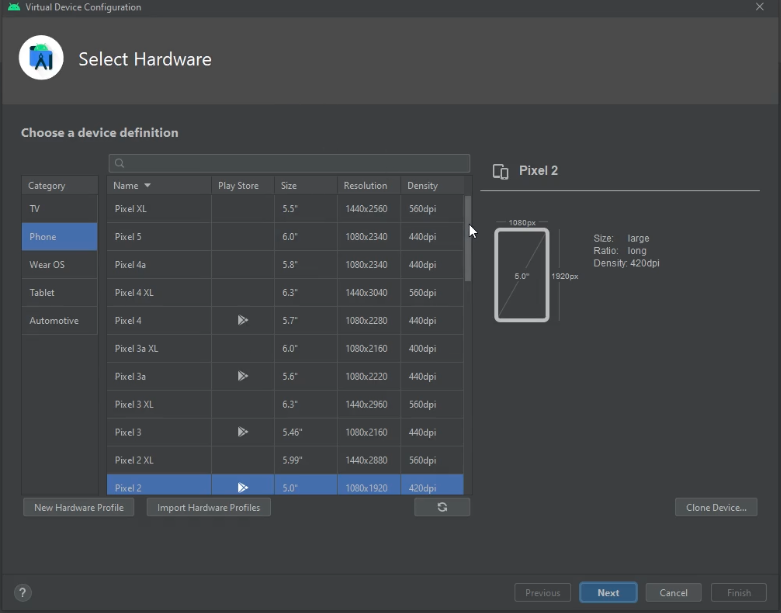
We can install multiple AVD to check the behavior of applications on different devices. The devices who have the play store icon mentioned right in the next column can pull the apks directly from play store. After selecting the device, we need to select the android version. After considering these configurations, we can simply start the emulator.
Accessing adb Shell
To access the shell of an emulator when it’s on the same network, you can use the adb (Android Debug Bridge) tool with the following steps:
- Kill any active instances of adb first because it gives an error if we try to access it with some other instance currently being active. We can use the below command on windows machine

- Start adb server using below command

- Now connect with the server using the below command

Static Analysis Steps
Pulling APK from PlayStore
Now we can start the real work. As we setup emulator with android version that had play store installed, we can easily pull apk using playstore using below steps
- Download the application from playstore in emulator
- Get shell on adb using the above mentioned method
- Now we need to get the package name of the application to use afterwards for pulling apk. We can get the apk using below command
pm list packages
- Now we need to get path of our package file using below command
pm path “package-name-here-that-we-got-in-above-command”
- Now after exiting from the above adb shell, use new adb command to pull apk and save it with custom name
adb pull path-here name-here.apk
Manual Static Analysis
We can check the following points when doing manual status analysis. We can use jadx gui app for this analysis
- Permissions check using manifest.xml file
- Checking “exported=true” activities / intent filters
- Checking exported content providers
- We can also decompile the application to do in-depth analysis of application
apktool d application-apk-file-here
- Checking strings.xml file for hard-coded strings or any other important information
Automated Static Analysis
We can use a very famous tool for automated static analysis called MobSF which can be downloaded from the below link
https://github.com/MobSF/Mobile-Security-Framework-MobSF
After installing the app, we can use provided run.sh or run.bat files to start the processes. A good point about using this tool is that it is quite user friendly e.g. we can simply upload apk and it will start processing it automatically. In the below image, use the button “Upload & Analysis” to start the analysis.

MobSF can point out issues in the application but there are cases when it cannot be trusted 100%. Sometimes it requires human attention to check whether something that is pointed out wrong is actually wrong. Similarly, the security score provided by MobSF to any app cannot be 100% accurate so that should be considered beforehand as well.
Dynamic Analysis / SSL Pinning Bypass Techniques
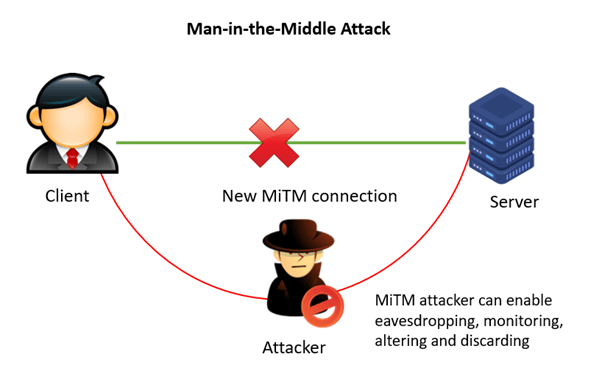
SSL pinning is a security technique used in mobile applications to enhance the security of HTTPS connections by associating a specific SSL certificate or public key with a particular server, preventing adversaries from intercepting and decrypting the traffic using forged or compromised certificates.
You can read more about SSL-Pinning at this link.
Analysis With BurpSuite
Please install burp suite from the given link for the platform of your choosing
https://portswigger.net/burp/releases/professional-community-2023-12-1-3?requestededition=community
It’s best to use the professional version as it has many benefits over the community version. After setting up burp, one important setting is to configure proxy settings.
Burp Window => Proxy => Options => All Interfaces
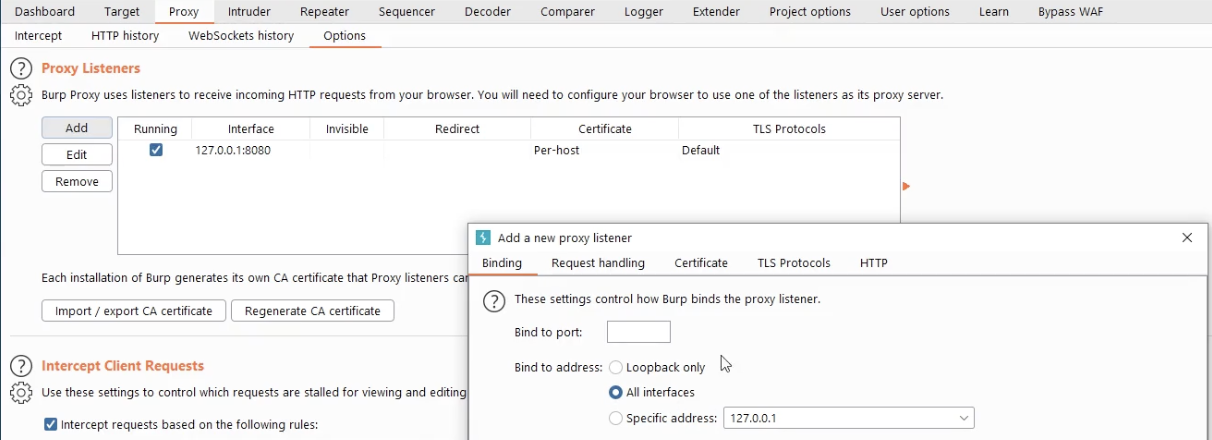
The above option should be enabled for whatever port we use.
On the other hand, we need to set proxy settings on the emulator as well. For that, go to settings in extended controls, proxy tab, enable manual proxy configuration and set IP and port accordingly.
After setting these configurations, go to the browser in the emulator and search anything. There will be errors about certificates. Now we will import the burp suite’s certificate in the emulator to avoid this issue. To do this, follow below steps:
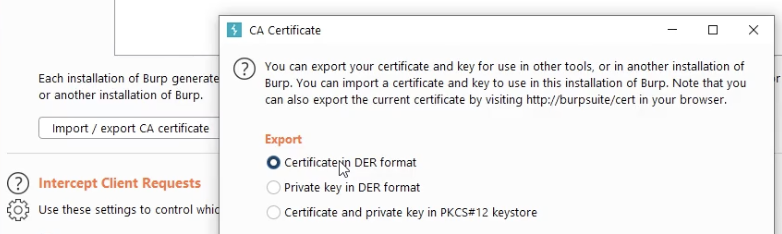
- Export certificate from burp
Burp Window => Proxy Tab => Options Tab => Import /Export CA Certificate => DER Format => Save as “.CER” format
- Drag Drop it inside emulator
- Now install this certificate in emulator
- Go to Settings
- Install from SD Card
- Click on the certificate with our name, set certificate name, select VPN and apps from credentials use drop down and click ok
Now again go to the browser and search for google.com. This time, the error should be gone. If the application crashes at this point, its most probably SSL Pinning now.
SSL Pinning Bypass Using Frida & Objection
Frida and Objection are dynamic instrumentation frameworks commonly used in Android SSL pinning bypass testing. They play a crucial role in injecting js in native code into running processes, modifying the behavior of Android applications at runtime, allowing testers to intercept and manipulate SSL/TLS traffic, bypassing SSL pinning mechanisms implemented within the app for security testing purposes.
Installing Required Tools
The documentation of the tools can be found at
https://frida.re/docs/android/
https://github.com/sensepost/objection
To install the required tools, python3 is required. After having python3, use below commands
~ pip3 install frida-tools
~ pip3 install objection
To patch the application, use below commands
~ objection patchapk/patchipa –source apk-file-path-here
It will save the new-apk in the same folder that we can install now and try to intercept the traffic. If the automated way of patching does not work, we can try the next approach i.e. manually to patch the application.
SSL Pinning Bypass By Manually Patching Application
We can perform the following steps to manually inject frida into our apk
- Decompile apk using below command
apk d apk-name-here.apk
- Now we need frida-gadget for our specific apk architecture. To check this, check the architecture of our emulator. If it’s x86_64 then we will download tools according to it. We can download this from below link
https://github.com/frida/frida/releases
- Unzip the downloaded file. It will be a .so file. Rename it to frida-gadget.so
- Copy the file created in step 3. Go to the folder created in step 1, go to lib, go inside the architecture folder that is of our emulator e.g. x86_64. Paste file here. Sometimes, files in this folder have a prefix as well with their name, if so, place the same prefix before the newly copied file name.
- Now add the following code in the smali code of this apk. The code needs to be in the activity which starts at the launch of the app. For Example, if the application’s first activity is mainactivity, then this will go in the constructor of that activity before the return statement.
const-string v0, "frida-gadget"
invoke-static {v0}, Ljava/lang/System;->loadLibrary(Ljava/lang/String;)V
- Add this permission if not already present
<uses-permission android:name=”android.permission.INTERNET” />
- After adding above code, we need to rebuild our apk using apktool
apktool b folder-containing-modified-code -o name-of-new-apk-file-here
- Now we need to sign the application using below commands
# if you dont have a keystore already, here’s how to create one
$ keytool -genkey -v -keystore custom.keystore -alias mykeyaliasname -keyalg RSA -keysize 2048 -validity 10000
# sign the APK
$ jarsigner -sigalg SHA1withRSA -digestalg SHA1 -keystore mycustom.keystore -storepass mystorepass repackaged.apk mykeyaliasname
# verify the signature you just created
$ jarsigner -verify repackaged.apk
# zipalign the APK
$ zipalign 4 repackaged.apk repackaged-final.apk
- Now install the newly created apk n the emulator
- After performing previous steps, start the app, open a command prompt and perform next steps. Run these commands mentioned in step 1 and 2
objection exploreandroid sslpinning disable- Now go back to the burp suite and intercept traffic now. If successful, it will show traffic intercepted
In this tutorial, we’ve covered the fundamentals of mobile penetration testing, introducing a range of tools such as jadx-gui, adb, apktool, android studio, frida, and objection. We’ve explored both automated and manual approaches to performing penetration testing on mobile applications, delving into various steps involved. Additionally, we’ve examined techniques for bypassing SSL-Pinning to facilitate more comprehensive system analysis. It’s important to note that this tutorial provides a foundational understanding, and there is a vast array of further techniques and methodologies to explore in the realm of mobile application testing. As you continue to delve deeper into mobile application testing, always prioritize thoroughness and adaptability to ensure the integrity and resilience of mobile systems. Happy testing!