
GoPhish : Open Source Phishing Toolkit
Everyone needs to conduct phishing attacks to see the organisation’s defence against Phishing during a penetration test . Here is an Open source Solution : GoPhish.
Gophish is an open source phishing toolkit designed for businesses and penetration testers. It provides the ability to quickly and easily set-up and execute phishing engagements and security awareness training.
What is Gophish?
Gophish is a phishing framework that makes the simulation of real-world phishing attacks dead-simple. The idea behind gophish is simple – make industry-grade phishing training available to everyone.
“Available” in this case means two things –
- Affordable – Gophish is currently open-source software that is completely free for anyone to use.
- Accessible – Gophish is written in the Go programming language. This has the benefit that gophish releases are compiled binaries with no dependencies. In a nutshell, this makes installation as simple as “download and run”!
The idea of a phishing simulation platform isn’t new. Let’s take a look at some of the features that really set gophish apart and make it awesome.
Hosted On-Prem
There are many commercial offerings that provide phishing simulation/training. Unfortunately, these are SaaS solutions that require you to hand over your data to someone else.
Gophish, an Open Source Phishing Toolkit is different in that it is meant to be hosted in-house. This keeps you data where it belongs – with you.

GoPhish Phishing Toolkit
Installing Gophish Using Pre-Built Binaries
Gophish is provided as a pre-built binary for most operating systems. With this being the case, installation is as simple as downloading the ZIP file containing the binary that is built for your OS and extracting the contents.
To install gophish, simply run
go get github.com/gophish/gophish
This downloads gophish into your
$GOPATH.
Next, navigate to
$GOPATH/src/github.com/gophish/gophish
and run the command
go build
This builds a gophish binary in the current directory.
Running Gophish
Now in order to get started with GoPhish, edit the GoPhish configuration file i.e “config.json” and look for “listen_url” and change its value to your system’s IP address. Remember to change its value for both the “admin_server” and “phish_server” which will come in very handy later. After it’s done, run the following command:
:~$ sudo ./gophish
This will start the GoPhish server. Once it is running, default credentials will be displayed on the screen for the admin access to your instance. The username is admin and the password would be a random string of characters. Copy that string of characters and then open a web browser. Point the browser to https://<yourIPaddress>:3333. When prompted, enter the default login credentials. This will log you in to your Gophish admin panel.
Real Life Phishing Scenario:
Let’s take a look at an example of using Gophish in a real life scenario. We have a cat loving person at our company and we will use this knowledge to hack the person’s credentials using Gophish. We will need an email named related to cats i.e “catsseller1337@gmail.com” in our case in order to trick our victim into thinking that its a real cat seller organization or a person.
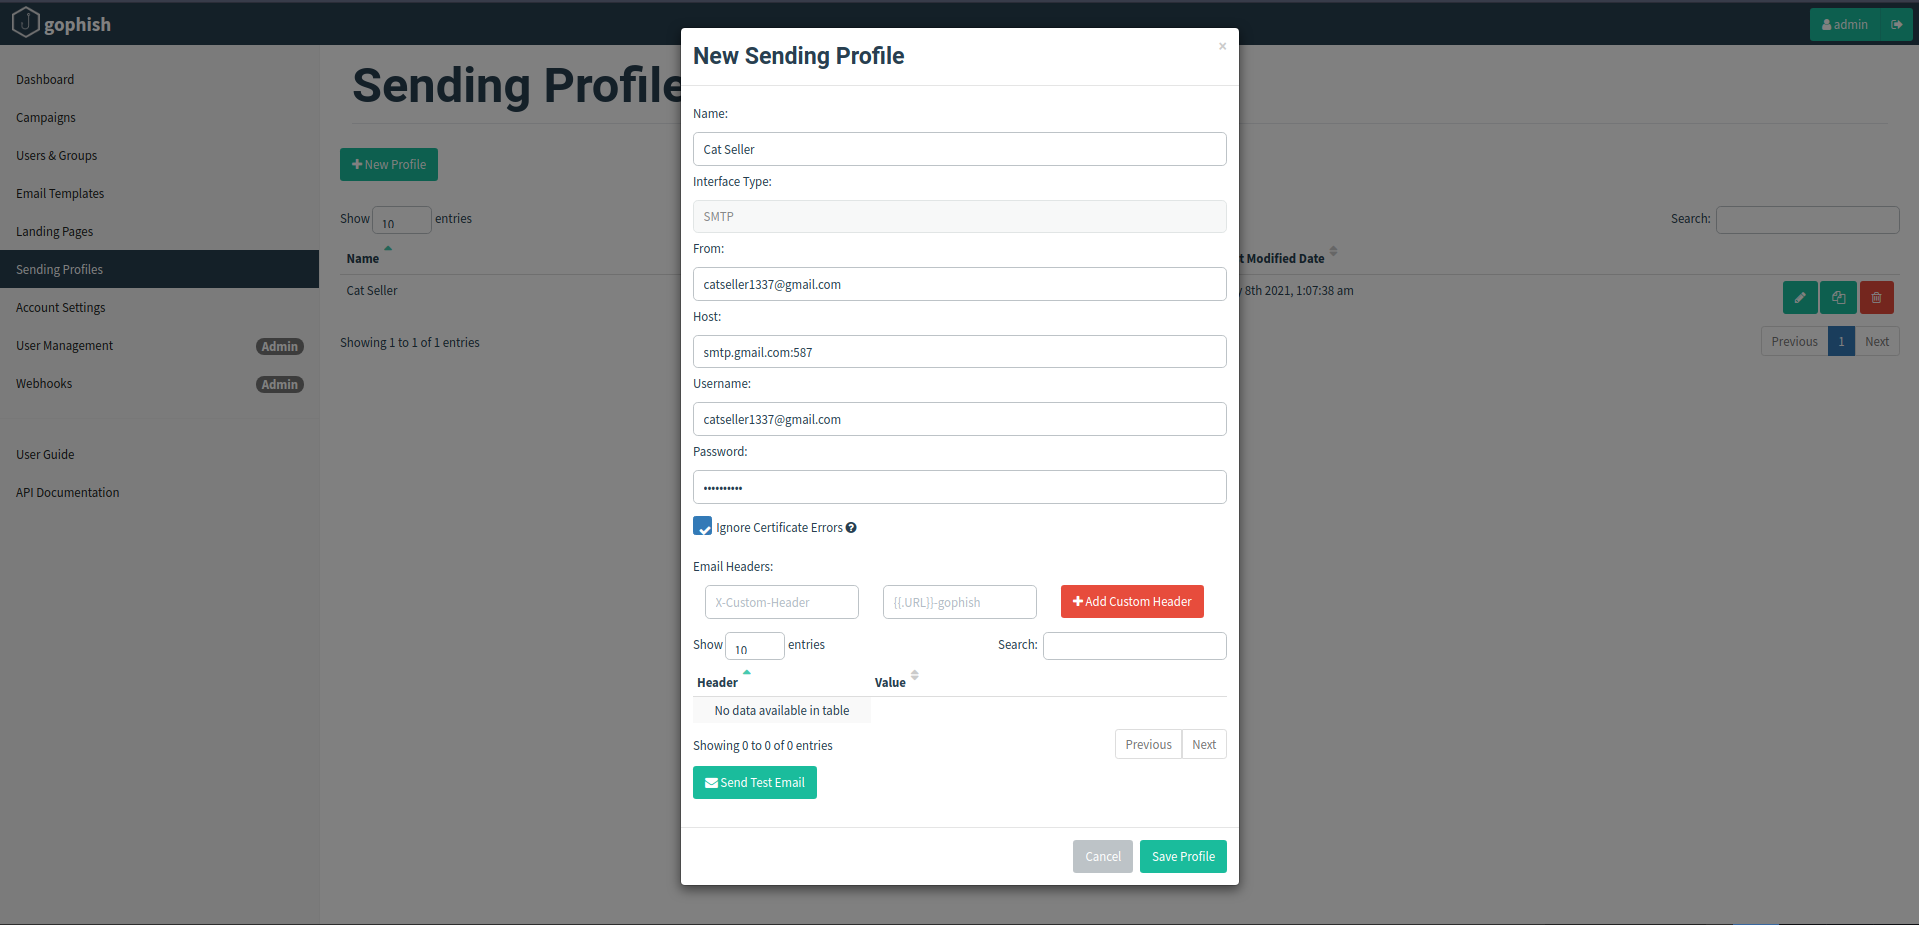
Sending Profiles:
Now on the Gophish admin panel, go to the “Sending Profiles” tab and click on “New Profile” option. Here we will name the profile as Cat Seller, put on our Email address in “From” and “Username” field and provide its real password in the “Password” field. In the “Host” field it is recommended to keep it as “smtp.gmail.com:587” in case that we don’t have our own smtp server hosted on a VM.
Now click on Send Test Email, enter the victim’s email address and his full name, click on send. In case, the sending profile is created successfully, we will see a prompt like this.

If any authorization error occurs, go to your google account settings, in the security tab Turn On the less secure App access option. Now click save profile and we are ready to go to step 2.
Landing pages:
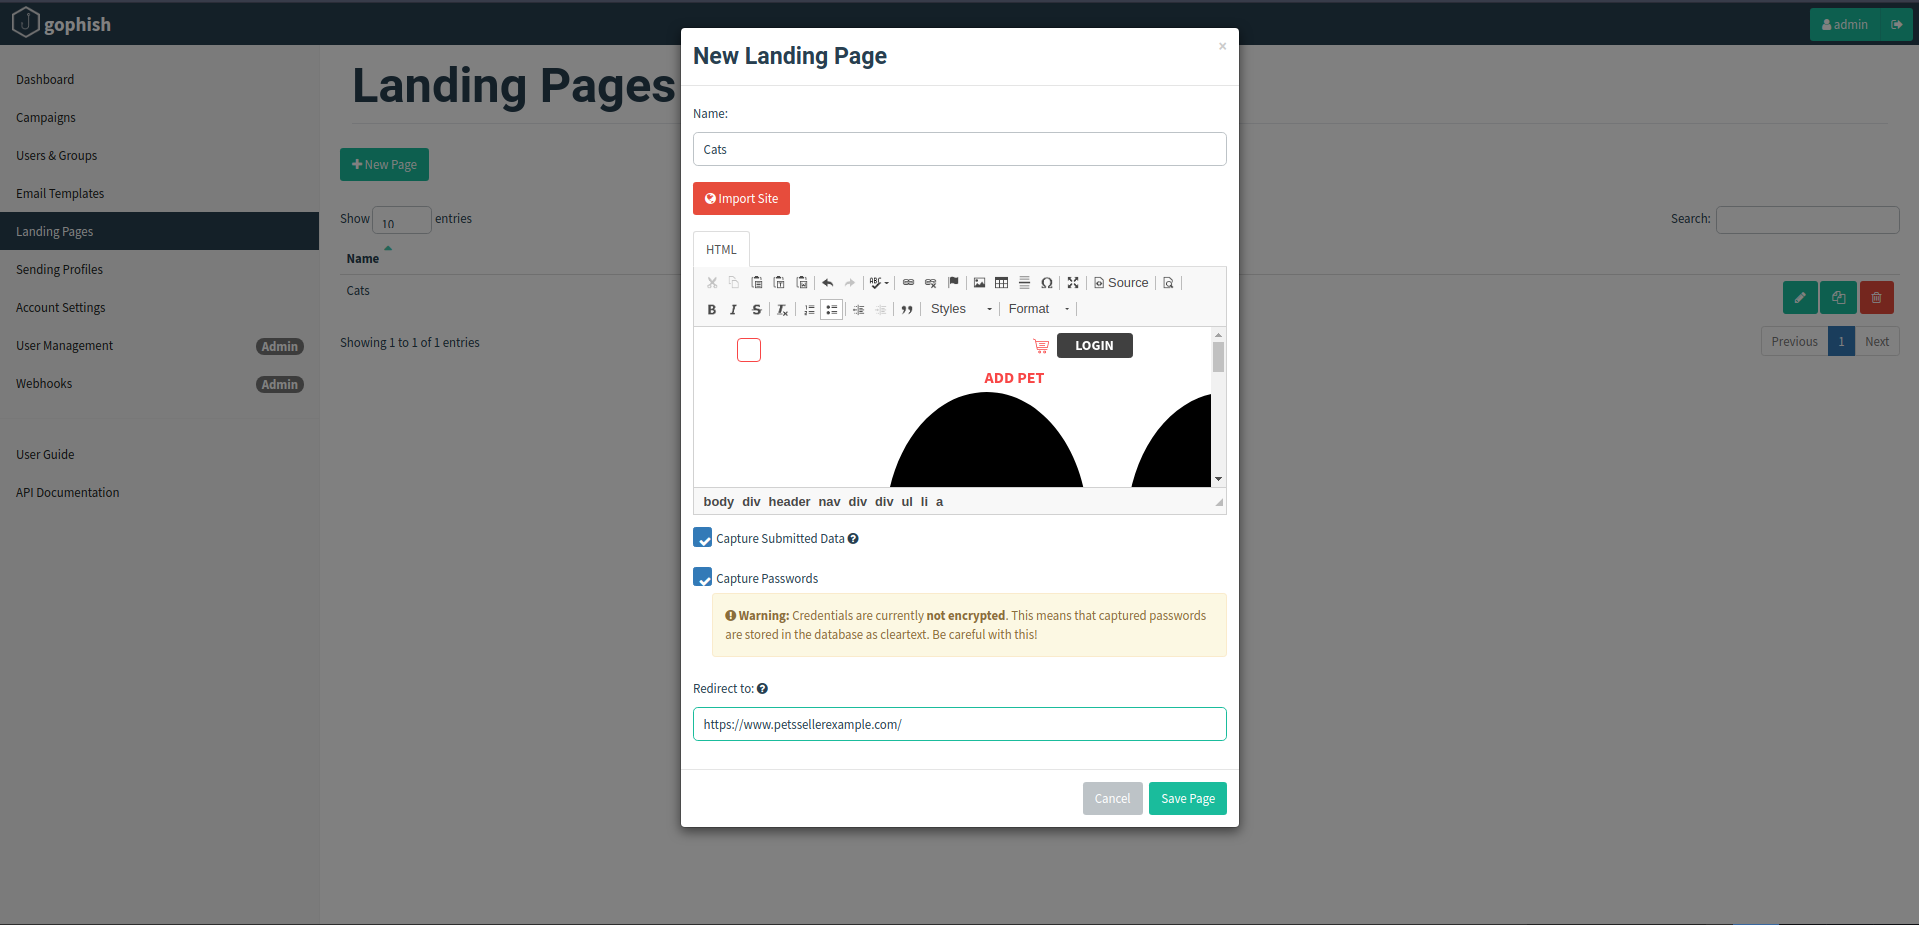
Now in the Landing pages tab, click on the “New Page” option. We want our victim to land on a page of our choice when he clicks our email i.e a login page of any website that looks similar to our target victim’s likings. For example a pet site in our case. Click on the “Import Site” button and what we will do here is to copy and paste any pet site login page url, hoping that the victim would fall for our trap. Make sure to check the “Capture Submitted Data” and “Capture Passwords” field.

In the “redirect to” tab, paste the link of any good pet selling website so that the victim will have no clue that he has been tricked after submitting his credentials. Save the changings by clicking on the “Save page” button at the bottom right corner of the window.
Make sure to mirror the “sign in” page of a website that would reload one time after clicking on the sign in option. Rather than showing a popup message that password is incorrect or wrong username when one enters wrong credentials.
Email Templates:
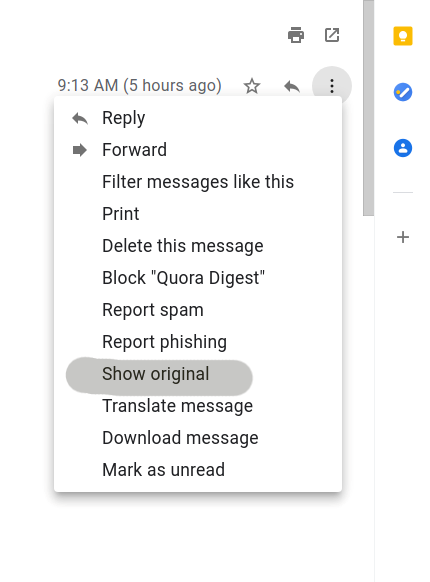
Now in the Email Templates tab, click on “New Template” option. The whole purpose of the email template option is to trick the victim into thinking that the email is indeed a legitimate and a real one. This can be done by going to your email account, find any email that resembles our target scenario, go to “ View Page Source” or “See Original” option on the selected email.
We will see a bunch of information related to the email message like Delivered To, Received, X Google Smtp Source, ARC Message Signature, ARC Authentication Results etc. Copy all the information and go to the Gophishing window, in the new template tab click on “Import email” and paste it here. If it would contain all the header and metadata of a real email that would make it less suspicious.
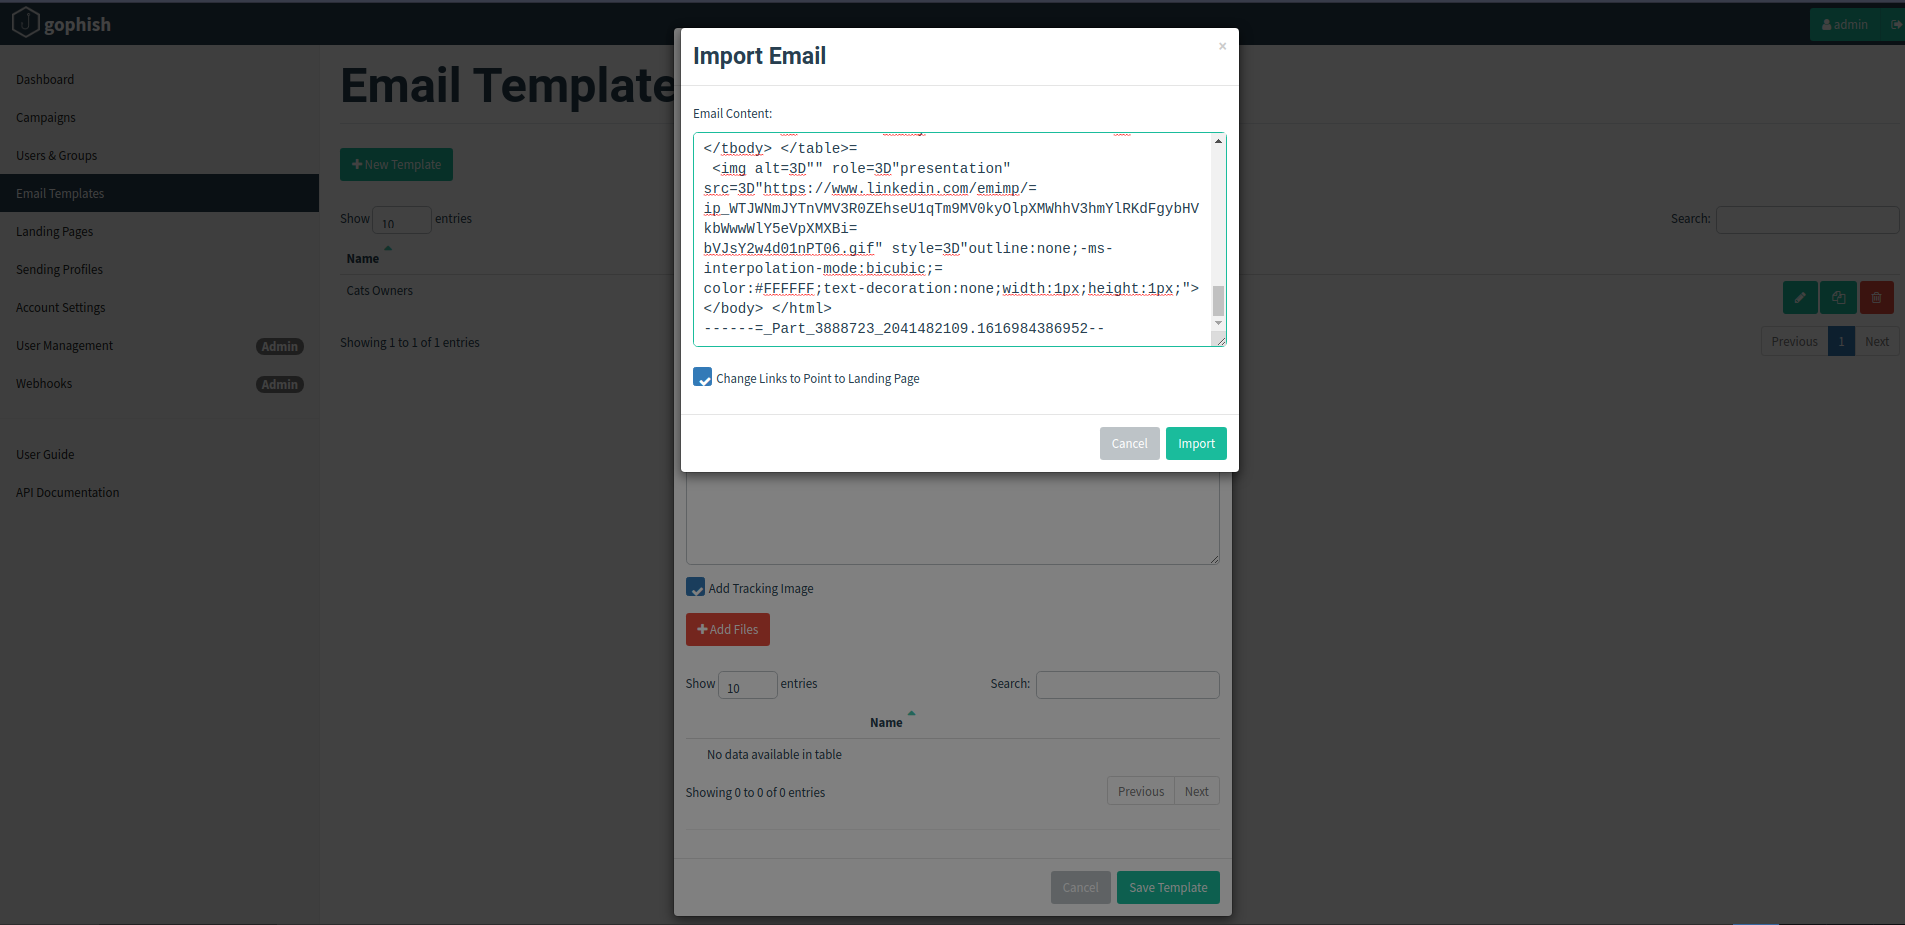
Click on Import and then Save the template. Make sure to tick the “Add Tracking Image” option so that whenever the victim clicks anywhere on email that is considered as an image, he will be redirected to our malicious website’s login page. Also name the template related to the victim.
Users and Groups:
In the Users and Groups tab, we will select the people whom we want to send the email, we can select them by providing their email addresses or by importing a large number of people at once. Let’s say we want to send it to a single person. Here write his email address, click on “Add” and save changes.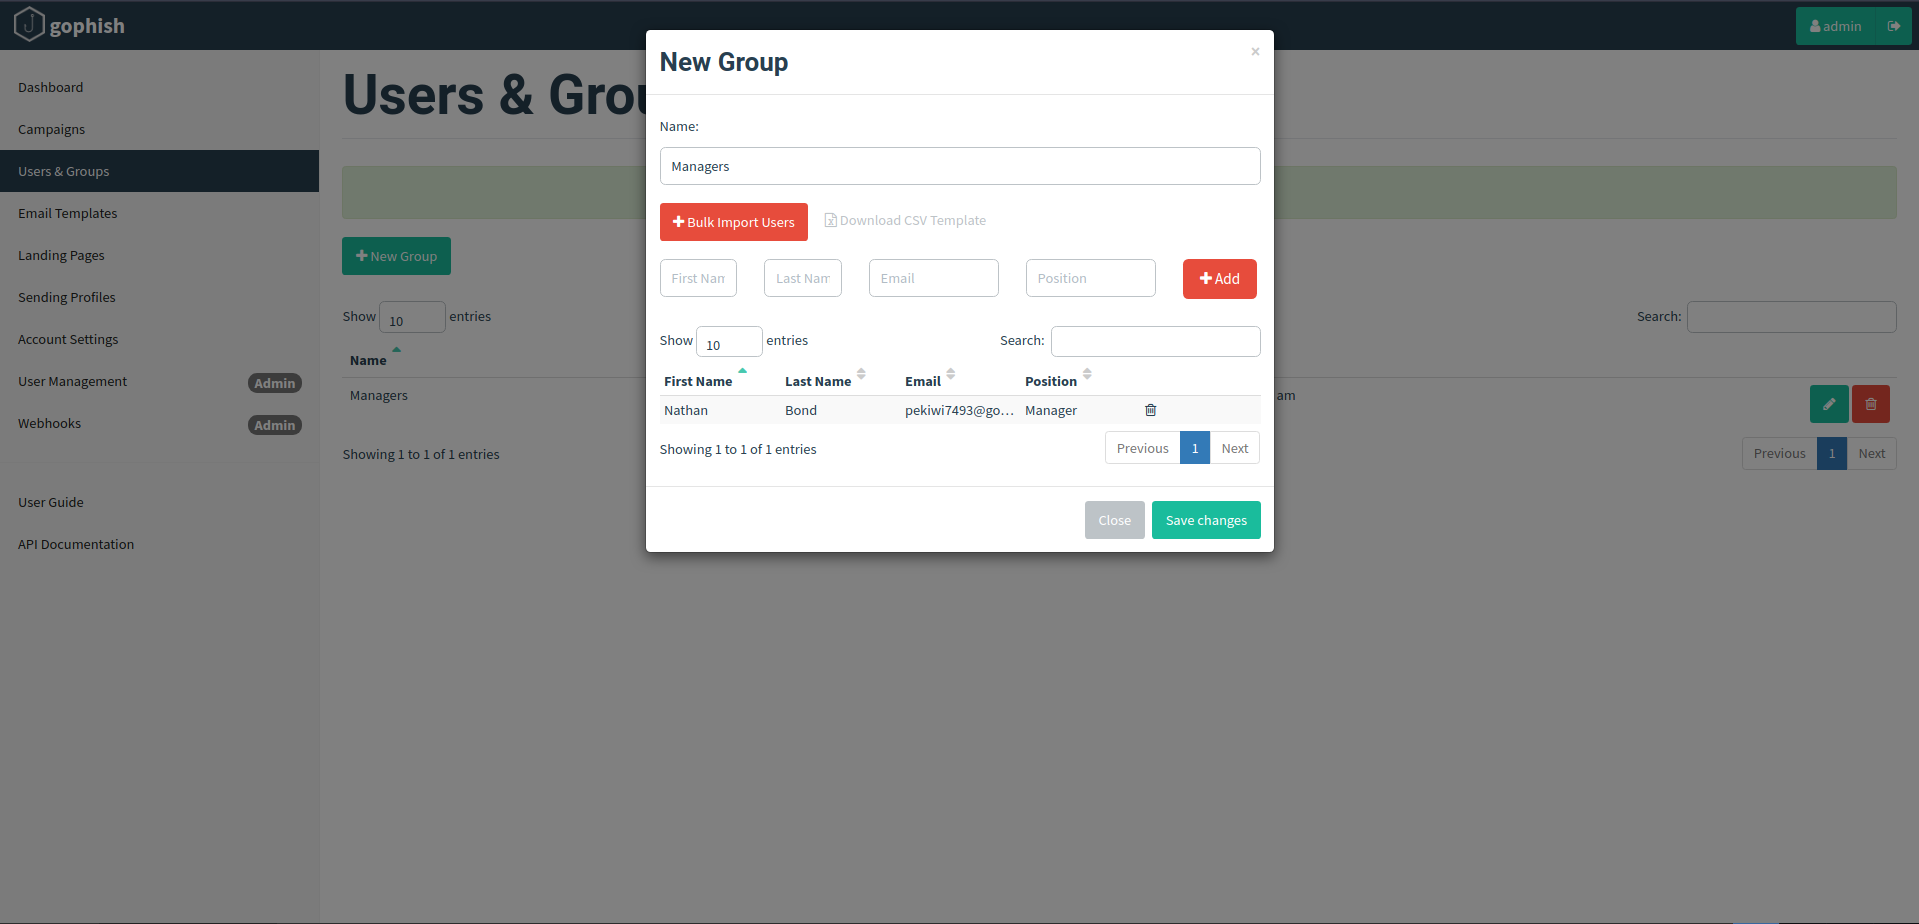
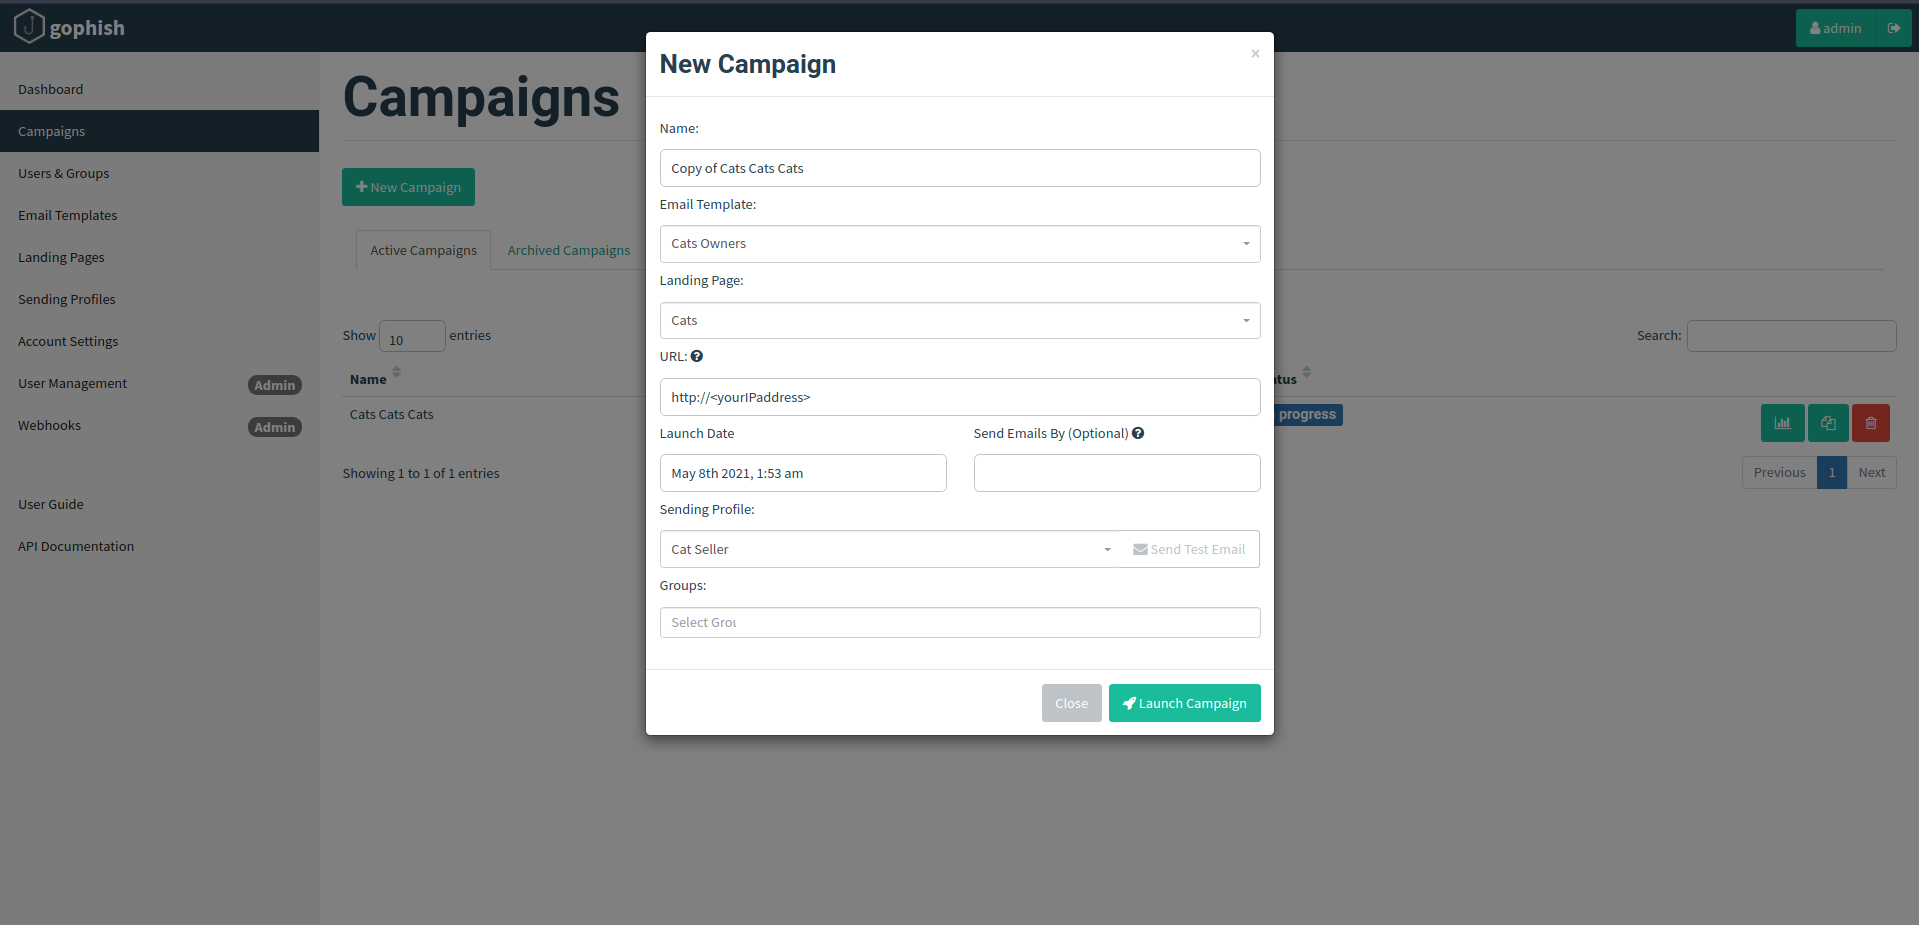
Campaigns:
It is the final step in our work. The “Campaigns” tab fields are self explanatory and auto-selected in a single case. Here we have to select all the things we have configured till now i.e Landing Page name, Email Template, Sending Profile name, Group name etc. In the URL tab, write the IP address you have configured at the start in the “config.json file”. Click on “Launch Campaign” at the bottom right and we are good to go.
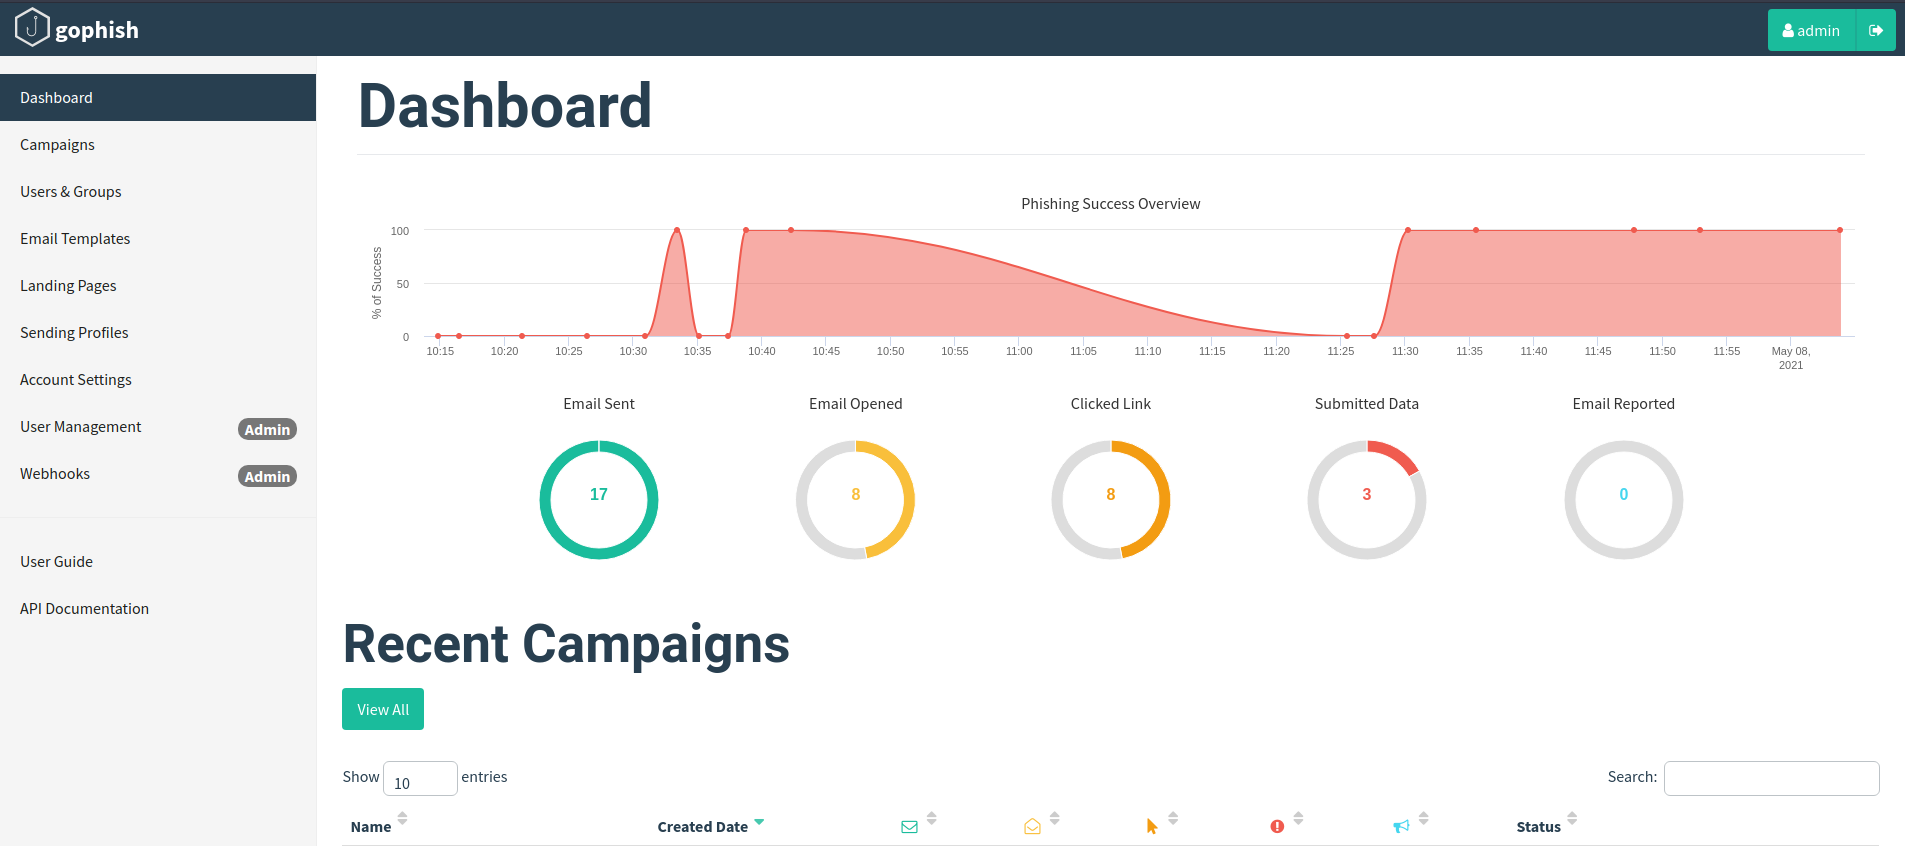
Results:
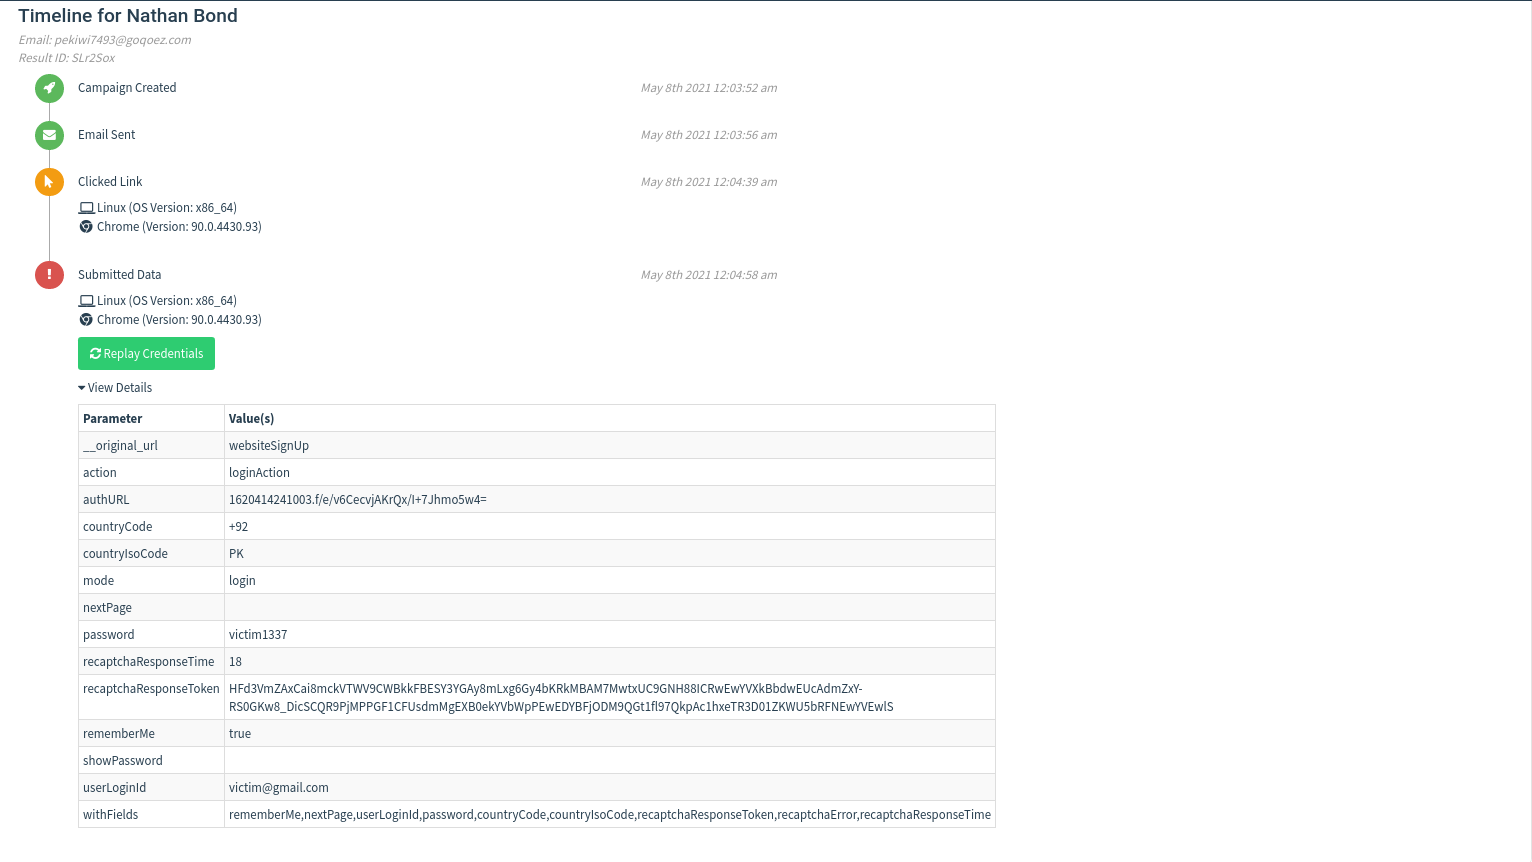
After all is done, we will have a look at the Dashboard section and go to our desired campaign. Here we are greeted with all the statistics about our Launched campaign i.e Email Sent, Email Opened, Clicked Link,Submitted data with its exact time. Let’s look at the results after some time and we can see that someone has opened our malicious email and entered his credentials which are captured successfully by Gophish.
Conclusion:
Gophish is an awesome tool to carry out a phishing attack. It provides all the tools and techniques in a systematic and organized user friendly manner. It allows you to mirror a site to your own choice or make a landing page in html for yourself. No matter how good the security of an organization is, the weakest link of it is its people. Gophish allows one to exploit this link with the help of minor knowledge about the other person.