
If you are looking for an Autopsy Kali Linux Tutorial you are in the right place. To acquire a forensically sound copy or disk image, we need appropriate media to analyze the files. To rule out a media as forensically good copy, we need to verify the integrity and authenticity of the data. So, it will be similar to the original composition. It is necessary to document every step of the way and capture appropriate images that state the examination is running correctly. So, the documenting phase is crucial for forensic imaging.

Linux distribution system also has live “Forensic mode.” It is an integrated feature to interact with data stored on a drive without breaking the system. Backtrack Linux, now officially known as Kali Linux, introduced the system back in 2013. Since then, it is used by people from government officials to learners on the topic.
Overview
In the Linux distro, we can use forensic mode in the live boot option to experiment with autopsy Kali Linux with a digital forensic toolkit. To perform the task, we need to have a sandbox system with Kali installed. It is possible to use a windows machine too. But we will use Linux in VirtualBox, surrounded by a windows computer.
Excluding the windows OS, the programs and sandbox OS are Open Sources. So, we can tweak with them however we want. We can use “Live” forensic mode to make things quick and easy. The Kali Linux system comes pre-built with all the open-source forensic software necessary for Autopsy. The tool is convenient and doesn’t need a separate machine to handle the task.
The Sleuth Kit and Autopsy are not too different. Sleuth Kit itself is a standalone suite of CLI forensic tools. On the other hand, Autopsy is a GUI on top of the Sleuth Kit itself, made accessible through a web browser.
How To Use Autopsy In Kali Linux
We have to type in the following command to install autopsy package in the console on our Linux machine.
sudo apt-get install autopsy
It will install the latest version of Autopsy, and currently, 2.24-3 is running. It will establish a graphical forensic interface to SleuthKit tools.
The tool helps to do in-depth analysis on Windows and Unix-based file systems. These are primarily are FAT, NTFS, EXTFS, FFS, and EXT3FS.
Step 1: Opening Autopsy
For the first stage, we need to boot up Linux and hit Applications. From “Kali Linux,” we need to visit Forensic Suites, and “Autopsy” is on that list. Selecting that will open up a terminal window. The window will prompt to open Autopsy in the default browser on the following address:
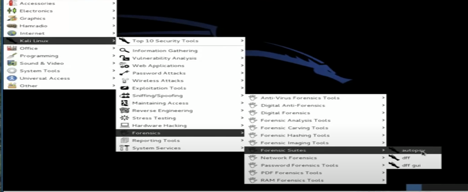
http://localhost:9999/autopsy.
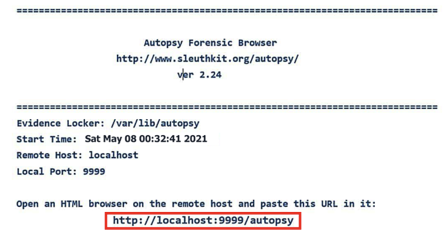
Step 2: Launching Autopsy through browser
If you’ve ever tried to learn how websites function and wanted to learn the basics of web development, chances are you already know how the localhost works. The same thing is going on here. Autopsy Kali Linux hosts the program, which can be used via browser GUI Application. On the browser window, we can start using Autopsy Kali Linux on “Autopsy Forensic Browser.”
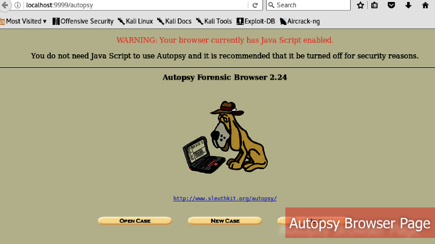
Similarly, typing in $ Autopsy in the terminal will bring up to the URL page too.
After loading the browser, we are on the Autopsy page to try out the digital forensic toolkit. This page has several options— “Open Case” will prompt available instances or resume where left off. There is also a “New Case” that we will use and one help option, self-explanatory. Creating a new case will prompt another blank space. Here we can name the case with the regular naming convention. Giving it a proper description will help other investigators to know what’s going on fairly quickly.
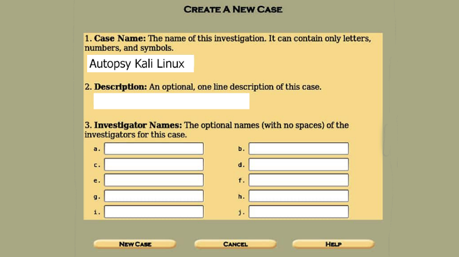
Last but not least, we can list the names of investigators. There is room for plenty. Once all (or necessary) fields are complete, we can proceed to the next step by pressing “New Case.”
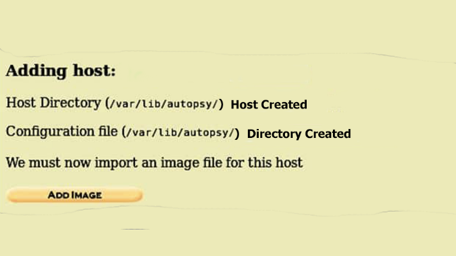
An autopsy will show us intimate details on where the case is stored and location of the configuration file on the next window.
Step 3: Adding Host
The host window is pretty simple. We have hostnames, description, field to store time zone value which is optional. TimesSkew Adjustment is an important one.
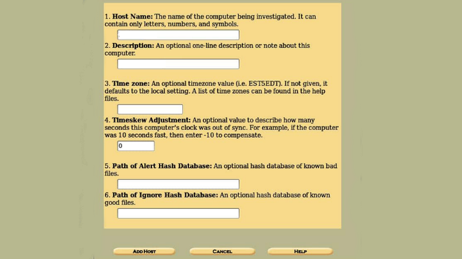
But leaving it default is better than filling it with information that will not be of any use. Clicking on the “Add Host” will prompt us to another window to add an image to the host.

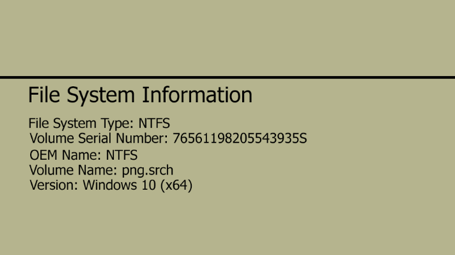
It shows us relevant information on the host.
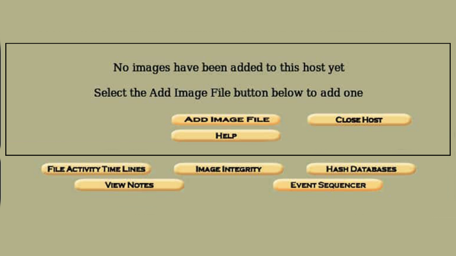
Step 4: Adding Image
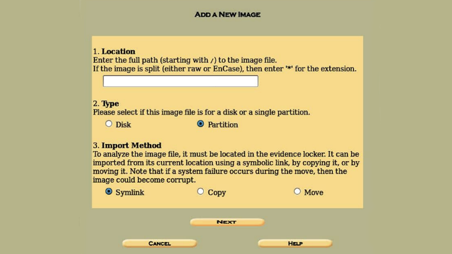
Within localhost, we can go forward and fill the IMG description page for going further with Autopsy. This page contains the “Location” of the image. We have to check the directory and fill this up. If a USB flash drive is used, for instance, it may look like
/root/USB_flash_drive.img
 Option 2 “Type,” which can either be disk or partition. On the third option, we have to select a method. There are three: Symlink, copy & move. For this case, we will copy the evidence in our locker. Choosing the one that suits our needs and clicking next will take us to the gallery page.
 We can add more details to the image file from the next page and what we intend to do with it. We can ignore, calculate and add a new MD5 hash value too. Once done, we can see the hash value or current MD5 value of the image.
 The value here is unique and can be compared with other matters. It is a unique identifier, just like our fingerprint. Clicking in “OK” again will bring up to the main case management screen. From here on out, we can redirect ourselves wherever necessary.
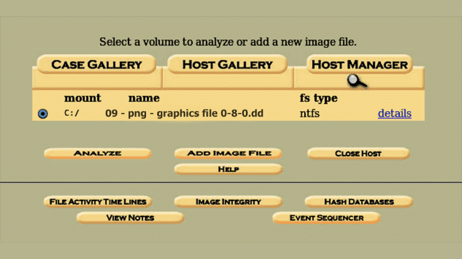
Step 5: Analyzing Files
The previous steps we mentioned helped us setting up the environment and settings to use for Autopsy. Now here on out, we can do whatever we want and collect data however we want, and things just got interesting. If we validate the file system image, it will compare the MD5 value against the original MD5 value. A pass or fail indicator will show up, signaling that we are working with the image intended for this autopsy examination.
 Let’s select “File Analysis,” and Autopsy will start analyzing files. Depending on the file size and values, it will take some moment.
For creating an IMG file, there are plenty of resourceful ways if you don’t have any. Once can be done via FTK imager or Guymager. CLI can also be used to get images from the disk.
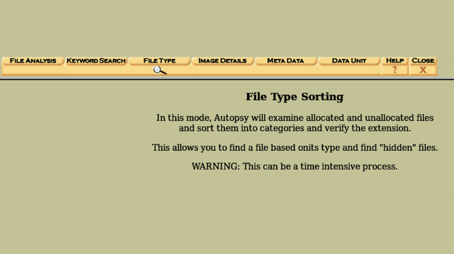 In Autopsy, we can sort files. The image attached above this line shows all the ways to sort files in the manner of requirement.
From here, after sorting the files, of course, it becomes usable and to collect data. Our files become listed. Furthermore, we can retrieve or extract data from an external drive for later use. Documenting these steps is an integral part of Autopsy.
Why is Autopsy Kali Linux Digital Forensic Toolkit better?
There are plenty of reasons to choose Autopsy. One of the primary ones is, using Autopsy is very easy. It is built-in right on the OS, and there is no extra step for setting up a new environment.
Also, there are plenty of 3rd party modules to use with Autopsy. Timeline Analysis, Hash Filtering, Keyword Search, Web Artifacts, Data Carving, Multimedia, Compromise Indicator, and more. We can scan the computer using STIX, and it is within the component of autopsy Kali Linux.
Autopsy Kali Linux is not resource-hungry and can be used inside VirtualBox. We can set up the sandbox environment with as many resources as we want. And best of all, it is free. We get all the core and upcoming features at no charge. Meaning it is a great place to learn and work on at the same time without changing the forensic toolkit.
Autopsy GUI gives access to a variety of tools to investigate within command lines. The Sleuth Kit Autopsy is best and more practical than individual tools. We are not comparing other tools, but this goes without saying. It is recommended to bump up the settings of the sandbox machine if the mother device allows it. We assume you’re running things on VirtualBox. If not, then optimizing the operating system will give a result that benefits in terms of time progression and more. Autopsy Kali Linux Digital Forensic Toolkit is used for a long time, and professionals recommend it. Autopsy holds high value in the digital forensic sector.