Welcome back everyone! In the last article we looked in depth at port scanning and how it works. We also covered the TCP three-way handshake, and the concept of stealth scanning! In the end of the first article, I stated that we’re going to be building our own port scanner. I also said that we’re going to be writing this port scanner in Ruby.

But in order for everyone to understand the code, we’re going to crush the basics and do a Ruby crash course! This article will teach you the first half of everything you need to know to write and understand the code behind our port scanner. First, let’s make a brief list of what we’ll be covering in this article…
- Puts vs. print
- Strings and integers
- Converting to other data types
- Arrays
Alright, now that we have a brief summary of what we’ll be covering, let’s jump right in!
Puts vs. Print
If you’ve ever used a scripting language, you should be familiar with print. But for those of you who are completely new to scripting, print simply allows us to display something inside of the terminal. Ruby has two different versions of print, there’s the regular print, and then there’s puts. When we use print, it will print everything in the same line until we tell it to move lines. But if we use puts, it will automatically move to the next line when it’s done. Let’s quickly demonstrate this difference. I’ve made two scripts that print “Hello, World!” to the terminal. The first one uses print, and the second one uses puts. Let’s go ahead and execute our first script using print:
![]()
Here we can see that using print will stay on the same line as previously stated, now let’s see the same script, but we’ll use puts instead:

Alright! We can see here that puts automatically put a newline after it printed “Hello, World!”. Generally, we’ll use puts when we want to notify the user of something. For example: If we’re beginning a port scan, we’ll put that the scan has started. We can use print for things such as giving the user a prompt, so input can be done on the same line and is kept clean.
Now that we’ve covered puts vs. print, let’s move on to strings and integers!
Strings and Integers
Remember how when we printed “Hello, World!”, there were always quotations around the words? This is because “Hello, World!” is a string. Basically, when you place quotation marks around a set of characters, it signifies them as words. For example; 10 is seen as a number, but “10” is seen as a word. Whenever we take input from the user, it will generally be returned as a string, which means we’ll need to convert it to a different type. This is because we can’t perform math with a string. Try the following equation in your head: “Hello” 1. See? You can’t add numbers to a word, and the computer is no different. When we print something, we need to print it as a string. Now that we’ve covered strings, let’s move on to converting data types!
Converting Data Types
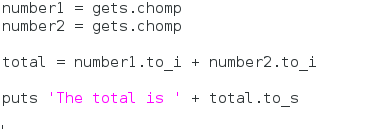
As we previously stated, strings and integers don’t get along very well. That’s why we need to know how to convert between them. When we want to convert between data types, there are multiple ways to do this. We’ll be using dot notation. Basically, we list what we want to convert, and then we add a period, followed to “to_” and then the first letter of whatever we want to convert to. I’m going to show you a code snippet, and then we’ll dissect it:

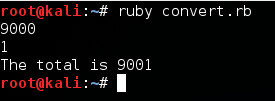
Here we can see that we’ve made two variables (A variable simply stores any value, you make them by typing whatever name you’d like them to have, followed by and equal sign, and then the value you wish to give them) and assigned them the value of gets.chomp. Using gets will allow the user to enter text into the terminal, and using .chomp will strip the newline character from the end of the result. This allows the user to give input as to what they want. Below that, we can see that we are converting what the user entered into integers, and we’re adding them together. Let’s go ahead and run this script:

We can see here that it worked! We were able to convert the user’s strings into integers and add them together. Now let’s move on to our next topic and talk about arrays.
Arrays
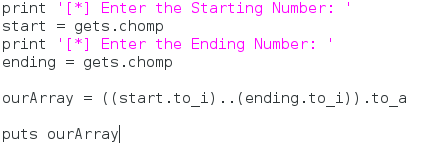
Arrays are fairly simple. An array is just a set of data instead of just one piece. Imagine if you had a box. That box represents a variable that can hold information. Normally, we can only put one thing in the box at a time, but what if we want to put multiple things in the box? We can make it an array. Let’s edit the code from our last script and make an array containing every number between the two numbers that the user entered:

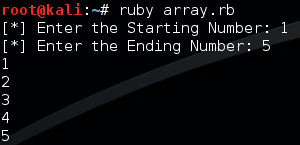
We can see here that instead of adding the two together, we’ve converted both of them to integers, and we’ve added “..” in between them. We placed this whole thing inside of parenthesis and we’ve ended it with “.to_a”. We’ve already covered the conversions, but the interesting part is the “..” in the middle. Essentially, these two dots represent every number between the first integer and the last. Let’s run this this script and generate an array of numbers 1 through 5:

There we go! We were able to successfully convert our strings to integers. Once we did that, we made an array of every number between them!
We’re going to quickly cover how write and execute a Ruby script, so that you can get some practice in before the next article. You can use any text editor (I prefer gedit), and once you’ve finished your script, save the text file with the “.rb” extension. Then open up a terminal and locate your script. Once you’ve located your script, enter “ruby” into the terminal, followed by your script. This will run the text file as a Ruby script.
That’s all we’ll be covering today. Originally we were going to cover four more topics in this article, but it was just too long! Next time we’ll be crunching the rest of the basics, and then we’ll finally know enough to build our port scanner, I’ll see you there!

Leave a Reply