Welcome back everyone! In the last recon article, I stated that we’re going to be building our own ARP scanner for network enumeration and host discovery. We’re going to be building this ARP scanner in Python, with the use of the Scapy module. Scapy is a packet manipulation tool. For those of you that don’t know, a packet is a small unit of data that travels across a network (There are different names for different units, but we’ll use “packet” a general term).

Being able to build custom packets give us immense power. We can make whatever packets we want. Imagine the possibilities; we could launch a DoS attack, we could launch a port scan, or in our case we can build an ARP scanner!
This article is just going to be an introduction to Scapy so that we’ll know how to use it later. We’re going to build some custom packets and ping a host on our network. We’re going to do a normal ping first, then we’re going to spoof our address during a ping to prove that we can manipulate every aspect of a packet. So, let’s get started!
Step 1: Start the Python Interpreter and Import Scapy
Scapy is a module for Python, this means that in order to use the features of scapy to the best of our ability, we should import the module into Python. For our testing today we’re only going to be using an interpereter that is running live inside of a shell in our Linux distro. In order to fire up our interactive Python shell, we just need to enter “python” into the BASH shell. Let’s go ahead and open up our interpreter:
 Now that we’re in our live interpreter, we need to import scapy. I suggest you read the Ruby crash course, as the information learned there will make this easier to comprehend. If you did read the Ruby articles, you’ll remember the concept of libraries and modules. Groups of code that are specialized for certain tasks. In Ruby, we ‘require’ these modules, but in Python, we ‘import’ them. Let’s import our scapy module now:
 It’s worth noting that this error will be printed every time we import scapy unless we manually suppress it. Now that we have our interpreter up and running and we’ve imported scapy, we can go ahead and make our packets.
Understanding the OSI and TCP/IP Models
In order to understand how these packets work, we need to understand the OSI and TCP/IP models. These models represent how packets are encapsulated. When packets are send across the network, they are packed with information. This information is packed into layers, and only one layer is packed at a time. Let’s see a photo of the OSI model:

The OSI model is made of seven layers. Let’s imagine an HTTP packet coming from a website. At the application layer we’d have HTTP as it is an application layer protocol. The presentation and session layers are both associated with protocols resting above and below them. The transport layer is responsible for transporting our data (who would’ve guessed?), at this layer we have our trusting TCP and it’s not-so-caring counterpart UDP. Then we have the network layer. If you’ve ever heard someone refer to and IP address as a layer 3 address, this is because IP rests at layer 3 of the OSI model. Next up is the data link layer. This is where LAN restricted protocols like ARP reside. Finally we have the physical layer. This is the final layer before the packet is actually put on the network.
Packets are encapsulated (packed) going down the OSI model. The actual data being carried by a packet is stored under the application layer. If packets are built moving down, that means they are dissected at their destination by moving up the OSI model. We’ll learn more about this model later, but this will provide a basic understanding for now.
Side note: The TCP/IP model is a condensed version of the OSI model:

Step 2: Craft and Send the Packets
Now that we know how the OSI model works, we can build our packets. When we build our packets, we need to build then backwards. Let’s build our normal ping packet first. For those of you who don’t know, the protocol behind ping is ICMP (Internet Control Message Protocol). Ping rests at layer 3 of the OSI model, so we won’t need to put anything more than the IP and ICMP layers. These layers are more commonly known as headers, so I’ll be referring to them as such for the remainder of this article.
Let’s go ahead and assemble our normal ping packet:
 We can see that we first packed our IP header with the destination address of 10.0.0.1, then we packed our ICMP header that signifies this packet as a ping packet. There is quite a bit that we didn’t configure here, that’s because scapy will auto-fill anything that we leave blank. This makes it easy to get just what we want without the hassle of configuring an entire packet.
Now that we have our normal ping, let’s send it and get our ping-back. We’re going to be using the sr1() function from scapy, this stands for send/receive 1. This function will send the specified packet and will receive one response packet. Let’s go ahead and send our packet:
 There we go! Now, when we send a packet, scapy will listen to all incoming traffic until it times out or receives a response. Here we received a response packet and we’ve stored it under the name “res_pkt_1”. Let’s read this stored packet:
 We can see that packet comes from 10.0.0.1, and that it is an echo-reply ping packet. This means that the host responded, we successfully made and sent a ping! Now that we get the gist of making and sending packets, let’s send another ping packet, but this one will be a bit more complicated.
Let’s see the construction of our packet:
 Here we’ve defined our weird ping packet with the same destination, but this time we’re going to spoof the IP address as 1.3.3.7. We’ve got the same ICMP header, but now we have a whole new header. This is a raw data header. Whatever we set ‘load’ equal to will be packed in as raw data. We’re going to sniff this packet in wireshark so now is a good time to open that up. Let’s go ahead and send our packet:
 You may notice that we used the send() function instead of a send/receive function. This is because the source address is 1.3.3.7. This address doesn’t exist on the network, so we won’t receive an echo reply. Let’s take a look in wireshark and see what happened:

At the top we can see that the source of this packet is the address we inserted into it, 1.3.3.7. We can see that it is in fact a ping packet, and if we look at the bottom, we can see a jumbled mess of letters and dots. At the end of this mess, we can clearly see the words “This ping isn’t real!”. This is the raw data that we inserted into our packet by force. We did it!
That concludes this article. We’re definitely going to be using scapy more, also, we’re going to learn the basics of Python to use in conjunction with scapy. We’ll eventually get around to networking and learning about the OSI/TCPIP models, but let’s take it one thing at a time. In the next article, we’re going to be starting to learn Python, I’ll see you there!

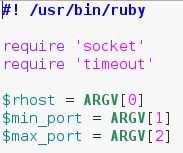 The last bit of this snippet involves us calling multiple elements out of the “ARGV” array. This is an automatically generated array that contains command line arguments in the order they’re given. This means that when we run this script, we need to give the target, the starting port, and the ending port as command line arguments.
 Alright, we can see here that we’ve placed the whole array generation inside a begin/rescue statement. We start our conversion with an if statement, which tests to see if the start port number is less than or equal to the stop port number. This is to avoid generating an invalid range of ports. We’ve stored our range of ports in a new variable called $to_scan. The dollar sign in front of the variable name means this variable can be accessed from anywhere in the script. Now that we’ve got our range of ports, we can build the method to scan a given port.
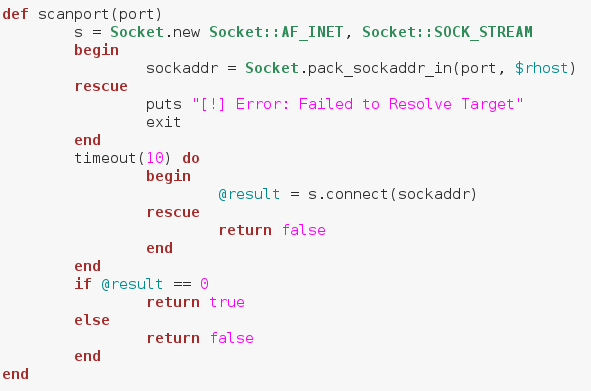 We start by creating a socket. We do this by calling .new on the Socket module we required earlier. Then we follow it with some attributes we want our socket to have. Next, we make a new variable named sockaddr, in this variable we store the result of calling pack_sockaddr_in out of the Socket module. In order to connect our socket to a remote host, we need to properly pack the addressing information into it. This is the proper way of doing so, we’ve placed this within a begin/rescue just in case the socket fails to resolve the target.
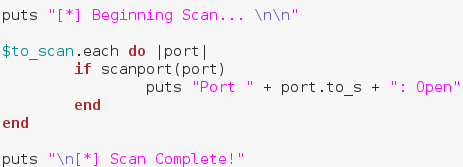 First, we put that we’re beginning the scan, followed by some blank lines for neatness. Then we make a .each loop with our to_scan array. We then make an if statement using our method. Remember how our method returned true or false? Well this is where that comes in handy. Instead of manually evaluating it, we can just place it in an if statement and let it take care of everything. If the result from our method is true, we print that the scanned port is open, anything else we just ignore. Once our scan is complete, we put that the scan is complete. Now that we have our port scanner (
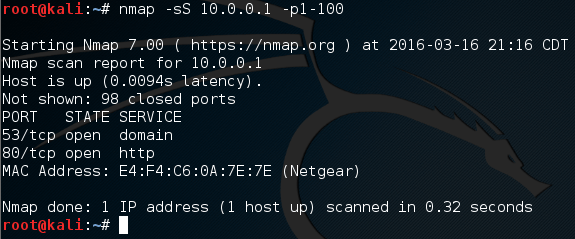
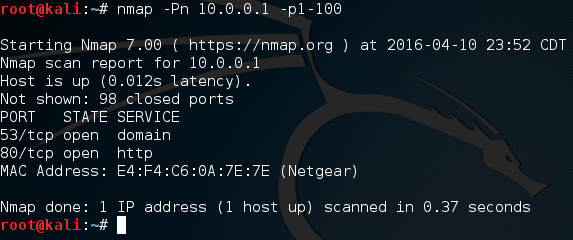 Alright, if we scan ports 1 through 100, we can expect that ports 80 and 53 will be open. Let’s go ahead and fire up our port scanner! First, we need to make the file executable using the
 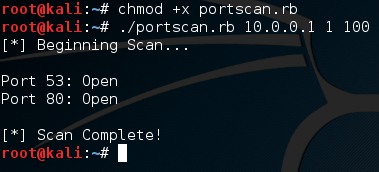 There we go! We were able to successfully build our own, functional port scanner! I hope now that we’ve built our own, we have a bit better understanding about how they work. In the next article, we’ll be covering the concept of discovery, and a few different tactics used by attackers. I’ll see you there!
 Alright, let’s give a quick rundown of this code and then we’ll execute it. We’ve made an array containing many strings, and we’ve made a .each loop. We can see the word “word” encased in pipes (This is a pipe: |). Think of this as a temporary variable name. Each element in the list will be housed under this temporary variable when it’s their turn to be put through the loops code. Now that we know the in’s and out’s of this loop, let’s execute this script:
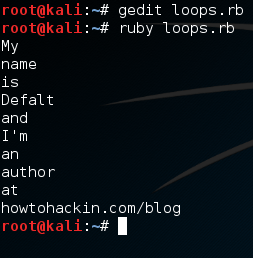 There we go, we were able to print out each element of our array individually. Now that we know how loops work, let’s move on to methods.
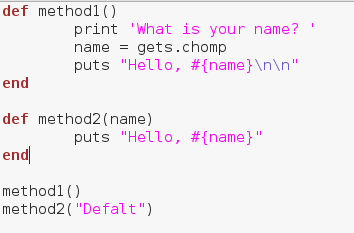
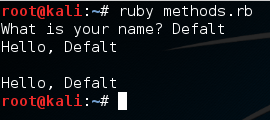 Alright, there we go! We were able to make and properly execute our methods! These will allow us to re-run a section of code whenever and wherever we need. Now that we’ve learned about methods, let’s move on to a very important concept, begin/rescue.
 This example script will simply ask the user for a number and tell them what their number plus one is. But as you may have guessed, the user can enter whatever they want, including things that aren’t numbers. Let’s go ahead and generate an error by entering a word instead of a number:
 Here we can see that we’ve generated an error. By taking a deeper look at the error message we can see that it was a TypeError. Now that we know what kind of error is generated by this bug, we can account for it using begin and rescue. Let’s edit our code to account for this new error:
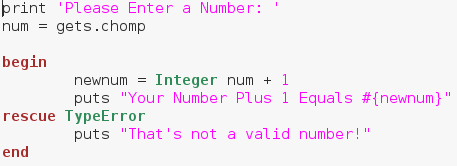
 There we go! We were able to successfully diagnose and account for a possible error! When making real life tools, error detection is extremely important. We stand no chance of notifying the users of an error if we don’t even know what happened!